Table of contents
- Introduction to Google Analytics 4
- Google Analytics 4 Vs. Universal Analytics
- Why Should You Use GA4?
- How to Setup Google Analytics 4
- 1. Setting Up GA4 using Google Tag Manager
- 2. Setting up GA4 if Your Site Already Uses Analytics
- Navigating the Google Analytics 4 Interface
- Advanced Features in Google Analytics 4
- Common Issues and Troubleshooting in Google Analytics 4 Setup
- Best Practices for Accurate Data Collection in GA4
- Maximizing the Value of Google Analytics 4
The Ultimate Guide to Google Analytics 4: Setup, Configuration, and Usage
Ievgen Krasovytskyi, Head of Marketing @ OWOX
Google Analytics 4, the latest advancement in web analytics, provides website owners and digital marketers with essential features and capabilities, establishing it as a pivotal tool. In this guide, we'll walk you through the setup, configuration, and usage of GA4. Whether you're new to Google Analytics or transitioning from Universal Analytics, our guide aims to provide you with the knowledge and skills needed to harness the full power of GA4 for comprehensive data analysis and strategic decision-making.

Introduction to Google Analytics 4
Google Analytics 4, marks a substantial evolution in web analytics, surpassing its predecessor, Universal Analytics. It introduces a new framework for understanding user interactions, focusing on event-based data rather than session-based metrics. This shift allows for a more detailed and nuanced view of user behavior across websites and apps, facilitating a deeper understanding of the customer journey. GA4's design is inherently cross-platform, seamlessly integrating data from both web and mobile app usage.
A key aspect of GA4 is its commitment to user privacy and data compliance, aligning with modern data protection laws like GDPR and CCPA. It employs advanced machine learning to provide meaningful insights, even with limited data due to privacy restrictions. Additionally, the platform provides a user-friendly interface featuring customizable reports and real-time data processing. It proves indispensable for businesses aiming to enhance their digital strategies in a privacy-conscious environment.
Google Analytics 4 Vs. Universal Analytics
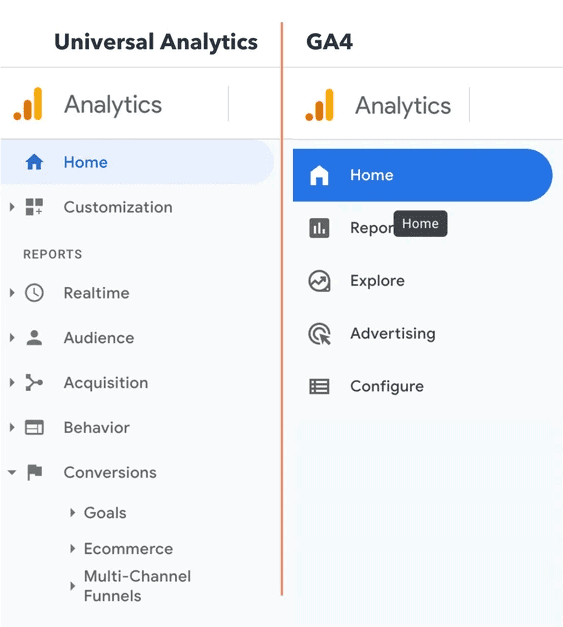
Google Analytics 4 (GA4) departs from Universal Analytics (UA) with its event-driven data model, focusing on user interactions rather than sessions. This shift allows for more detailed and customizable tracking of user behavior. GA4's approach is more adaptable and nuanced compared to UA's session-based analytics. Here's a comparison of Google Analytics 4 (GA4) and Universal Analytics (UA):
Feature/Aspect | Google Analytics 4 (GA4) | Universal Analytics (UA) |
Data Model | Event-based tracking. Focuses on user interactions. | Session-based tracking. Focuses on page views. |
User Tracking | Tracks users across devices and platforms. | Primarily tracks users on a single device/platform. |
Privacy and Compliance | Built with privacy in mind, compliant with GDPR/CCPA. | Less emphasis on privacy, and it is less robust for new regulations. |
Reporting and Analysis | More flexible and customizable reports. | Standard, less flexible reporting options. |
Machine Learning | Advanced machine learning for predictive insights. | Limited machine learning capabilities. |
Data Collection | Collects data in a more granular form (events). | Collects data in sessions and pageviews. |
Cross-Platform Tracking | Seamless integration of web and app data. | Primarily web-focused, with a separate setup for app data. |
User Interface | More intuitive and user-friendly. | Traditional might be less intuitive for new users. |
Future-Proofing | Designed to adapt to a cookie-less future. | Relies more on traditional cookies. |
Lifecycle Reporting | Enhanced lifecycle reports (e.g., user engagement). | Basic lifecycle reports (e.g., acquisition, behavior). |
Data Retention | Flexible data retention settings. | Standard, fixed data retention settings. |
Real-Time Data | Improved real-time reporting capabilities. | Basic real-time reporting features. |
Why Should You Use GA4?
Switching to Google Analytics 4 (GA4) from GAU (if you are still on the GA360 paid version) is advisable, as it is the future of analytics, with its event-based model offering more detailed insights into user behavior across platforms.
GA4 emphasizes user privacy more, aligns with modern data protection laws, and uses machine learning for predictive insights. Even if you're planning to wait to use it, setting up a GA4 property to run alongside Universal Analytics is beneficial for future-proofing your analytics and improving data collection for more informed marketing strategies.
How to Setup Google Analytics 4
Setting up Google Analytics 4 involves creating an account, adding a property, and installing the tracking code on your website, followed by configuring essential settings to start collecting and analyzing data for comprehensive insights. Here is the step-by-step process for GA4 setup.
1. Setting Up GA4 using Google Tag Manager
Step 1: Create a Google Analytics Account
Visit Google Analytics: Go to the Google Analytics website.
Sign Up or Sign In: If you don’t have a Google account, you must create one. If you possess a pre-existing Google account, kindly proceed by signing in.
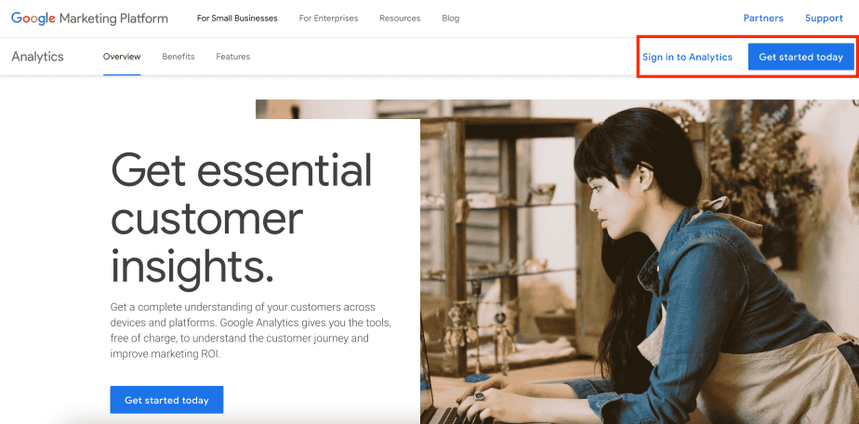
Start the Setup Process: Click on "Get started today" or "Sign in to Analytics" to begin.
Step 2: Set Up a New Property
Navigate to Admin: In your Google Analytics dashboard, find the 'Admin' section (usually a gear icon at the bottom left).
Create Property: Click on ‘Create Property.’ A property represents your app or website and is where your data will be collected.
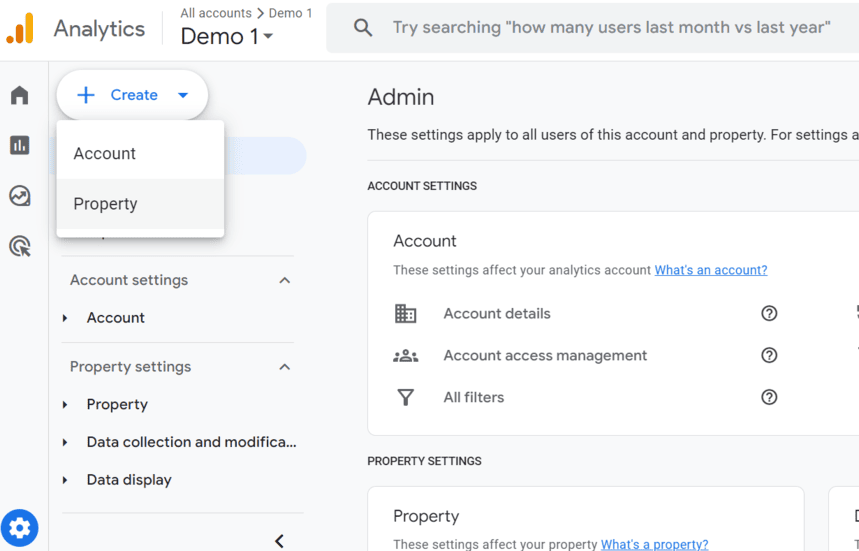
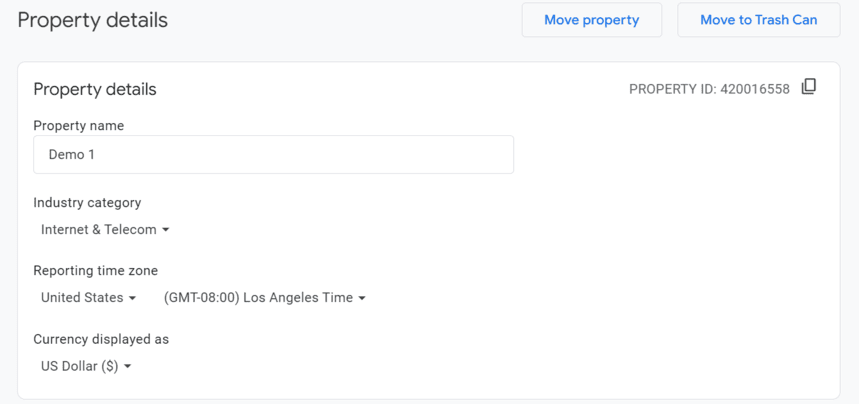
Enter Property Details: Fill in the name of your website or app, and select the reporting time zone and currency.
Step 3: Configure Data Stream
Choose Data Collection Source: Select where you want to collect data from - your website (Web), Android app, or iOS app.

Enter Website Details: If you choose a website, provide your website URL and a stream name (like your website name).
Enable Enhanced Measurement: This feature automatically tracks certain interactions on your site, like page views and clicks.
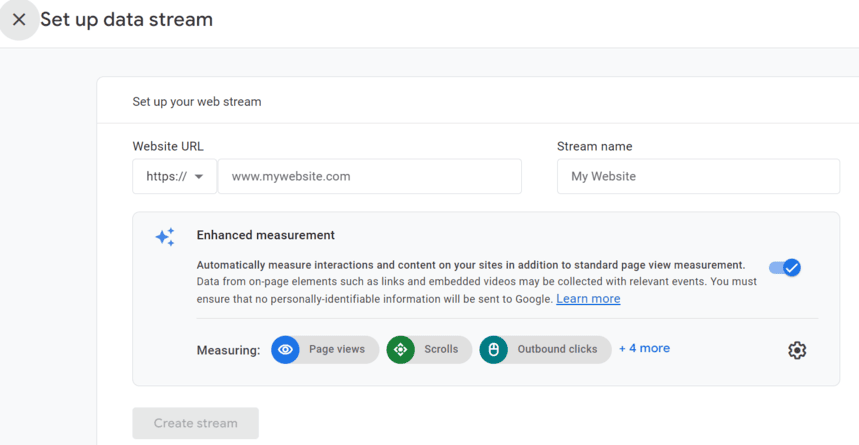
After setting up a web data stream for collecting data, you can locate it in the Data Streams section. Feel free to add more streams to track data on multiple platforms.
Step 4: Find Your Measurement ID
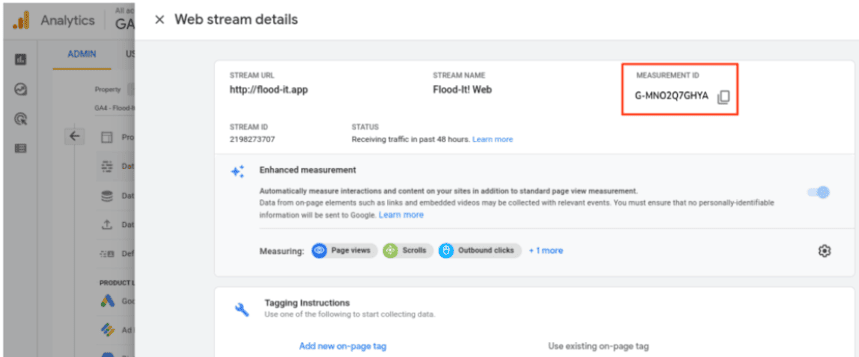
In your GA4 interface, after setting up a data stream, you'll see a unique 'Measurement ID.' This ID is crucial for tracking. Every data stream you create will be assigned a unique measurement ID.
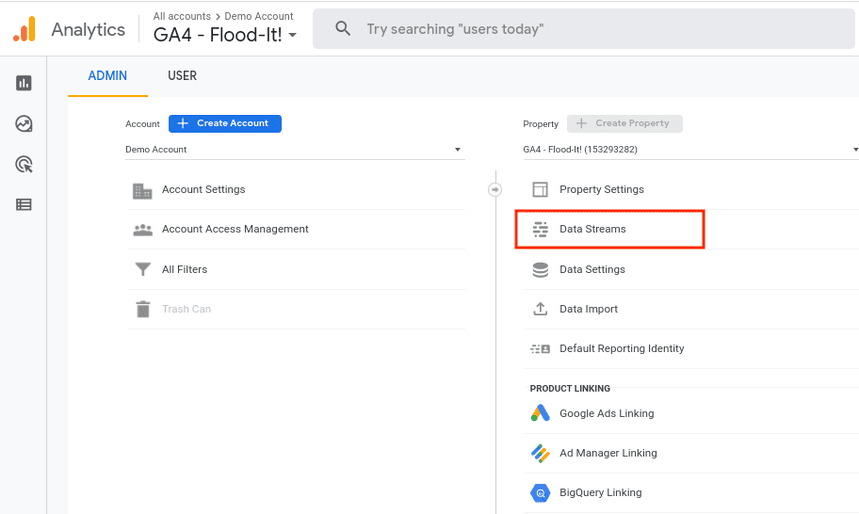
Finding your GA4 measurement ID is simple: Go to your GA4 property, click on "Admin" at the bottom left, select "Data streams" under "Property," click "Web," choose your web data stream, and find your measurement ID in the top right.

Admin → Data streams → Web→ Web data stream → Measurement ID
Step 5: Set Up Google Tag Manager
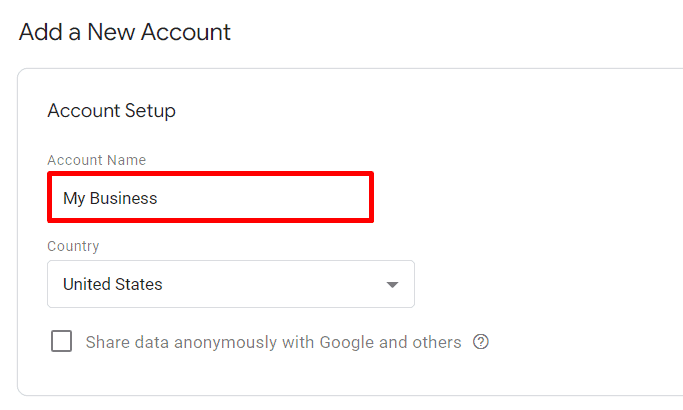
Visit GTM: Go to the Google Tag Manager website and log in, or sign up and move on to the Account Setup. Provide your business name and select the country of operation.
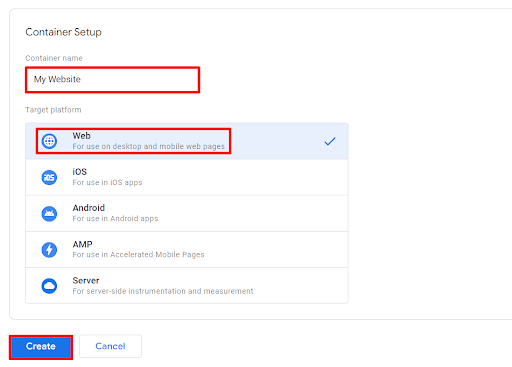
Create a New Container: Think of a container like a box where all your website tags will be stored. Name it (usually your website name) and select "Web" as the target platform.
Agree to Terms: Read and accept the GTM terms of service.
Install GTM on Your Website: You'll get two pieces of code. Place the first one as high in the <head> of your website as possible and the second one immediately after the opening <body> tag.
Step 6: Link GA4 with GTM
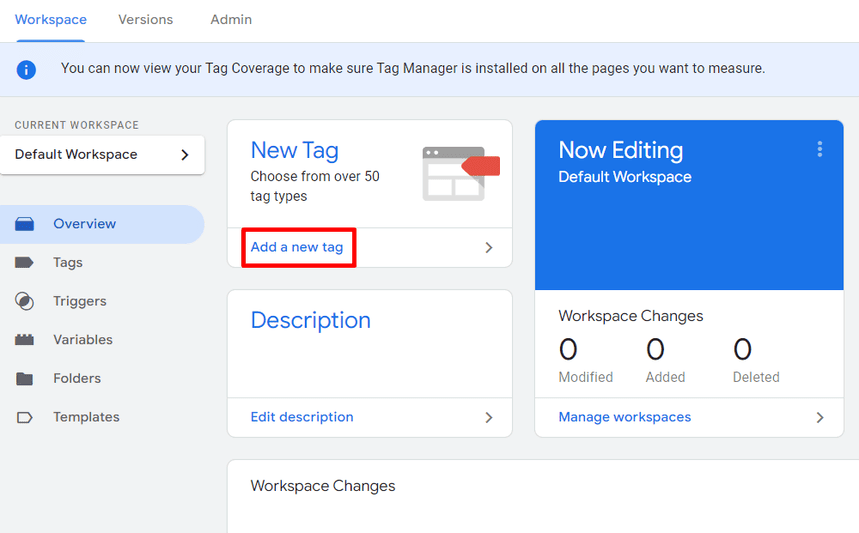
Add a New Tag in GTM: In your GTM dashboard, select "Add a new tag."
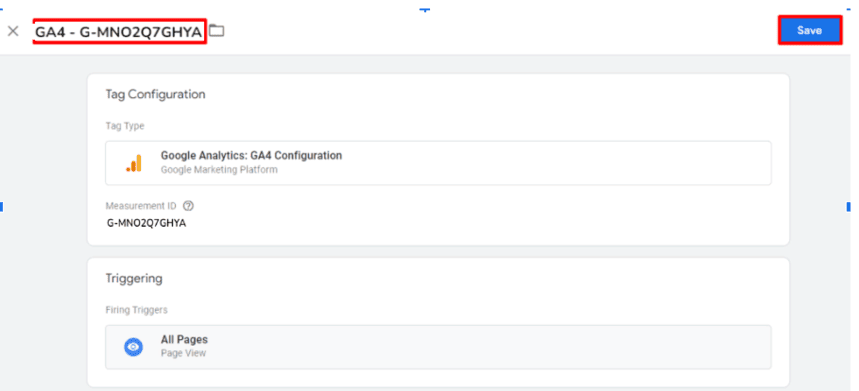
Configure the Tag: Choose "Google Analytics: GA4 Configuration" as the tag type.

Enter Measurement ID: Paste the Measurement ID you got from GA4.
Set Trigger: Choose "All Pages" as the trigger. This means the tag will work on every page of your site.

Name and Save the Tag: Give your tag a name (like "GA4 - All Pages") and save it.
Step 5: Test and Publish
Preview Mode: Before making anything live, use GTM's preview mode to test your tag. This lets you see if the tag is firing correctly on your website.

Check-in GA4: Go to your GA4 dashboard and use the "DebugView" to see if data is being collected.
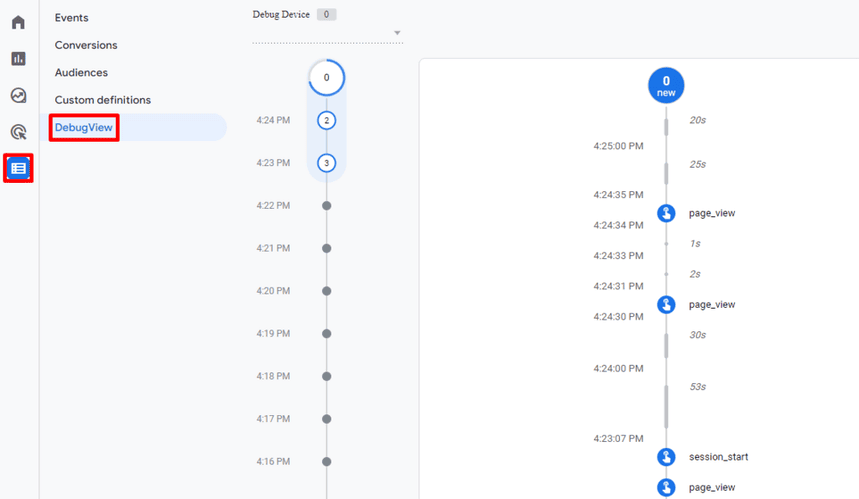
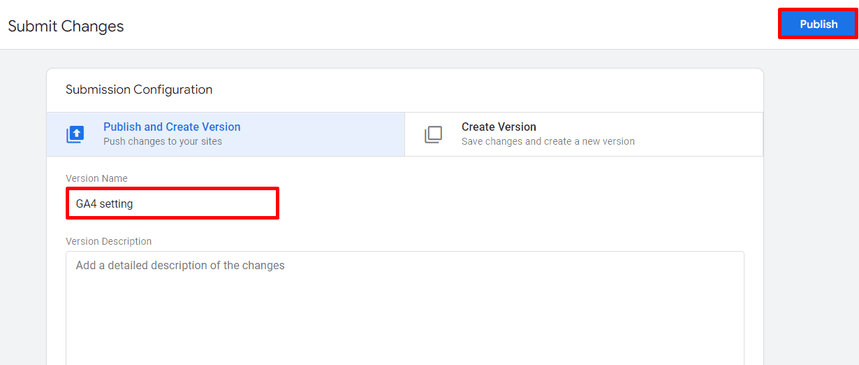
Publish in GTM: If everything looks good, return to GTM and hit "Submit" to publish your changes.

Version Name: Generate a Version Name and then click on the Publish button to complete the setup for tracking.
Step 7: Verify Your Setup
Check Real-Time Data: In GA4, go to the 'Real-Time' report to see if data is being collected. You should see live data if visitors are on your site.

2. Setting up GA4 if Your Site Already Uses Analytics
Step 1: Access GA4 Setup Assistant
- Go to the Admin panel within your Google Analytics account.
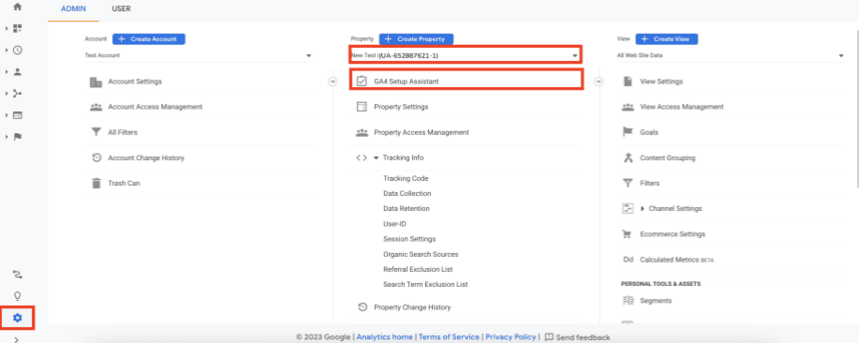
Choose the relevant account and select your existing Universal Analytics (UA) property.
Click on "GA4 Setup Assistant", located at the top of the Property column.
Step 2: Launch GA4 Setup Assistant
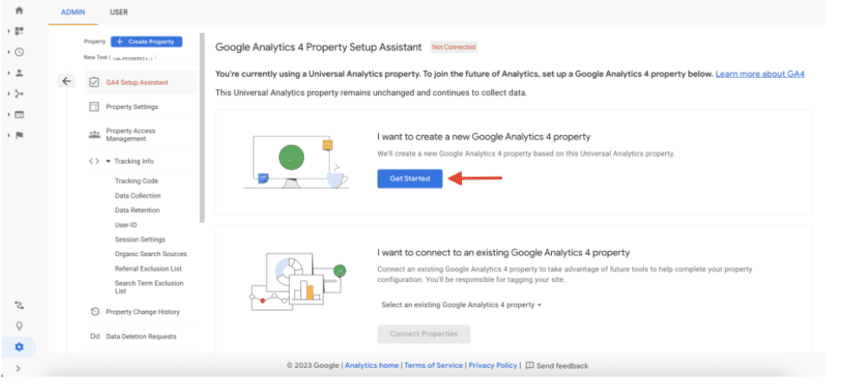
- Click the "Get Started" button under the section "I want to create a new Google Analytics 4 property".
Step 3: Continue Adding GA4 Property via Setup Assistant
- WitiIn the pop-up window, click on the "Create and continue" button.
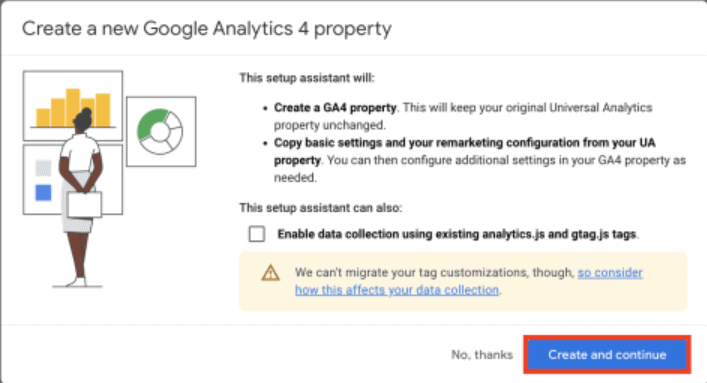
- Alternatively, you might see a "Create property" button. This option allows Google Analytics to utilize the tags already set up for Universal Analytics, connecting them to your new GA4 property. This creates a link between the two properties, allowing them to work together effectively.
Step 4: Choose How to Install GA4 Tag
Upon clicking the button, you will encounter two choices:
Use the Google tag found on your website: This enables you to employ the current tag on your website to gather data for GA4.
Use a different Google tag: This option allows you to add a new tag to your website for GA4.
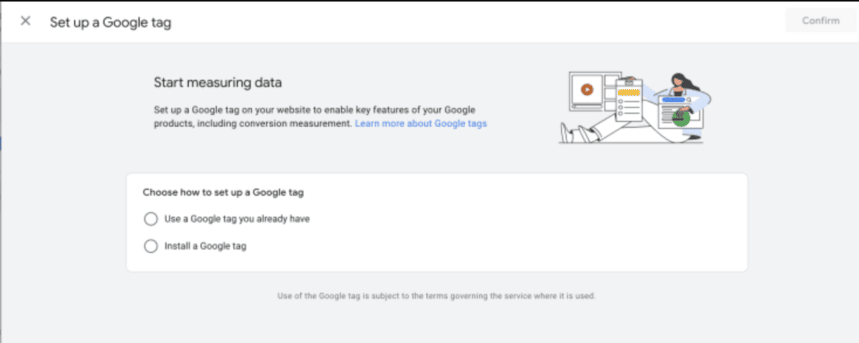
Step 5: Choose the Tag Setting Up Option
You'll come across a screen where you need to select the installation method for the tag.
Google recommends installing the tag manually, but you can also select other options more relevant to your situation. Follow the instructions provided for each method.
Step 6: Complete the Setup for a Successful GA4 Connection
- Once you complete all the steps, your Universal Analytics and GA4 properties will be connected.
Step 7: Finalize GA4 Property Setup
- Select the "Go to your GA4 property" button.
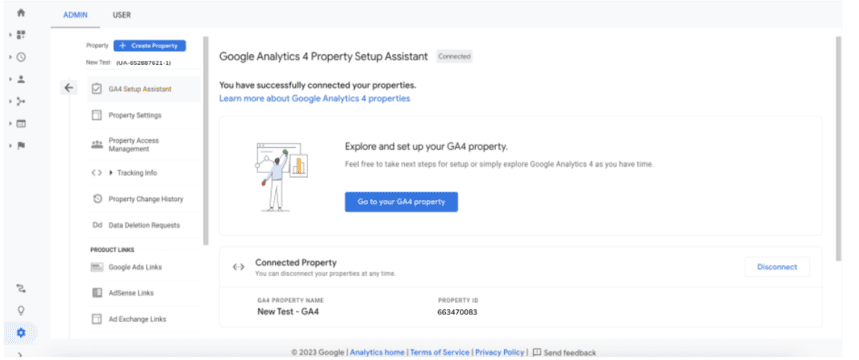
- You will be directed to the GA4 Setup Assistant interface, where you can add relevant features and settings to complete your GA4 property setup.
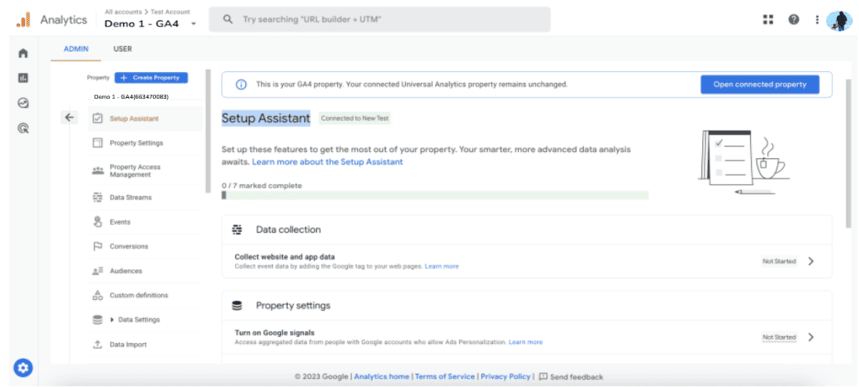
By following these steps, you will successfully set up a GA4 property alongside your existing Universal Analytics property, ensuring a smooth transition to the new analytics platform.
Navigating the Google Analytics 4 Interface
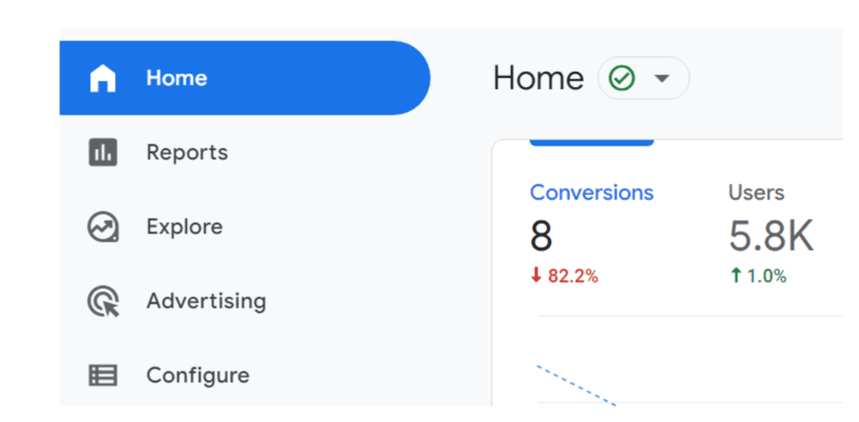
When you log into GA4, you're greeted with a dashboard that's your command center. Here, you'll find a menu on the left side, which is your main navigation tool. This menu includes sections like 'Realtime,' 'Life Cycle,' 'User,' 'Events,' 'Conversions,' and 'Configure'. Each section opens up a world of data about your website's performance and user interactions.
Understanding the GA4 Dashboard and Reports
Dashboard Customization: The main dashboard can be customized to show the reports and metrics most relevant to you. You can add or remove report cards based on your preferences.
Exploring Reports: Click on any report in the menu to dive deeper. For example, the 'Acquisition' report under 'Life Cycle' shows how users find your site.
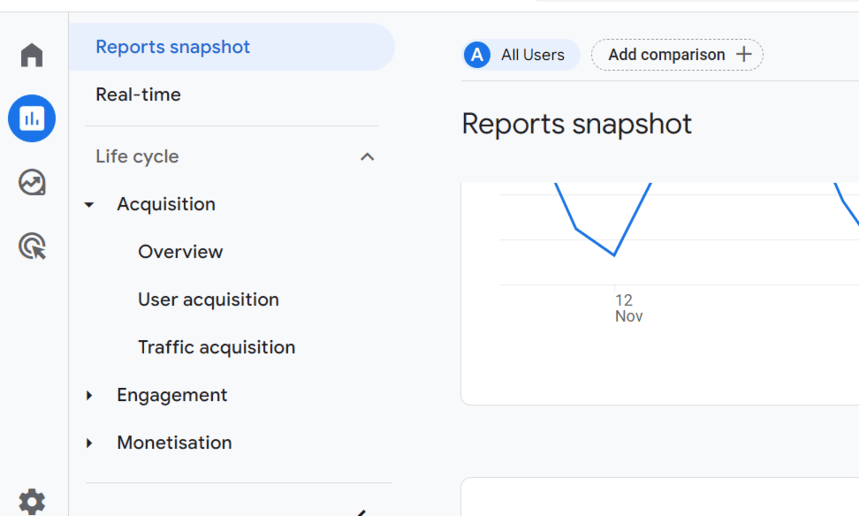
Understanding Data Cards: Each report contains data cards with specific metrics. Hover over any metric or graph for more detailed information.
User Analysis: The 'User' section provides insights into who your users are, including demographics like age, gender, and interests.
Customizing Views and Data in GA4
- Creating Custom Reports: To generate personalized reports, click on "Customization" in the menu. This allows you to tailor reports to your specific needs.
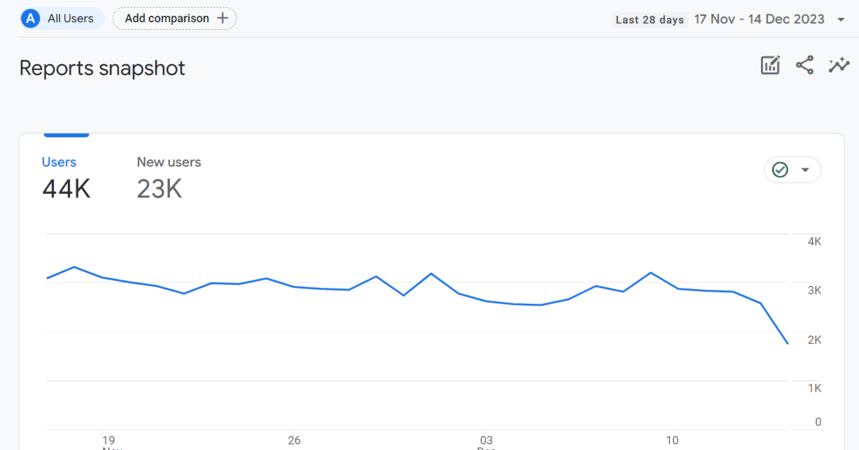
- Using Explorations: The 'Explorations' feature is for advanced data analysis. Here, you can create complex data visualizations and drill down into user behavior.

Setting Up Comparisons: You can directly compare data across different dimensions (like periods and user segments) in your reports.
Configuring Events and Conversions: In the 'Configure' section, you can set up and modify events and conversions to track specific user actions on your site.
Audience Creation: Create audiences based on user behavior to use in your reports or for remarketing purposes.
Data Filters: Apply filters to your reports to focus on specific data segments, like users from a particular country or traffic from a specific campaign.
Advanced Features in Google Analytics 4
Effective evaluation of website or app success requires the implementation of goals and conversion tracking in Google Analytics 4. By defining and monitoring user actions such as completed purchases, sign-ups, or form submissions, this process provides essential data for optimization and improvement.
Setting Up and Tracking Goals in GA4
Start by accessing GA4, navigating to Admin, and selecting the property for which you want to set up goals.
Go to Events: Under the "Property" column, find and click on "Events."
Mark Events as Conversions: Identify the events you want to track as goals. If the event is already listed, toggle the "Mark as conversion" switch to the right of the event. If the event is not listed, you will need to set it up as a custom event first.
Create Custom Events (if necessary): If the event you want to track as a goal is not automatically tracked by GA4, you need to create a custom event. Go to "Create Event" and set up your custom event by defining the parameters and conditions.
Verify Conversions: After setting up your events as conversions, go to the "Conversions" report under "Reports" to verify that your goals are being tracked correctly.
Utilizing Enhanced Measurement and Event Tracking
Access Enhanced Measurement: In your GA4 property, go to "Admin," and under the "Property" column, click on "Data Streams."
Select Your Data Stream: Choose the data stream (like your website) for which you want to enable Enhanced Measurement.
Enable Enhanced Measurement: Find the "Enhanced Measurement" section within the data stream settings. Toggle it on to automatically track certain types of interactions like page views, scrolls, outbound clicks, site searches, video engagement, and file downloads.

Customize Settings: Click on the gear icon next to the Enhanced Measurement toggle to customize what interactions you want to track. You can turn specific interactions like file downloads or video views on or off.
Set Up Event Tracking: You may need to set up custom events for more specific interactions. Navigate to the "Admin" area and utilize the "Events" section to either create new events or modify existing ones.
Test Your Setup: Use the "Realtime" report in GA4 to test and ensure your events are tracked correctly. You can also use the "DebugView" mode to troubleshoot and verify the following events on your site.
Analyze Event Data: Once your events are tracked, you can analyze the data in various reports within GA4. Use the "Events" report to see an overview of all events or dive into specific event reports for detailed insights.
Common Issues and Troubleshooting in Google Analytics 4 Setup
Incorrect or Missing Tracking Code: Ensure the GA4 tracking code (G-XXXXXXX) is installed on every website page and check with 'Tag Assistant' for correct firing.
Duplicate Data Due to Multiple Tags: Remove any duplicate GA4 tracking codes from your website pages to avoid inflated data.
Data Stream Misconfiguration: Verify that the correct website URL is entered in your data stream settings and that the stream is correctly linked to your GA4 property.
Events Not Tracking Properly: Check that event names and parameters in GA4 are correctly set up and use 'DebugView' to test event firing.
Enhanced Measurement Issues: Ensure 'Enhanced Measurement' is activated in your data stream settings and customize as needed for tracking specific interactions.
Property and View Confusion: Understand and differentiate between 'property' and 'view' in GA4, ensuring you are viewing the correct reports.
Cross-Domain Tracking Problems: Properly configure 'cross-domain tracking' in GA4 and ensure all domains are correctly listed and linked in the property settings.
User Permission Issues: Review your user permissions in GA4 to ensure you have access to viewing data and making configurations.
Filter Configuration Errors: Examine your filter settings in GA4 to ensure they are set up correctly for including or excluding appropriate data.
Integration Issues with Google Ads or Other Platforms: Check integration settings and ensure platforms like Google Ads are properly linked and data sharing settings are configured correctly.
Real-Time Data Not Showing: Account for possible delays in data processing and verify that real-time reporting and tracking codes are functioning correctly.
Best Practices for Accurate Data Collection in GA4
Proper Installation of Tracking Code: Confirm the accurate installation of the GA4 tracking code on every page of your website to ensure comprehensive data collection.
Use of Data Streams: Set up data streams accurately for each platform (website, app) to gather data across different user touchpoints.
Regularly Update and Verify Configuration: Regularly check and update your GA4 configuration to ensure accurate tracking, especially after making changes to your website or app.
Utilize Enhanced Measurement: Enable Enhanced Measurement in GA4 for automatic tracking of key interactions like page views, scrolls, and downloads.
Custom Event Tracking: Define and track custom events that are crucial for your business to gain deeper insights into specific user actions.
Cross-Domain Tracking: If you operate multiple domains, set up cross-domain tracking to maintain user session continuity across different domains.
Filter and Segment Data Appropriately: Use filters and segments to clean and organize your data, avoiding skewed results due to internal traffic or irrelevant sessions.
Regular Data Audits: Regularly review your GA4 account through audits to identify and rectify any discrepancies or issues in data collection.
Stay Updated with GA4 Features: Keep up-to-date with new features and updates in GA4, as the platform is continuously evolving with new capabilities.
Leverage Machine Learning Insights: Utilize GA4’s machine learning capabilities for predictive insights and to identify trends that may not be immediately apparent.
By following these best practices, you can ensure more accurate and reliable data collection in Google Analytics 4, leading to better insights and decision-making for your business.
Maximizing the Value of Google Analytics 4
To fully leverage the benefits of Google Analytics 4, capitalize on its advanced features for profound insights into user behavior and website performance. Businesses can obtain a more nuanced understanding of user interactions by utilizing its comprehensive event tracking, including automatic, recommended, and custom events. Early migration for existing users ensures historical data is preserved, enhancing long-term analysis. The ability to import external data enriches the analytics experience, while diverse exploration techniques offer detailed and customized reporting. Embracing these capabilities in GA4 can significantly enhance marketing strategies, improving web traffic and overall business growth.
FAQ
-
Why is Google Analytics 4 needed?
Google Analytics 4 (GA4) is needed to adapt to the evolving digital landscape. It offers a more user-centric, cross-platform view of data, aligning with modern privacy standards by not relying on cookies. GA4's predictive analytics and flexible event-based tracking provide deeper insights into user behavior, essential for businesses to understand and engage their audience effectively in a privacy-focused, multi-device world. -
How does Google Analytics 4 work?
Google Analytics 4 (GA4) collects data from websites and apps using a flexible, event-based model. It monitors user interactions in the form of events, offering a comprehensive perspective of the customer journey across various platforms. GA4 employs machine learning to offer predictive insights and enhanced measurement capabilities. This data is then analyzed to provide comprehensive reports, helping businesses understand and optimize their digital presence. -
Can I use Google Analytics 4 for free?
Yes, Google Analytics 4 (GA4) is available for free. Users can access its comprehensive suite of analytics tools without any cost. This includes advanced features like user engagement tracking, cross-platform measurement, and predictive analytics. GA4 provides valuable insights into website and app performance, making it an accessible and powerful tool for businesses and individuals looking to enhance their digital analytics capabilities. -
How do I set up GA4 in Google Analytics?
To initiate Google Analytics 4 (GA4), establish a GA4 property within your Google Analytics account. If you're new, use Google Tag Manager for a streamlined setup. Existing users should utilize the GA4 Setup Assistant for migration to ensure historical data is preserved. Follow the guided steps to configure your property, including data stream setup, to start tracking and analyzing your website's performance.
