Kitties vs Facebook Pixel: Your Marketing Past and Future
Remember when it was enough to add a picture of a kitty and your ad could get hundreds of reposts, likes, and whatever else?
Yeah, that doesn’t work anymore. Now the best way to get new clients is with relevant, personalized marketing directed at your target audience.
So how can you do that?
One way is to segment your audience. A so-called pixel can help you gather the information you need for segmentation.
Pixels are common across most advertising platforms. You can use a pixel to drop a cookie that will track website visitors so you can show special advertisements to them later. This is called retargeting.
Since Facebook had over 5 million advertisers as of 2017 and since 93% of marketers use Facebook advertising regularly, it’s time to learn more about one of the tools for advertising on Facebook: Facebook Pixel.
What’s Facebook Pixel and how does it work?
Facebook Pixel is a snippet of JavaScript code that’s added to each page of a site. When a user visits a page or performs some action on it, the pixel sends information about that activity to Facebook.
With the data that Facebook Pixel collects, you can track visits and conversions on your site, optimize ads, and create customized audiences for retargeting. Let’s look at each of these opportunities in a little more detail.
1. More precisely target your advertising
Instead of showing ads to everyone, you can create an audience of people who really care about your product: visitors to your site. For example, you can include in your audience:
- All visitors to your site in the last 30, 60, or 90 days (maximum 180 days)
- Users who visited (or didn’t visit) certain pages on your site (product page, “Thank you for your purchase,” etc.)
- Users who performed a certain action, for example added a product to the cart but didn’t finish the purchase
- The top 5%, 10%, or 25% of most active users
- Users who came to your site from a smartphone or tablet
All these criteria can be combined into a single audience if you wish. In addition, you can create similar audiences to increase coverage. That is, you can define an existing audience from visitors to your site and Facebook will find people with similar location, age, gender, interests, and so on.
2. Track the effectiveness of advertising
After you install Facebook Pixel on your site and set up event tracking in Ads Manager, you’ll find out how users behave who have come to your site from an ad on Facebook or Instagram. You can track any type of conversions that your ad brings on any devices and find out how much one target action costs you. You can see all clicks, registrations, orders, purchases, and other actions in Facebook reports.
3. Optimize your advertising campaigns
You can set up a campaign so that Facebook shows your ads only to people who are likely to perform a conversion action. This option is called Optimization for Conversions. The bottom line is that Facebook tracks who make purchases or does other things on your site and automatically shows ads to users who look like your customers. The more conversions on your site, the more accurately this algorithm works. With this option, you can increase the number of sales and reduce the cost of sales.
Measure CPO and ROAS in GA4
Automatically link your Ad Platforms cost data to Google Analytics 4 conversion data, so you can analyze your marketing KPIs and make fully informed decisions

I want to do this! How can I install Facebook Pixel on my website?
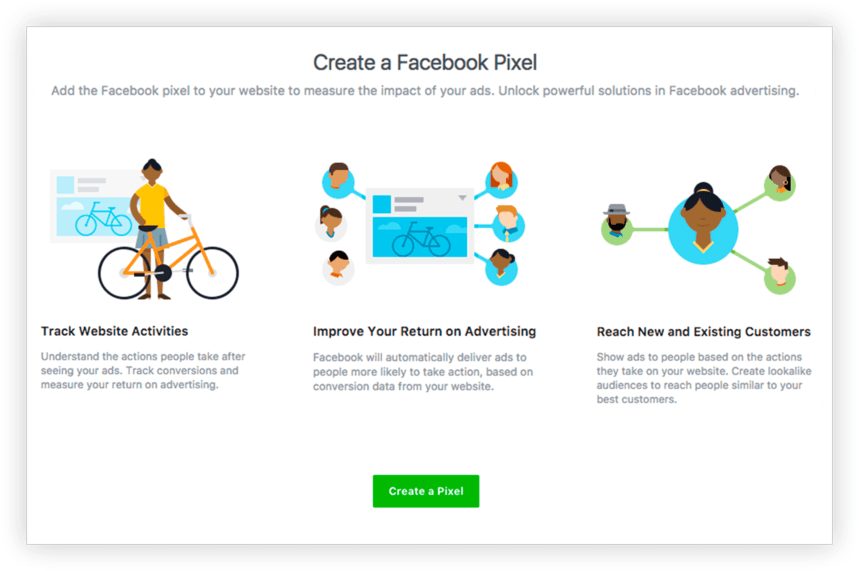
Step 1. Create a Facebook Pixel
Go to the Pixels tab in Events Manager and click Create a Pixel.
Write Pixel’s name, add your web link and click Create in the box that appears to finish creating your pixel.
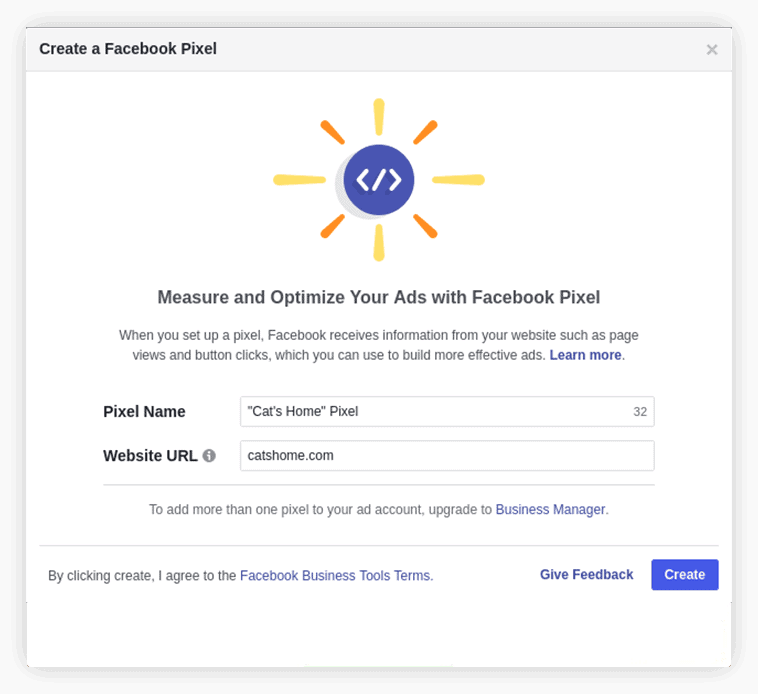
Once you’ve created your pixel, you’re ready to put the Facebook Pixel code on your website.
Step 2. Add the Facebook Pixel to your website
You can do this in different ways depending on how you update your website’s code:
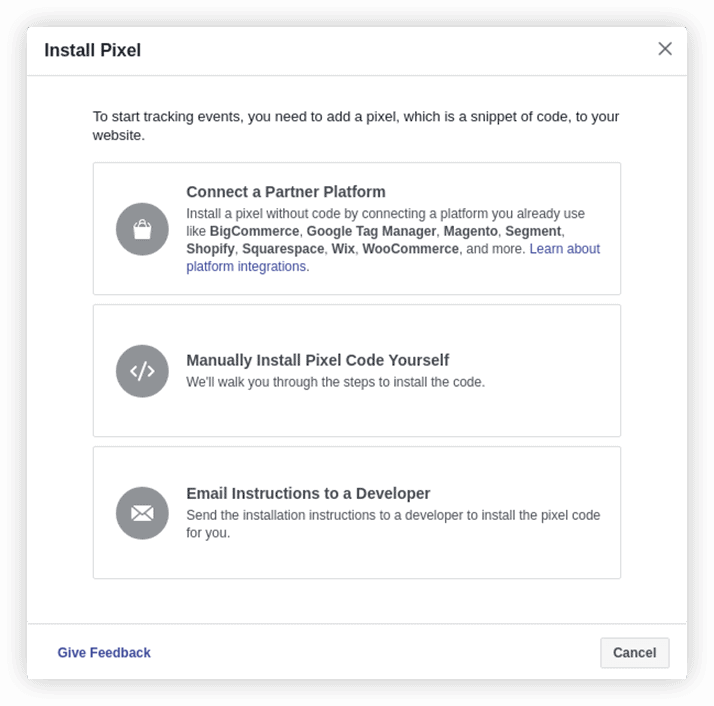
Option 1. If someone else updates the code on your website, then you can email them instructions to set up the Facebook Pixel on your site.
Option 2. In this case, select your platform or tag manager from this list and follow the instructions.
Option 3. If you update your website code by yourself, choose the «Manually Install Pixel Code Yourself». Then you’ll need to locate the received code between and tags on every page of your website.

Click Send Test Traffic after placing the code on your website to make sure your pixel is working properly. If your status says Active, your base code has been installed correctly. Keep in mind that the status can take several minutes to update.
Step 3. Configure events to track conversions
After you’ve installed the code, set up events to track people’s actions on your site and form audiences for retargeting based on these actions. You can do this in two ways:
- Add standard events offered by Facebook. This method is more complicated, as you have to tinker with the code, but it allows you to transfer additional information along with conversion information — for example, price and product name.
- Create custom conversions. This method is simpler, as the code on your website doesn’t need to be changed. But there’s a limitation: you can configure a maximum of 100 events per account.
Which method to choose depends on how well you understand your website code and what kind of business you have. For projects that offer various services or content, the second method is quite suitable. But for large stores with thousands of products, it’s better to use standard events. Let’s consider each method in more detail.
Method 1: Set up standard events
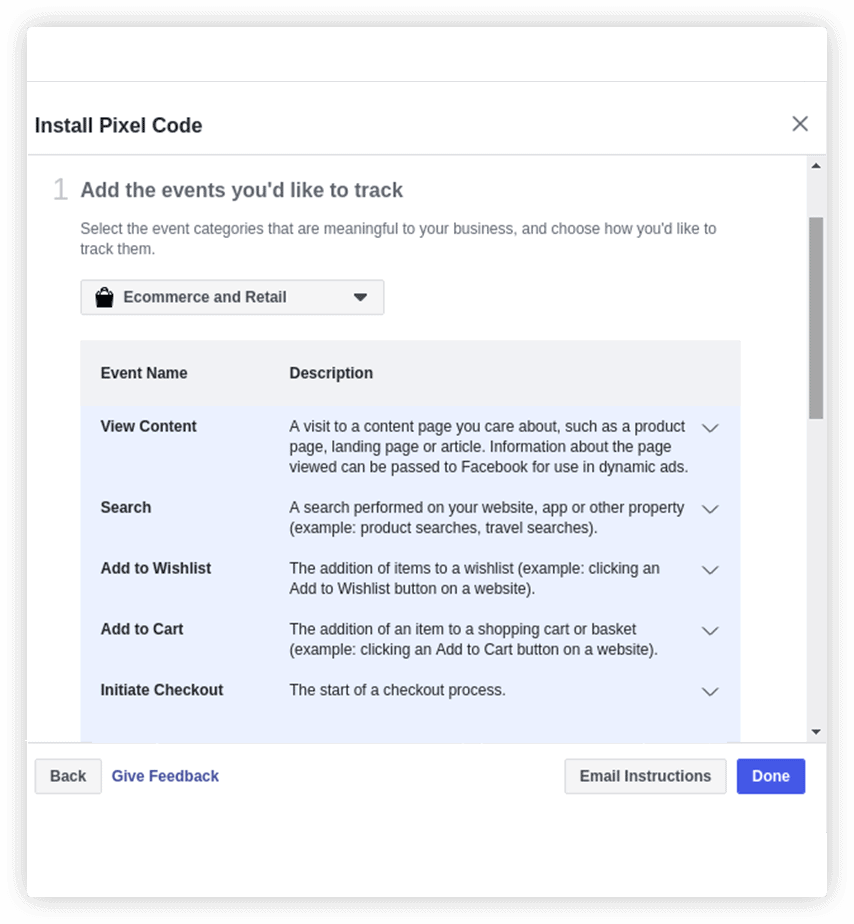
To set up tracking of standard events, go to the Events Manager —> Pixels tab, click Configure Pixel, select the manual code setting, and scroll through the settings to Add events that you want to monitor.
Choose your business and activities from the list that you want to track. For example, for the Electronics and Retail sector, Facebook offers 17 standard events:
If you click on a specific event, a window will open in which you can see the event code and additional settings. At the top of the window are two options for tracking events:
- Select Track event during page load if the user must go to a specific page, for example «Thank you for your purchase.»
- If you want to receive information on button presses, select Track event in embedded action.
Here you can specify additional parameters that you want to send with the event. For example, the value of the conversion or the contents of the shopping cart.
Copy the event code that’s generated after selecting all parameters:
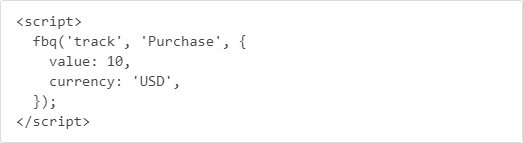
Add this code to the pages of the site where you want to track conversions, without changing the existing Facebook Pixel code in the header:
- To track events during page load, place the code just below the closing </head> tag and immediately before the opening <body> tag.
- To track events in embedded actions, place the event code between the <script> tags next to the button. Read more in the developer’s guide.
Method 2: Create custom conversions
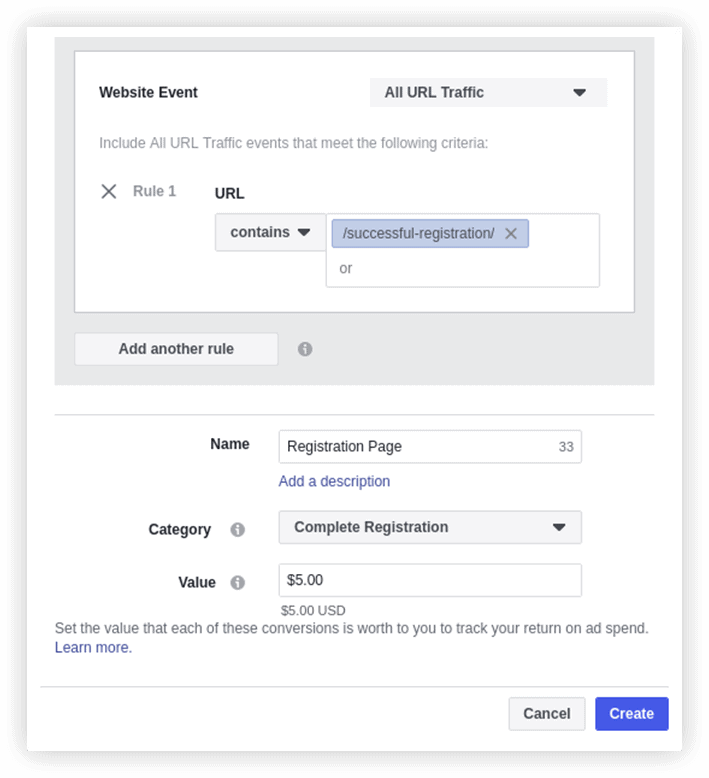
If you don’t want to mess around with the code, or if you don’t have the standard events that you need, you can create custom conversions using URLs. For example, a conversion could be the address of the «Thank you for your purchase» page or the page that a user is sent to after successfully registering on your site.
Go to the Events Manager —> Pixels section, open the Customized Conversions tab and click the Create Conversion button.
In the window that opens, specify the URL of the page (or part of the URL) during the transition to which the conversion will be counted. Fill in the name, select the appropriate category from the list, specify the conversion value (if necessary), and click Create.
It’s not working! Did I do something wrong?
Don’t panic! Sometimes Facebook Pixel might not work correctly.
To find out if your pixel is working correctly, install the Facebook Pixel Helper.
It’s a Chrome plugin you can use to see if there’s a Facebook Pixel installed on a website and check for errors:
- Go to the Chrome web store and search for Facebook Pixel Helper.
- Click + Add to Chrome.
- Click Add extension.
Once you’ve successfully installed the extension, you’ll see a notification that the plugin has been added to Chrome and a small icon will show in your address bar.
Now you can check that your pixel is working.
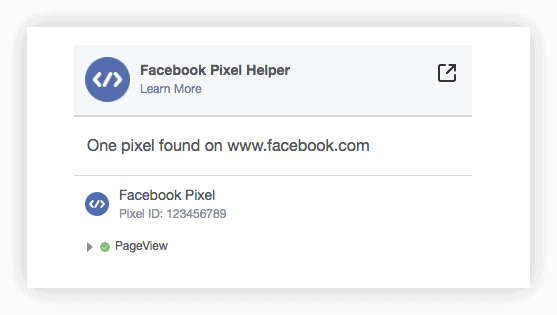
If the Pixel Helper finds a pixel on your site and there are no errors, then you’re ready to start creating Facebook ads with your pixel.
If you see a notification that no pixels were found on your site or that there’s an error, check out the troubleshooting section.
The most common issues:
- Issues with custom conversion rules when using the URL Equals option, as it will not count a conversion if someone lands on a version of the URL with any additional text beyond what is pasted into the URL field (ex: UTM parameters, http vs https, or even an extra «/» at the end).To track your custom conversions accurately, we suggest using URL Contains and pasting the minimum portion of the URL needed to distinguish this page from any other page on your website (ex: starting after «www» and ending before «.com» or «.org»).
- Issues with old conversion pixels. If you’ve just transitioned from the old conversion pixel and are optimizing for conversions, you may experience a few days of decreased performance while the new pixel gathers the data needed to optimize sufficiently. Please review the optimization section in the Conversion pixel transitioning guide for recommendations and best practices.
Summary
Facebook Pixel is a useful and convenient tool for those who want to increase the effectiveness of their marketing on Facebook and Instagram. It’s installed on your site, collects data about user actions, and sends this data to your Facebook advertising account. Thanks to this data, you can:
- Create target audiences for successful remarketing.
- Track conversions and evaluate advertising payback.
- Optimize your advertising campaigns by showing them to users who are more likely to complete a conversion.
Once you’ve mastered Facebook Pixel and you’ll be looking for more advantages, import data from Facebook into Google Analytics to compare the performance of all your advertising channels in one interface. You can do this using OWOX BI. See how it works with a free trial.
P.S. Instructions on how to set up the import you’ll find in the article «4 Ways to Import Cost Data into Google Analytics»
FAQ
-
Is it possible to use Facebook Pixel without running ads on Facebook?
Yes, you can use Facebook Pixel to track user behavior on your website even if you're not running ads on Facebook. This data can be used to optimize your website and create more effective marketing campaigns in the future. -
How can I test if Facebook Pixel is working correctly on my website?
You can use Facebook's Pixel Helper tool to check if Facebook Pixel is properly installed on your website and tracking events. -
How do I install Facebook Pixel on my website?
Installing Facebook Pixel on your website requires adding a little code to your website's header section. You can follow the step-by-step guide provided by Facebook to get started.