How You Can Connect BigQuery to Excel for Seamless Data Management
Learn how to effortlessly connect Google BigQuery data to Excel and simplify your data management


Google BigQuery (GBQ) doesn’t require additional maintenance costs and processes your data in less than a minute. You can learn about uploading data to GBQ from CSV file and JSON files, using the BigQuery API, Google Analytics 4, or from other Google services in our previous article.
You can also learn more about setting up the BigQuery Reports and automating reports in Google Sheets based on information from BigQuery. Today, we’ll tell you how to upload data from BigQuery to your all-time favorite – Excel.

To learn more about the benefits and ease of use of Google’s cloud-based data storage, read our detailed overview of BigQuery features. You can also watch the video “What is BigQuery?” by DevBytes, and read about five reasons why building reports is better in BigQuery
Note:* This post was originally published in February 2020 and was completely updated in April 2025 for accuracy and comprehensiveness.*
What is Google BigQuery?
BigQuery, developed by Google, is a cloud-based platform for big data analytics, specifically designed for large-scale enterprises. It enables the swift querying of vast datasets, often comprising thousands of rows, thanks to its powerful processing capabilities. By integrating BigQuery with your applications, you gain the ability to ingest and analyze extensive data volumes in real time, facilitating up-to-the-minute insights for business initiatives.
BigQuery can handle large datasets efficiently, allowing users to push data into a specified BigQuery dataset. This integration enables data professionals to leverage BigQuery's cloud capabilities while using familiar interfaces like Excel for easier management and analysis.
Signing up for an account grants access to BigQuery’s features, with the option of a monthly flat-rate payment plan. This plan offers businesses a predetermined data import and querying capacity, supporting multiple concurrent project analyzes.
![[GA4] BigQuery Export SQL Queries Library](https://cdn.prod.website-files.com/676a9690ef4ec151a69571ff/67accb414ac23fa946a18aaf_Group%202313663-min.avif)

Why Connect Google BigQuery Data with Excel?
Connecting BigQuery to Microsoft Excel opens up enhanced capabilities for businesses by leveraging Excel’s robust data analytics and visualization tools alongside BigQuery’s scalable cloud data warehouse for handling vast datasets in real time. This integration offers several key benefits:
- Seamless Access to Extensive Datasets: By linking BigQuery with Excel, businesses can effortlessly access and extract sizable datasets in real-time, bypassing any performance bottlenecks.
- Advanced Data Analysis and Visualization: Utilizing Excel’s comprehensive data analysis and visualization capabilities allows for deeper insights from BigQuery data, enhancing decision-making processes.
- Improved Collaboration: Excel’s user-friendly format facilitates easier sharing and collaboration. Connecting to BigQuery enables users to extract necessary data into Excel, simplifying teamwork and data sharing.
- Streamlined Data Reporting: Establishing a connection between BigQuery and Excel enables the automation of routine data reporting, ensuring timely and accurate data retrieval from BigQuery.
- Expanded Integration Options: BigQuery’s compatibility with various data sources, including Google Analytics and Google Ads, means that if you connect BigQuery with Excel, it allows for direct and efficient data transfers from these platforms into Excel for further analysis.
Additionally, this integration provides advanced data manipulation capabilities and advanced functionality, such as performing a Distinct Count and utilizing Power Pivot Measures, which are critical for users needing flexibility during data integration and enhancing their analytics processes. When you connect BigQuery to Excel, it becomes easier to use these advanced features for more powerful and flexible analysis.
This synergy not only amplifies data handling efficiency but also enriches the analytical outcomes available to businesses, making it a strategic move for leveraging data-driven insights.
Methods to Connect BigQuery To Excel for Data Import
There are several methods available to establish this connection, each tailored to meet different needs and technical requirements. From utilizing Power Query – a feature within Excel that simplifies data import and transformation – to leveraging Directly Import data from BigQuery to Excel Using IQY file for a more direct data import, the choice of method depends on factors such as the need for real-time data updates, ease of setup, and specific project requirements.
1. Directly Import data from Google BigQuery to Excel using an IQY file
- To import data from BigQuery to Excel, first of all, you need a unique key to run queries against BigQuery. You can create this key at any time, but please note that it has an expiration date. Additionally, you can convert Excel spreadsheets to CSV files for easy upload to BigQuery.
This involves saving Excel data as CSV, uploading it through the BigQuery Web UI, and noting the manual nature and lack of automation for recurring data transfers. Saving your data as a CSV file ensures compatibility and smooth uploading into BigQuery datasets.

If necessary, you can always create a new key.

You can also expire your current key using the Revoke Key button or in your Google profile settings.

- In Excel, create a new worksheet and provide the following information in the format shown in the screenshot below:
- Your project ID
- Your unique key
- Your query

Note that if your query exceeds 256 characters, Excel won’t run it. In this case, you should split your query into parts and insert them into adjacent cells.
- Next, download the IQY file below.
- In the Data tab in Excel, select Existing Connections. In the window that appears, click Browse for more and select the IQY file you just downloaded.

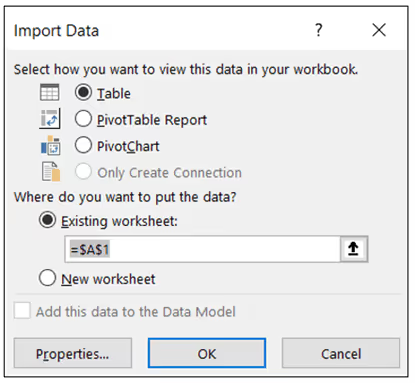
- The first time you connect, you’ll need to specify where your data will appear. Choose a cell in your current worksheet.

- In the following windows, specify the values of the cells containing your query, project ID, and connector key.

It’s ready! Your BigQuery data will now appear in Excel. The Import Data window provides options for transforming and managing data, including row limits for various data sources and the ability to add data to the Data Model for enhanced functionality.
As an alternative way to connect to Excel, you can use the Magnitude Simba ODBC driver for BigQuery, which is explained below. Detailed instructions can be found on YouTube: How to Connect Google BigQuery to Microsoft Excel. When using Power Query, you can rename datasets for clarity.
2. Connect BigQuery to Excel via API
Connecting BigQuery to Excel using the API involves a technical process that leverages BigQuery’s REST APIs to automate data sync and integration with external applications, necessitating a good grasp of programming and API usage. Given its technical nature, this method is best suited for those with engineering or analytical expertise, offering a powerful way to leverage their skills for advanced data integration tasks.
To get started, you need to enable the BigQuery API and install the BigQuery API client library as part of the setup process. Additionally, users must create a service account to connect BigQuery to external applications via API. Here’s how to establish this connection:
- Begin by accessing your Google Cloud Platform (GCP) account, navigate through the menu to ‘APIs & Services’ > ‘Library’, search for the BigQuery API, and enable it.

2. Create a service account in Google Cloud Platform by going to ‘IAM & Admin’ > ‘Service Accounts’ in your GCP console. Fill in the necessary details for the account and assign it a role with permissions for BigQuery, such as the BigQuery Data Viewer role or BigQuery Data Editor role, to ensure it has the required access. During this setup, you will need to enter service account details to grant appropriate access roles for the project.

- Inside your service account, navigate to the 'Keys' section, add a new key, select the JSON format, and download it. This key will authenticate your API requests. Creating this JSON file is crucial for the authentication process.

- Depending on the programming language you're using, install the BigQuery client library to facilitate communication with the BigQuery API. Ensure you enter the correct service account details to properly set up the account and grant necessary permissions for data access.
- Use your chosen programming language to make an API request to BigQuery, extract the desired data, and process it into a format suitable for Excel. For example, in Python, you would use the google.cloud.bigquery client to fetch data, load it into a Pandas DataFrame, and then export it to an Excel file using the DataFrame.to_excel() method.
Here's a simplified Python code example for fetching data from BigQuery and exporting it to Excel:
from google.cloud import bigquery
import pandas as pd
from io import BytesIO
# Authenticate using the service account JSON key
client = bigquery.Client.from_service_account_json('path/to/your_service_account.json')
# Configure the job to export data in CSV format
job_config = bigquery.ExtractJobConfig()
job_config.destination_format = 'CSV'
job_config.print_header = False
# Specify your GCS bucket and file path
bucket_name = 'your-bucket-name'
destination_uri = f'gs://{bucket_name}/your-data.csv'
# Reference your BigQuery table
table_ref = client.dataset('your_dataset').table('your_table')
# Initiate the export job
extract_job = client.extract_table(table_ref, destination_uri, job_config=job_config)
# Assuming the CSV file is now in your GCS bucket, download and convert it to a DataFrame
bucket = client.get_bucket(bucket_name)
blob = bucket.blob('your-data.csv')
csv_string = blob.download_as_string()
df = pd.read_csv(BytesIO(csv_string))
# Export the DataFrame to an Excel file
df.to_excel('your-data.xlsx')

This code snippet outlines fetching data from BigQuery, converting it to a CSV format, downloading it, and then exporting it to Excel. Modify the code according to your specific requirements. For comprehensive information, consult the BigQuery REST API documentation.
3. Connect BigQuery to Excel Using ODBC Data Source
Power Query Editor enhances Excel by enabling connections to various external data sources, a capability seamlessly integrated into Excel under the "Get & Transform Data" section in the Data tab. Excel can import data from BigQuery using a custom SQL query when combined with Power Query.

For this example, we'll utilize the ODBC driver as a BigQuery Excel connector, one of the options supported by Excel's Get Data feature, to connect to BigQuery. Using the ODBC driver, users can connect BigQuery to Excel without extensive coding knowledge.
First, we need to determine the Excel version (32-bit or 64-bit) before installing the driver.
- Open your Excel workbook.
- Click on the File menu.
- Select Account, then click About Excel.
- In the About Microsoft Excel window, look at the top to find your Excel version.
- It will specify whether it's a 32-bit or 64-bit installation.

To connect your BigQuery account to Excel, first, ensure you download and install the most recent version of the Google BigQuery ODBC driver on your system.
- Go to the Google BigQuery ODBC Driver download page.
- Select the appropriate version of the driver based on your Excel version:
2.1 If you use 32-bit Excel, download the Windows 32-bit driver.
2.2 If you use 64-bit Excel, download the Windows 64-bit driver.

3. Fill in your details (name, email, etc.), then click DOWNLOAD.
4. Extract the contents of the downloaded .zip file to a temporary directory.
5. Run the installer:
5.1 For 32-bit Excel: PROGRESS_DATADIRECT_ODBC_8.0_WIN_32_INSTALL.exe
5.2 For 64-bit Excel: PROGRESS_DATADIRECT_ODBC_8.0_WIN_64_INSTALL.exe
6. Follow the on-screen prompts to complete the installation.
After installation, follow the steps below to establish a connection with your BigQuery account.

1. Open the ODBC Data Sources app by searching for "ODBC" in the start menu search bar.

2. Within the app, navigate to the System DSN tab, select "Google BigQuery," and click on the "Configure" button.
- In the Data Source Name (DSN) setup, choose "User Authentication" as the OAuth Mechanism from the dropdown menu and click on the "Sign In…" button to initiate access to BigQuery data.

4. Authenticate access by logging into your Google account and allowing the connection when prompted.

5. After successful authentication, a success message will appear in your browser. Close the browser and return to the DSN configuration window, where the Refresh Token should now appear.
- Choose the specific project and dataset in BigQuery that you wish to export to Excel and save your configuration by clicking "OK."
- Save the DSN configuration with another click on "OK."

After setting up the ODBC driver as a BigQuery connector for Excel on your system, you're ready to utilize it as a data source for exporting data from BigQuery into Excel. Begin by opening a new Excel worksheet, and then proceed with the following steps to establish a connection between BigQuery and Excel.
Here's how you can load the data from BigQuery to Excel:
- In a new Excel worksheet, select the cell where you wish to import BigQuery data. Navigate to Data > Get Data > From Other Sources, and choose "From ODBC."

- Select "Google BigQuery" as the Data Source Name (DSN) and use the Advanced Options to input the SQL Query for the data you wish to load into Excel. Confirm your custom query by clicking "OK."

- Before executing the query in Excel, it's wise to first run and verify it within the BigQuery interface to ensure there are no errors.
- Once the query runs successfully, the results will appear in the preview pane.
To bring this data into Excel:
- Click Load to import it directly into your worksheet.

- Or click Load > Load To if you want to specify where and how the data should be inserted.
- In the Import Data dialog box, choose your desired layout and location, then click OK to complete the import.
You've now adeptly navigated the process of connecting BigQuery to Excel via ODBC and have successfully imported your data into Excel.

Automatically Updating Data from BigQuery in Excel
Automatically updating data from BigQuery in Excel is a powerful feature that ensures your analysis is always based on the most current information, leveraging advanced data manipulation capabilities. After you have successfully imported data from BigQuery into Excel, it’s crucial to maintain the freshness of this data to reflect any changes or updates that occur in the BigQuery database.
To utilize the auto-refresh feature for data updates, it is important to keep the Excel window open.
Excel facilitates this through its ability to connect to external sources and refresh data both manually and automatically. Manual refreshes are useful for ad-hoc updates, while automatic refreshes are ideal for maintaining up-to-date data without constant manual oversight. Setting up automatic data refreshes can save significant time and effort, allowing you to focus on analysis rather than data management.
This feature is especially beneficial in dynamic environments where data changes frequently, ensuring that your Excel workbook reflects the latest data with minimal effort. After importing data from BigQuery into Excel, it is crucial to ensure that the data remains up-to-date.
Refreshing Data Manually
Manually refreshing data in Excel involves a simple process to ensure your workbook contains the latest information from BigQuery. Navigate to the Data tab and locate the refresh icon positioned above the “Refresh All” option within the “Queries & Connections” section.

Accessing the raw data is crucial for comprehensive analysis and reporting, especially when dealing with configurations that handle data limits and transformations between platforms.
Clicking this icon initiates an immediate data update. Alternatively, for a quicker method, you can utilize the shortcut key Alt + F5. This action forces Excel to fetch and update the imported data, ensuring your analysis is based on the most current dataset available.
Setting Up Automatic Data Refresh
For continuous data updates without manual intervention, Excel allows you to set up automatic data refresh at specified intervals. Here’s how you can activate this feature:
- Navigate to Data > Queries & Connections > Refresh All, then choose the “Connection Properties” option at the end of the list.

- In the Query Properties menu, check the "Refresh every" box and specify your desired auto-refresh interval in minutes in the adjacent field.

3. Click “OK” to apply and save your settings.
It is also essential to clearly label the source data in Power Query to enhance transparency and facilitate a deeper understanding when sharing analyses with stakeholders.
With these steps, Excel will automatically refresh and update the BigQuery data at the intervals you’ve set, ensuring your data analysis remains up-to-date without needing manual refreshes in the import data window. This helps that your Excel file always reflects the latest BigQuery updates without manual intervention.
Best Practices for Managing BigQuery Data in Excel
When you connect BigQuery to Excel, following proper data management practices is essential to maintain data quality and performance. To ensure effective data management, it’s essential to follow best practices when working with BigQuery and Excel.
- Use a consistent naming convention: Apply a standard naming convention for your datasets and tables. This helps quickly identify and locate specific sources.
- Implement version control: BigQuery offers a built-in version control system that enables you to track changes to your data and revert to previous versions if needed.
- Ensure data security and authentication: BigQuery offers a range of security features, including encryption and access control. Utilise service accounts and authentication tokens to further enhance the security of your data.
- Monitor and optimize data queries: Regularly monitor and refine your queries to achieve optimal performance. BigQuery offers tools such as the BigQuery Query Planner and the BigQuery Console to support this process.
- Connect BigQuery to Excel for better management: By following these best practices when you connect BigQuery to Excel, you can ensure effective data management and accurate analysis.
By following these best practices, you can ensure effective data management and analysis when working with BigQuery and Excel.
Short Conclusions
Now you know how to load data from Google BigQuery cloud storage to Excel.
And if you want to learn more about GBQ and other analytics tools, subscribe to our newsletter. Every month you’ll get useful tips for modern marketers and analysts.
Frequently asked questions
.png)