
Free LinkedIn Ads to BigQuery Connector by OWOX: Own Your B2B Ad Data with Confidence
Import LinkedIn Ads data to BigQuery with zero code or cost. 100% free connector by OWOX designed for B2B marketers and analysts.

Running campaigns on LinkedIn Ads is straightforward. But sending that data from LinkedIn to BigQuery in a clean, structured format? That’s where things get complicated.
If you’ve ever tried moving LinkedIn Ads to Google BigQuery for reporting, you’ve likely hit roadblocks – from rigid APIs and manual export workarounds to expensive tools that restrict your field access or delay your refresh schedules.
That’s exactly why we built this.
With this free, no-code connector from OWOX Data Mart, digital and marketing analysts can easily send raw LinkedIn Ads data to BigQuery – no ETL tools, no engineering support, and no vendor lock-in. You control what’s pulled, how it’s structured, and when it updates.
Why We Made This Free Connector
At OWOX, we believe your LinkedIn Ads data should work for you, not the other way around. That’s why we built this LinkedIn Ads to BigQuery connector from OWOX Data Marts and made it 100% free. No paywalls, paid tiers, no feature restrictions, and no limits on what you can extract, analyze, or automate.
Built specifically for sending LinkedIn Ads to Google BigQuery, this connector helps analysts move beyond black-box tools and regain control over how their campaign data is accessed, structured, and used. You decide what comes in, how it’s modeled, and where it goes.
Whether you’re managing reporting workflows, blending data from BigQuery to LinkedIn insights, or just tired of ETL platforms dictating your schema, this tool gives you full ownership.
Join the Open-Source Movement
We’re not just releasing a free connector – we’re inviting you to help shape the future of data and marketing analytics tools.
At OWOX, we believe that data access and transparency should be a right, not a luxury. That’s why this connector is 100% open-source – giving you full control over how it works, what it does, and how far it can go.
If you like what we do, please ⭐ star our GitHub repo to show your support – it helps us reach more analysts and grow the number of available connectors.
Also, feel free to:
- Explore the code and customize it to fit your needs.
- Contribute to this data connectivity ecosystem: suggest new connectors, pull new connectors, and/or provide documentation to support the wider community.
- Join our community & share your feedback.
We’ve built the core, the foundation – now it’s your turn to take it further.
Why Bring LinkedIn Ads Data into BigQuery?
If you’ve worked with LinkedIn Ads Manager, you know the challenges:
❌ Native LinkedIn dashboards are rigid and offer limited export capabilities
❌ CSV files and manual downloads lead to outdated, error-prone workflows
❌ Many ETL tools charge by volume and still restrict field selection
Here’s how BigQuery changes that for analysts who need scalable, structured access to campaign metrics, and how this connector makes it simple:
✅ Load raw LinkedIn Ads data into BigQuery tables for flexible, SQL-based reporting
✅ Join with data from Salesforce, HubSpot, or offline lead tracking
✅ Automate refreshes and skip the costly data pipelines altogether
With OWOX, your LinkedIn campaign metrics live where your models do – in BigQuery.
Explore our other free connectors
Liking the freedom of custom reports? Take it further with these plug-and-play integrations:
LinkedIn Ads → Google Sheets
Facebook Ads → BigQuery
Twitter Ads → BigQuery
Reddit Ads → BigQuery
No fees, no code—only faster, smarter reporting across every ad channel.
Why Choose OWOX Free Connector for LinkedIn Ads to BigQuery
Most LinkedIn Ads to BigQuery tools claim to “simplify” your reporting, but they often lock you into rigid schemas, predefined field sets, or proprietary syncing methods. You’re left digging through someone else’s structure just to build the reports your team actually needs.
The OWOX connector takes a different route. It’s built for teams that want full transparency and the power to manage LinkedIn Ads data on their own terms.
- Zero-cost and open-source: Unlike usage-priced tools, this connector is available free on GitHub as part of OWOX Data Marts. You can review, customize, and run it on your own terms.
- Direct BigQuery write: Data flows straight from the LinkedIn Ads API into your BigQuery project – no CSVs, no staging layers, and no 3rd-party services in between.
- Schema flexibility: Define your destination table schema, set up field aliases for clarity, and adapt the structure to match your reporting needs.
- Refresh control: Automate data loads using scheduled jobs and keep your dataset updated when you need it – whether you want to append new rows or overwrite existing tables.
How the Connector Works
This LinkedIn Ads to BigQuery connector from OWOX Data Marts gives you exactly what other tools don't – flexibility without the complexity.
It runs entirely in your own environment on an open-source framework — no extra tools, paid ETL services, or external platforms required.
Here’s what it does:
- Connects to the LinkedIn Marketing API to pull data like campaigns, ads, accounts, and performance metrics
- Loads that data directly into your BigQuery tables – no CSVs, no middle layers
- Gives you full control: customize schemas, assign field aliases, and schedule automated refreshes according to your needs.
And yes, it’s 100% free – no usage limits, no locked features.
If you want to skip expensive ETL tools and own your LinkedIn Ads reporting stack, this connector is built for you.
💡Check out this quick and clear video walkthrough on setting up the free LinkedIn Ads to BigQuery connector. It shows how to automate your ad data elegantly—from setup to execution.
Step-by-Step: Import LinkedIn Ads Data to BigQuery with the OWOX Data Marts
Set up a fully self-managed, SaaS-free pipeline to import LinkedIn Ads data directly into BigQuery using the OWOX Data Mart and a local server.
Step 1: Install Node.js and OWOX CLI ( ~2 min)
To run OWOX Data Mart locally, you’ll need to install Node.js and the OWOX CLI. This setup allows you to start a local server and work with the Data Mart effectively.
To get started, install the LTS version of Node.js from nodejs.org and use a version manager like nvm or nvm-windows to avoid permission issues. Once Node.js is set up, you can install the OWOX CLI globally and run ‘owox serve’ to launch the local server.
💡 For detailed setup instructions and troubleshooting, check the official documentation.
Step 2: Connect Google BigQuery and Set Up Your Data Mart ( ~3 min)
Set up BigQuery as your destination and link it to a new LinkedIn Ads data mart in OWOX.
1. Open your browser and go to http://localhost:3000.
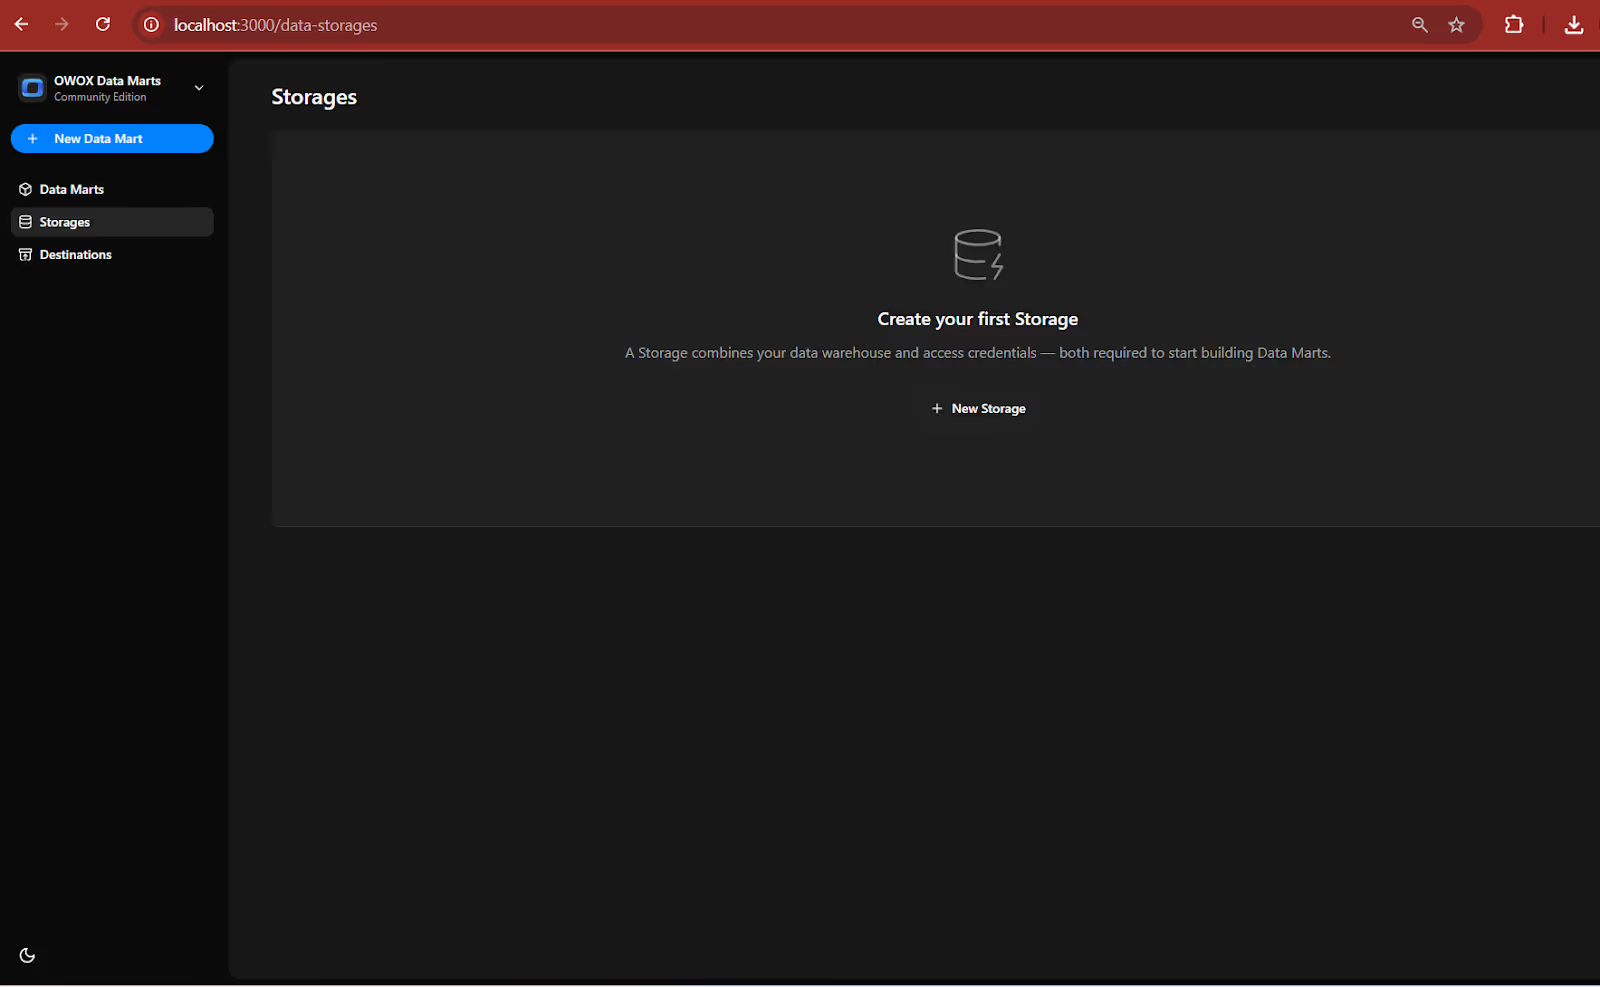
💡 Follow our guide, where you’ll find easy-to-follow instructions on how to configure your storage in OWOX Data Marts.
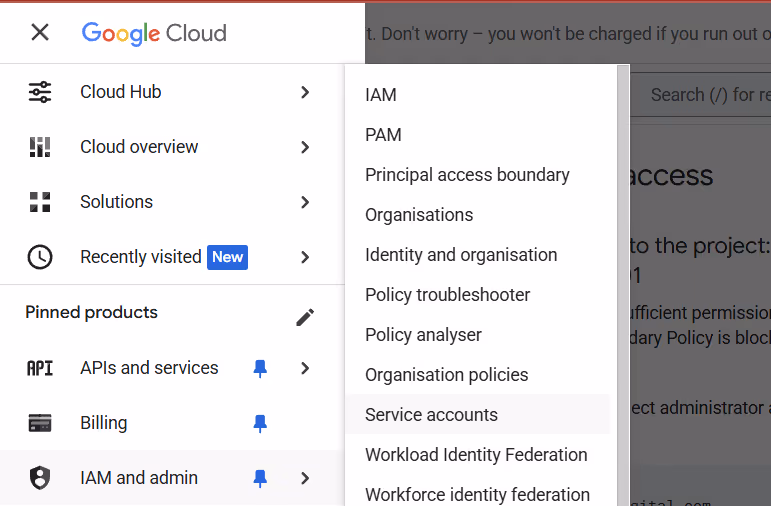
2. Create your Service Account JSON Key.
- Follow our guide to create your service account JSON Key.
3. Paste it into the ‘OWOX Service Account JSON Field’
- Don’t forget to click Save

4. Create your first Data Mart
- Once storage is added, click on the Data Mart Tab, then on ‘New Data Mart’
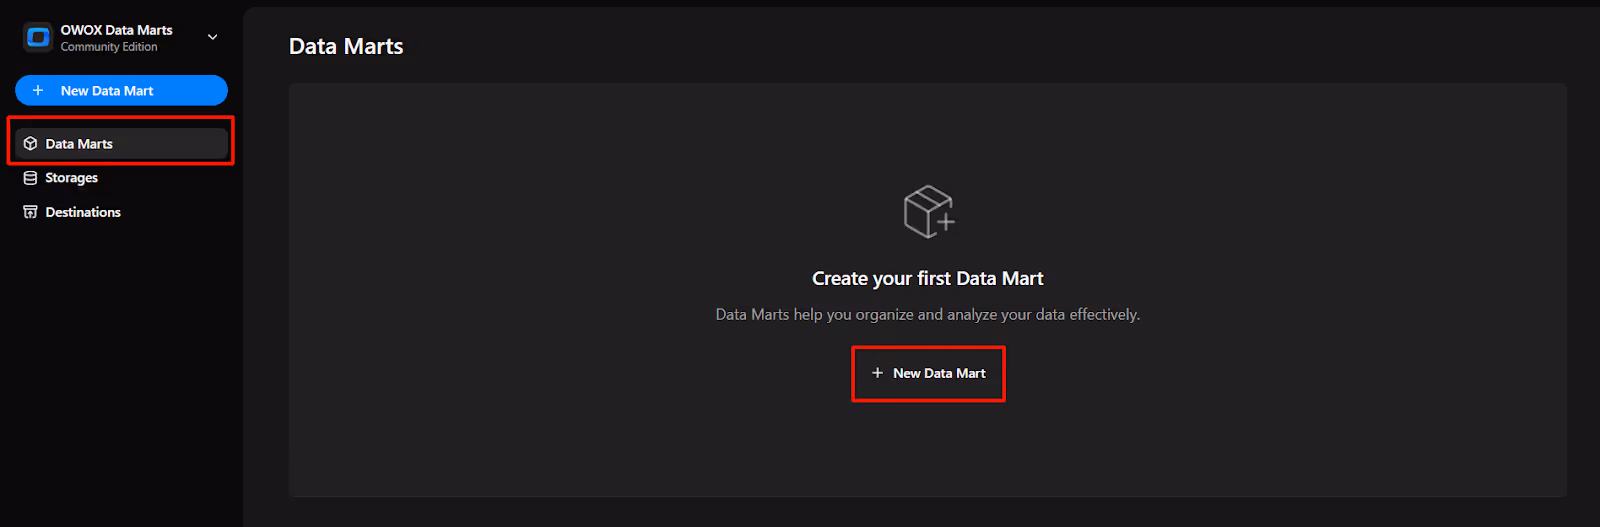
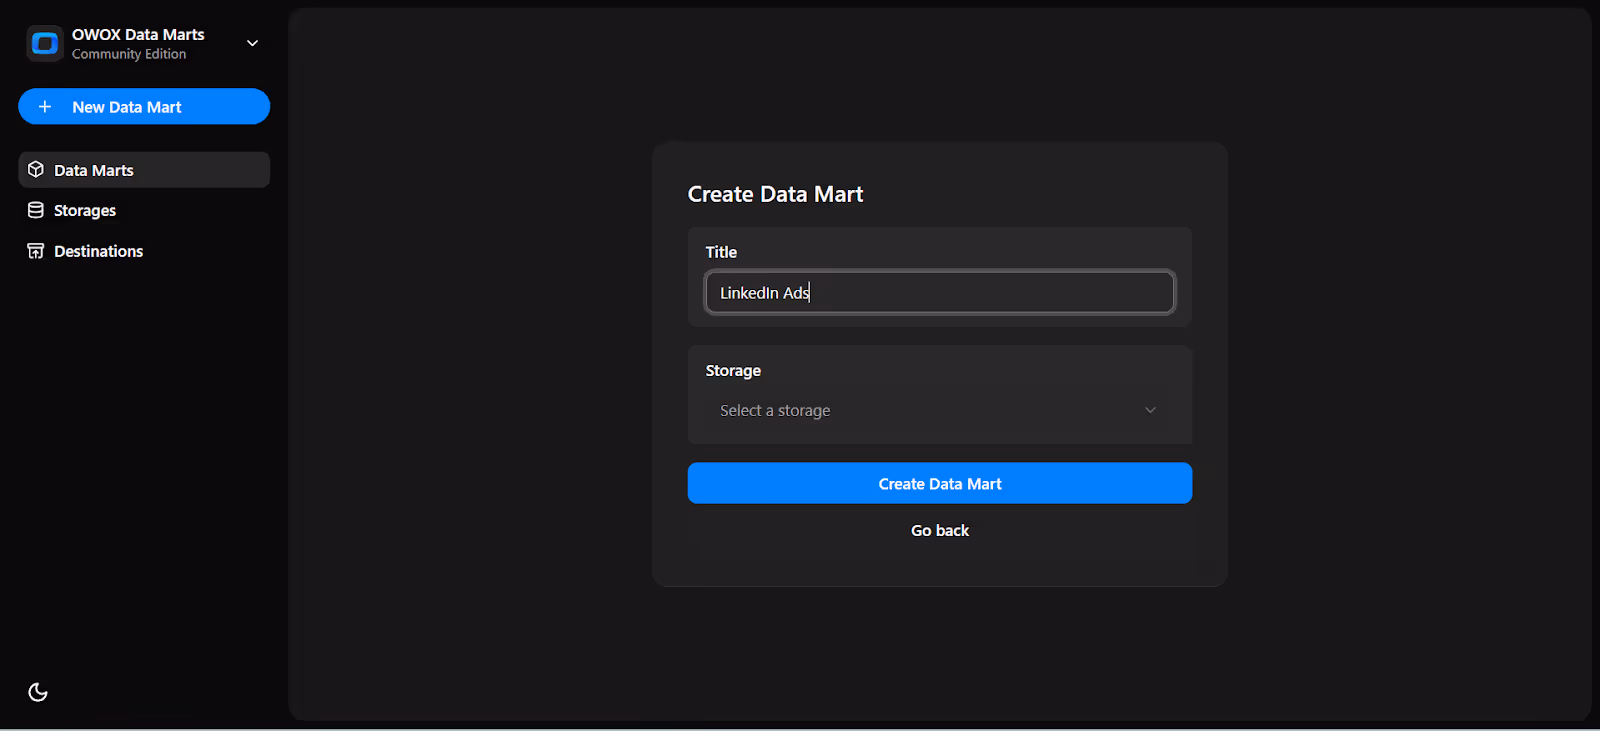
- Now, create the Data Mart, name the title as ‘LinkedIn Ads’, as the data source
- Choose the storage named ‘LinkedIn Ads Storage’ you just created
- Click ‘Create Data Mart’.
Now we will do the Data Setup
5. Setup your Data Mart
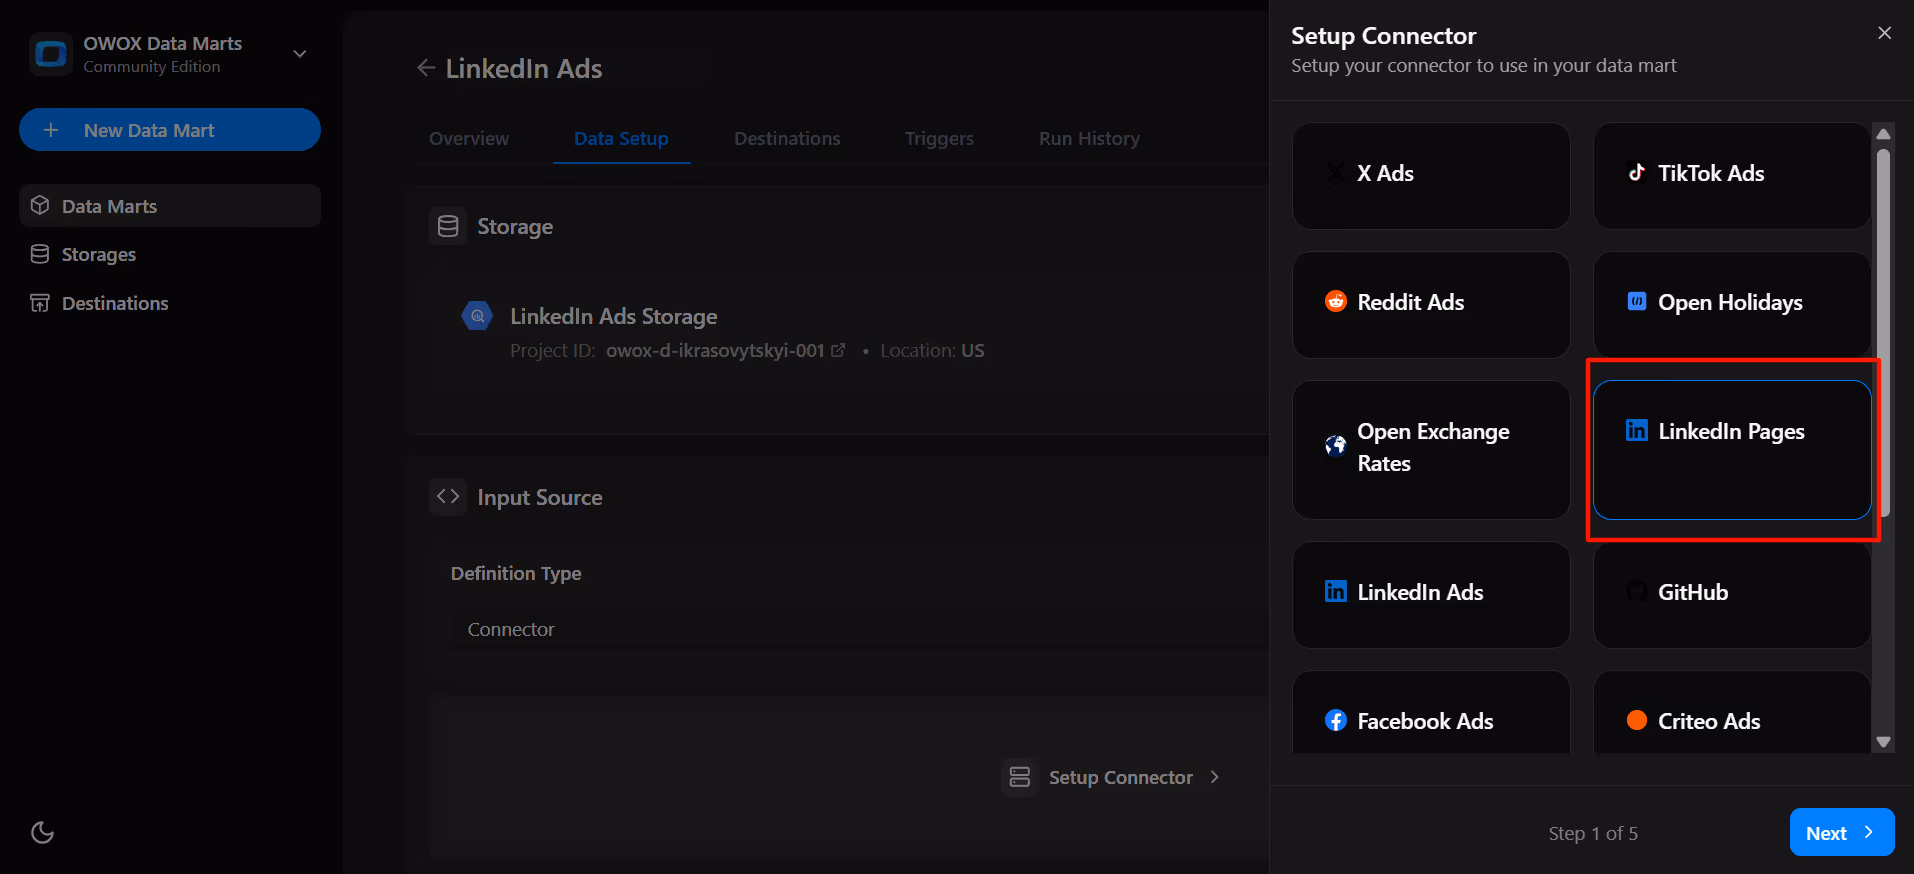
- Go to the Data Setup Tab and then select Connector
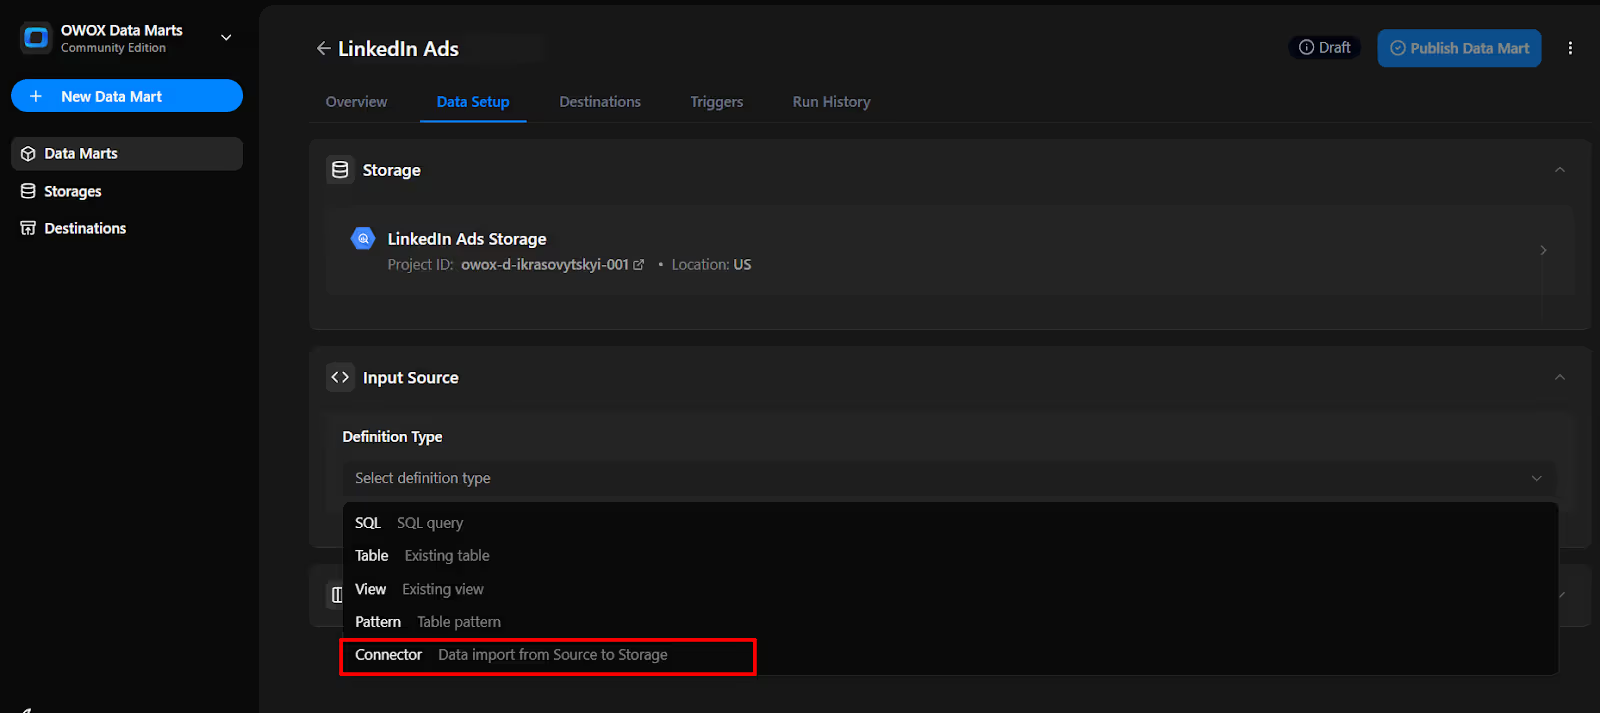
- Click on Setup Connector and Choose LinkedIn Ads Connector
Step 3: Get a LinkedIn Ads Access Token ( ~5 minutes)
To authorize the connector, you’ll need a valid LinkedIn Ads API access token. Let’s make sure you’ve got the right access credentials in place.
Prerequisites
- A LinkedIn account with access to the LinkedIn Developer portal
- A LinkedIn Developer App created and linked to your company page
- Advertising API access approved in the Products tab
- A valid Access Token generated with the required scopes (r_ads, r_ads_reporting)
Steps to Obtain Credentials
- Visit the LinkedIn Developer portal.
- Navigate to: https://www.linkedin.com/developers/
- Create a new app:
- Click the Create App button.
- Enter your App Name.
- Paste the link to your company’s LinkedIn page in the LinkedIn Page field.
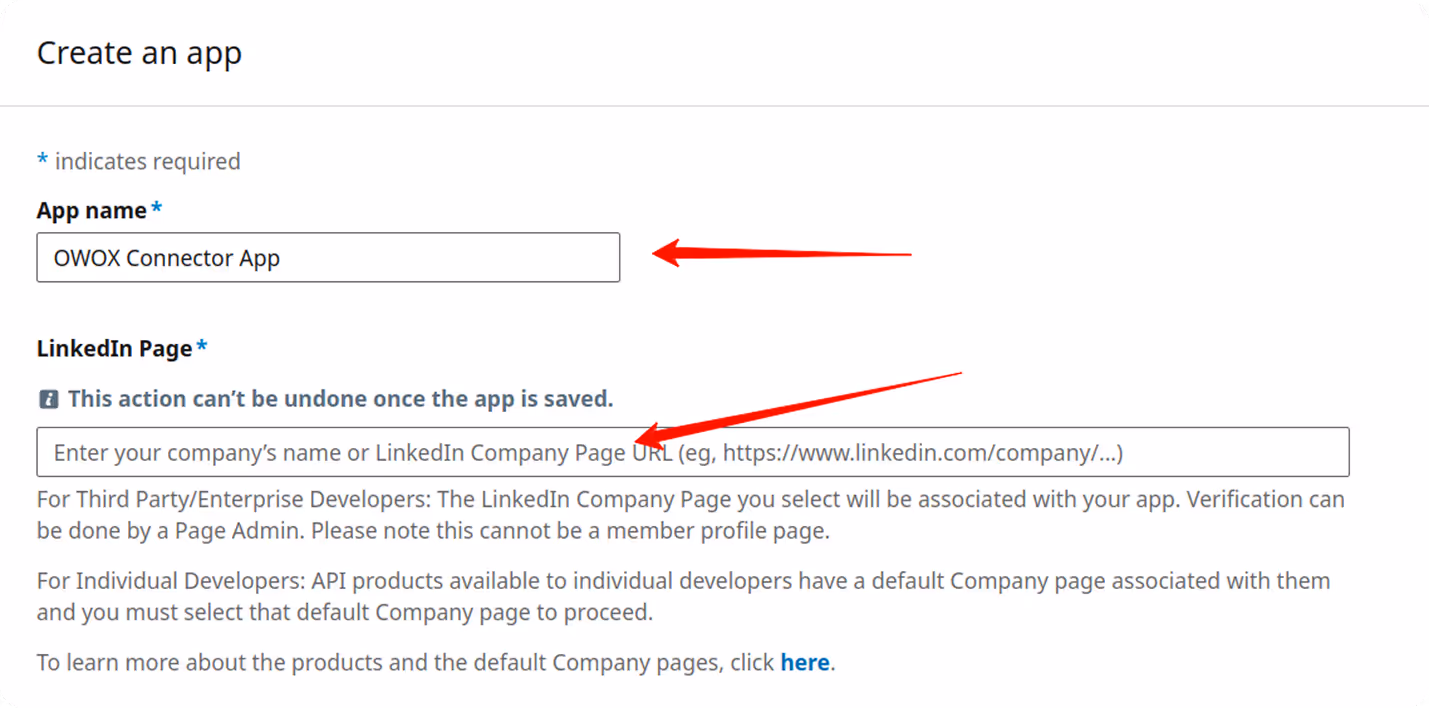
- Upload your company logo.
- Accept the legal agreement and click Create App.

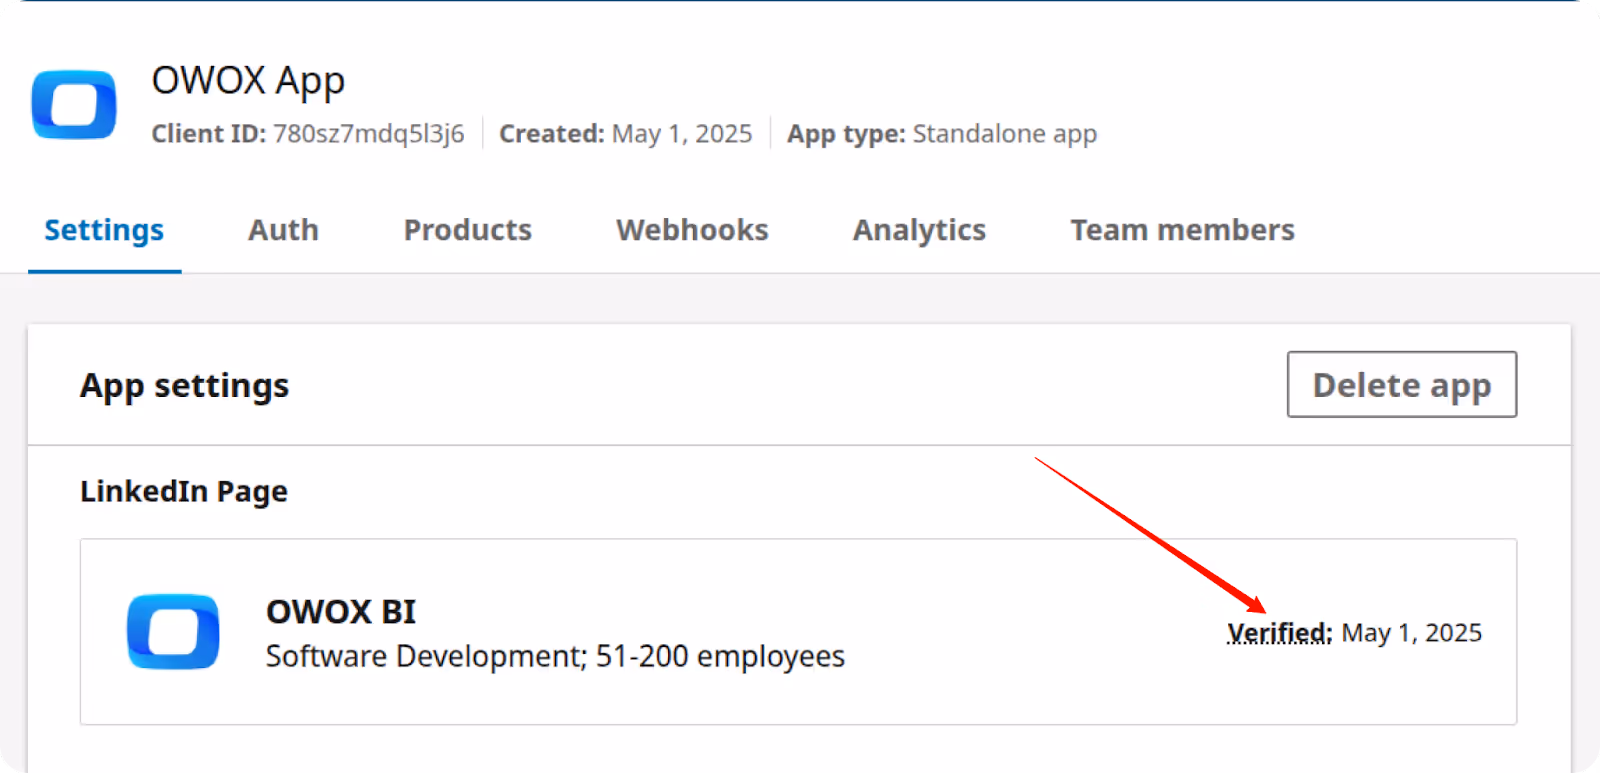
- Verify your app:
- Go to the Settings tab.
- Click the Verify button.
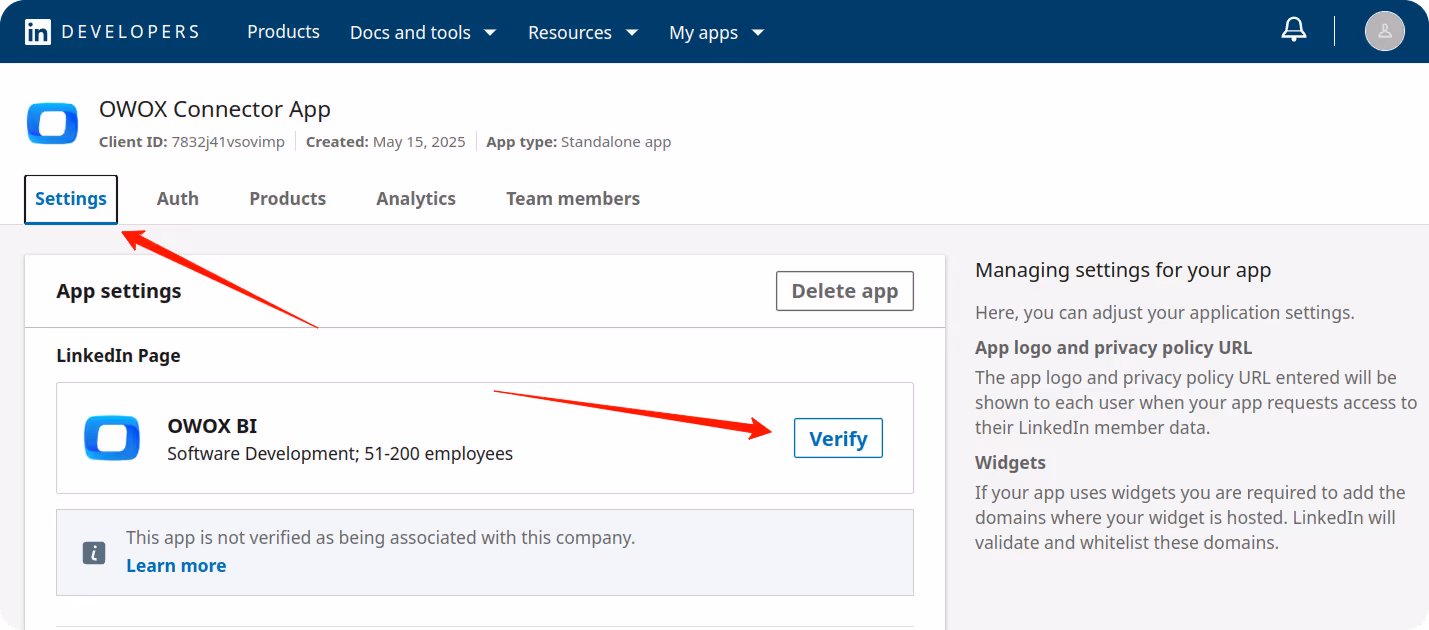
The admin of your LinkedIn company page will receive a request to approve the app.
- Copy the Verification URL.
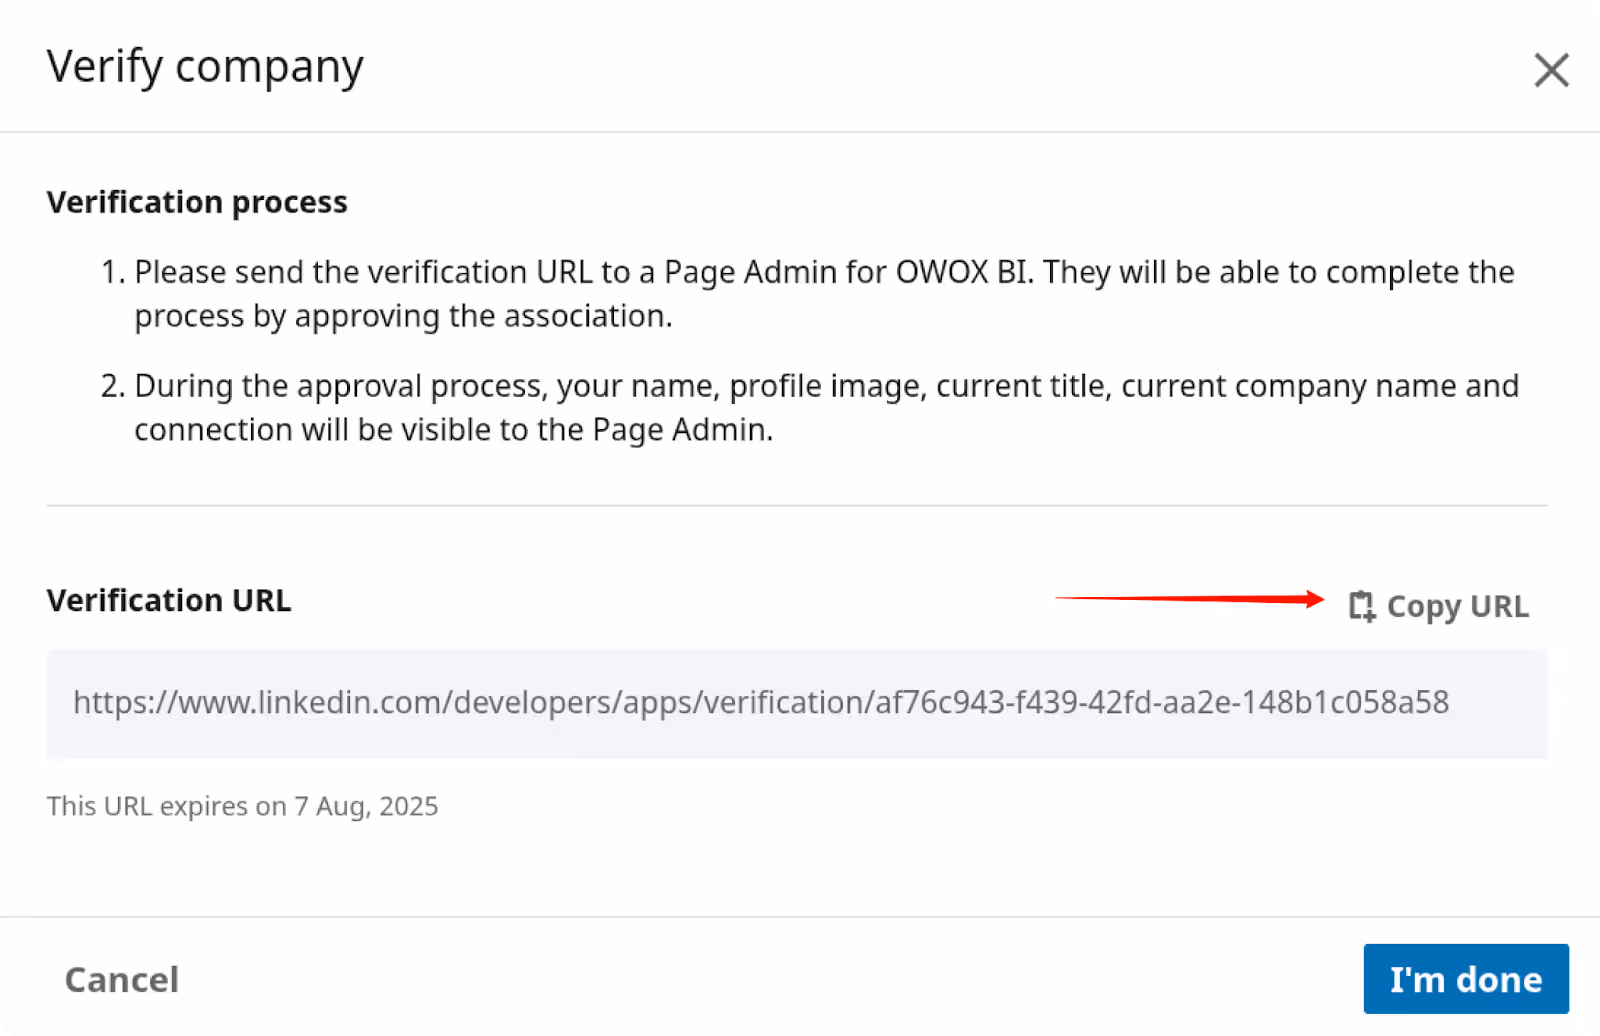
- Make sure your LinkedIn app shows as “Verified” under App Settings.
- Request Access to the LinkedIn Advertising API:
- Once your app is verified, navigate to the Products tab in the LinkedIn Developer Portal.
- Find the Advertising API and submit your access request.
Note: This API is required if you need to retrieve campaign performance, audience insights, ad creatives, and other paid media metrics.
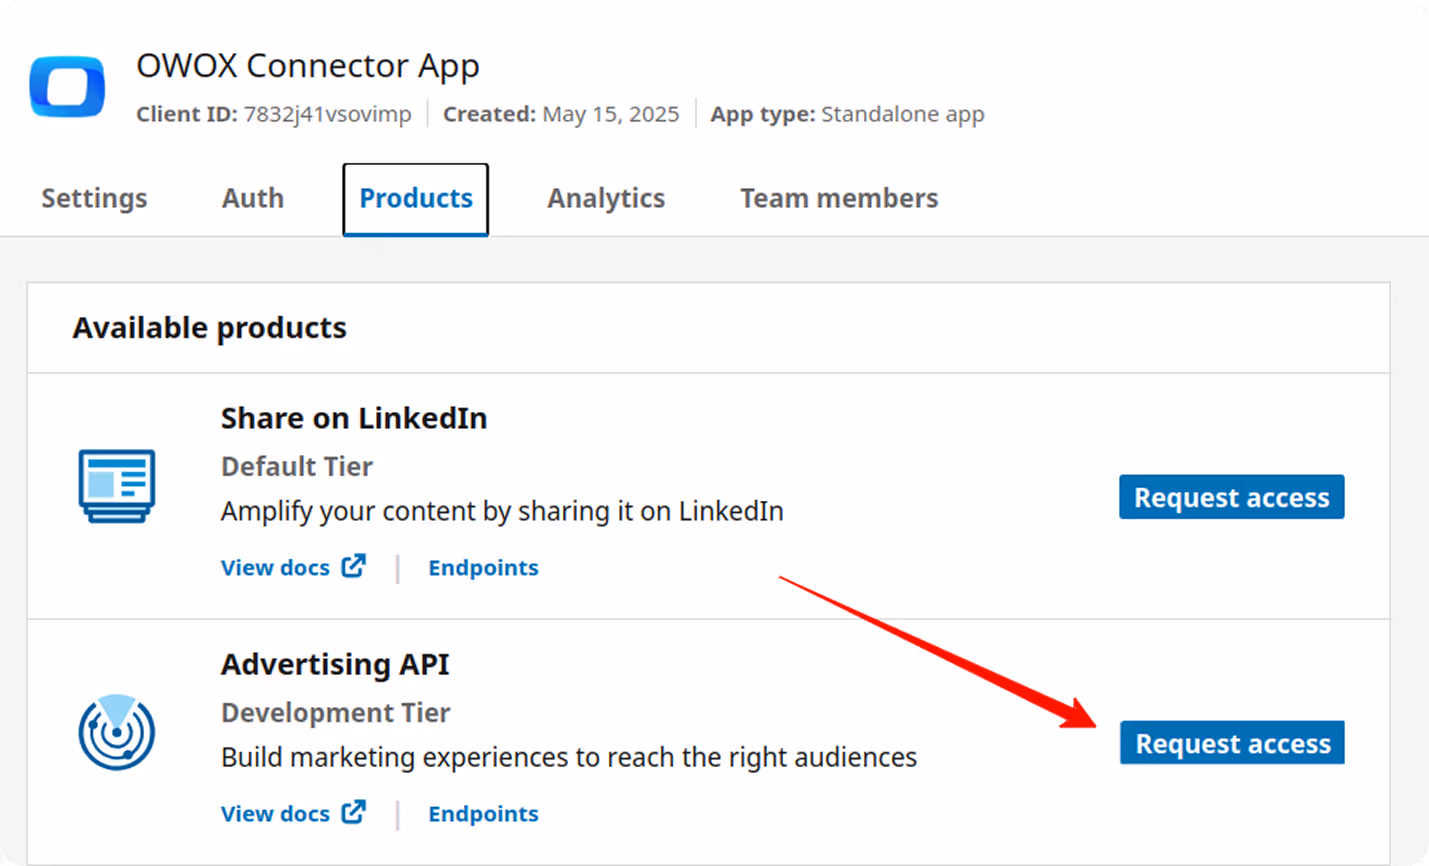
Note: Approval may take up to 24 hours. You’ll receive an email once approved.

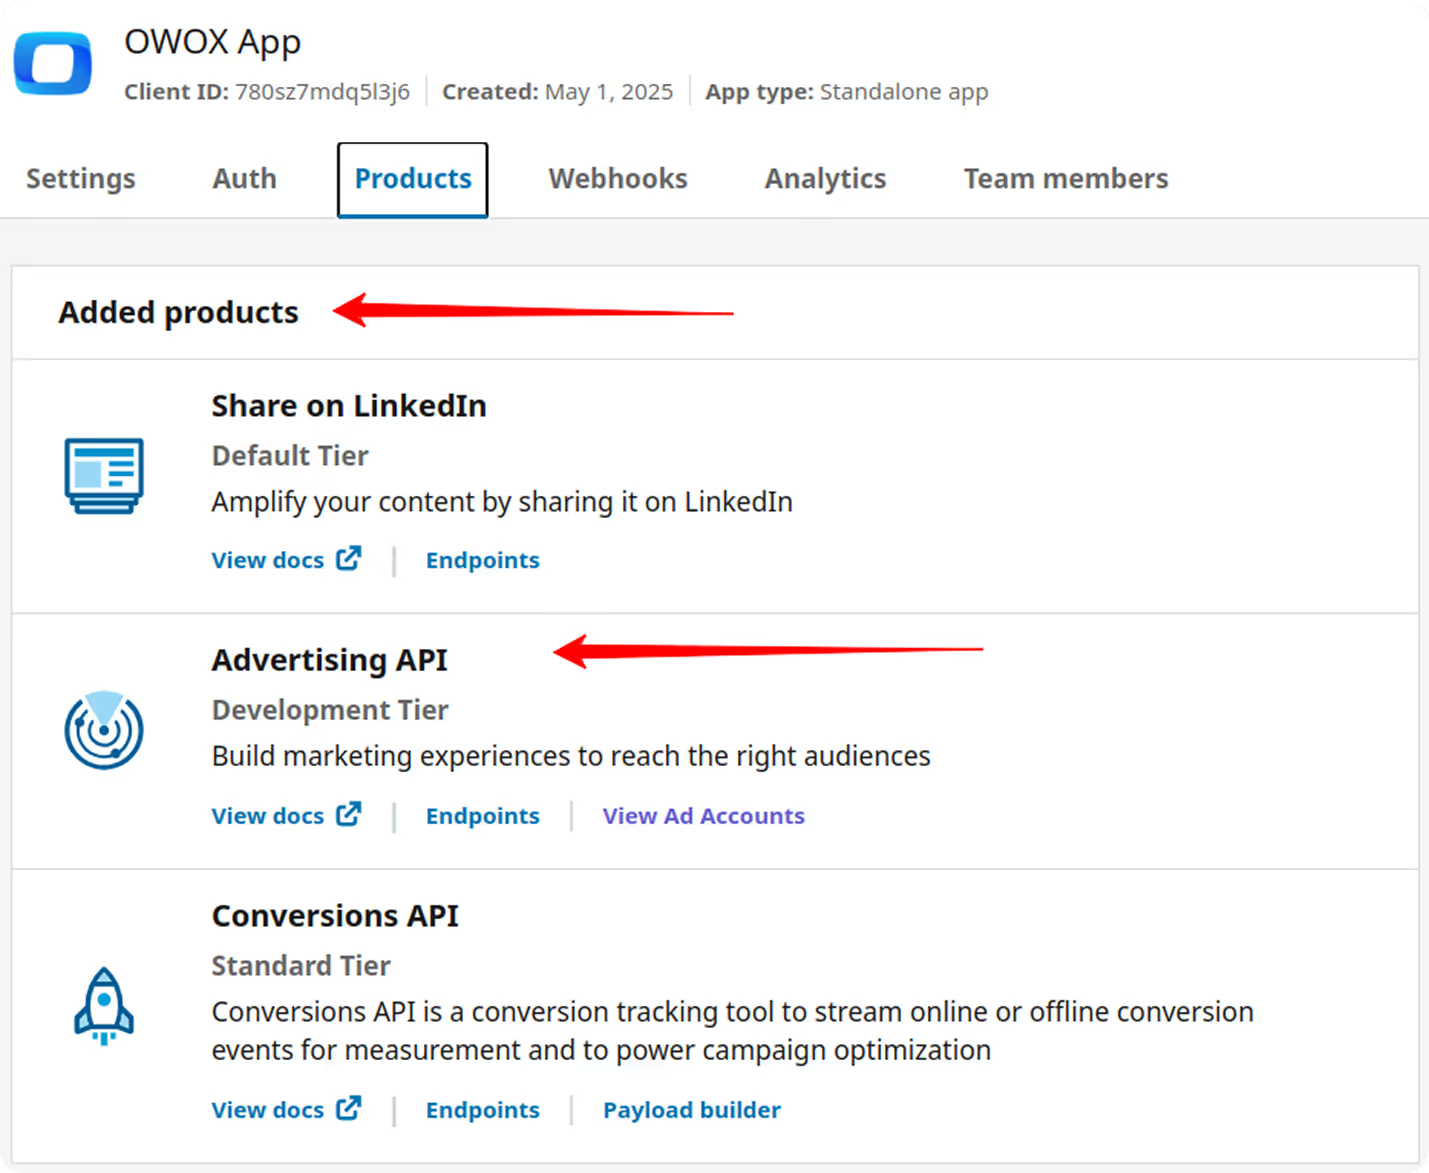
- Once approved, the Advertising API will appear under the Added Products section.
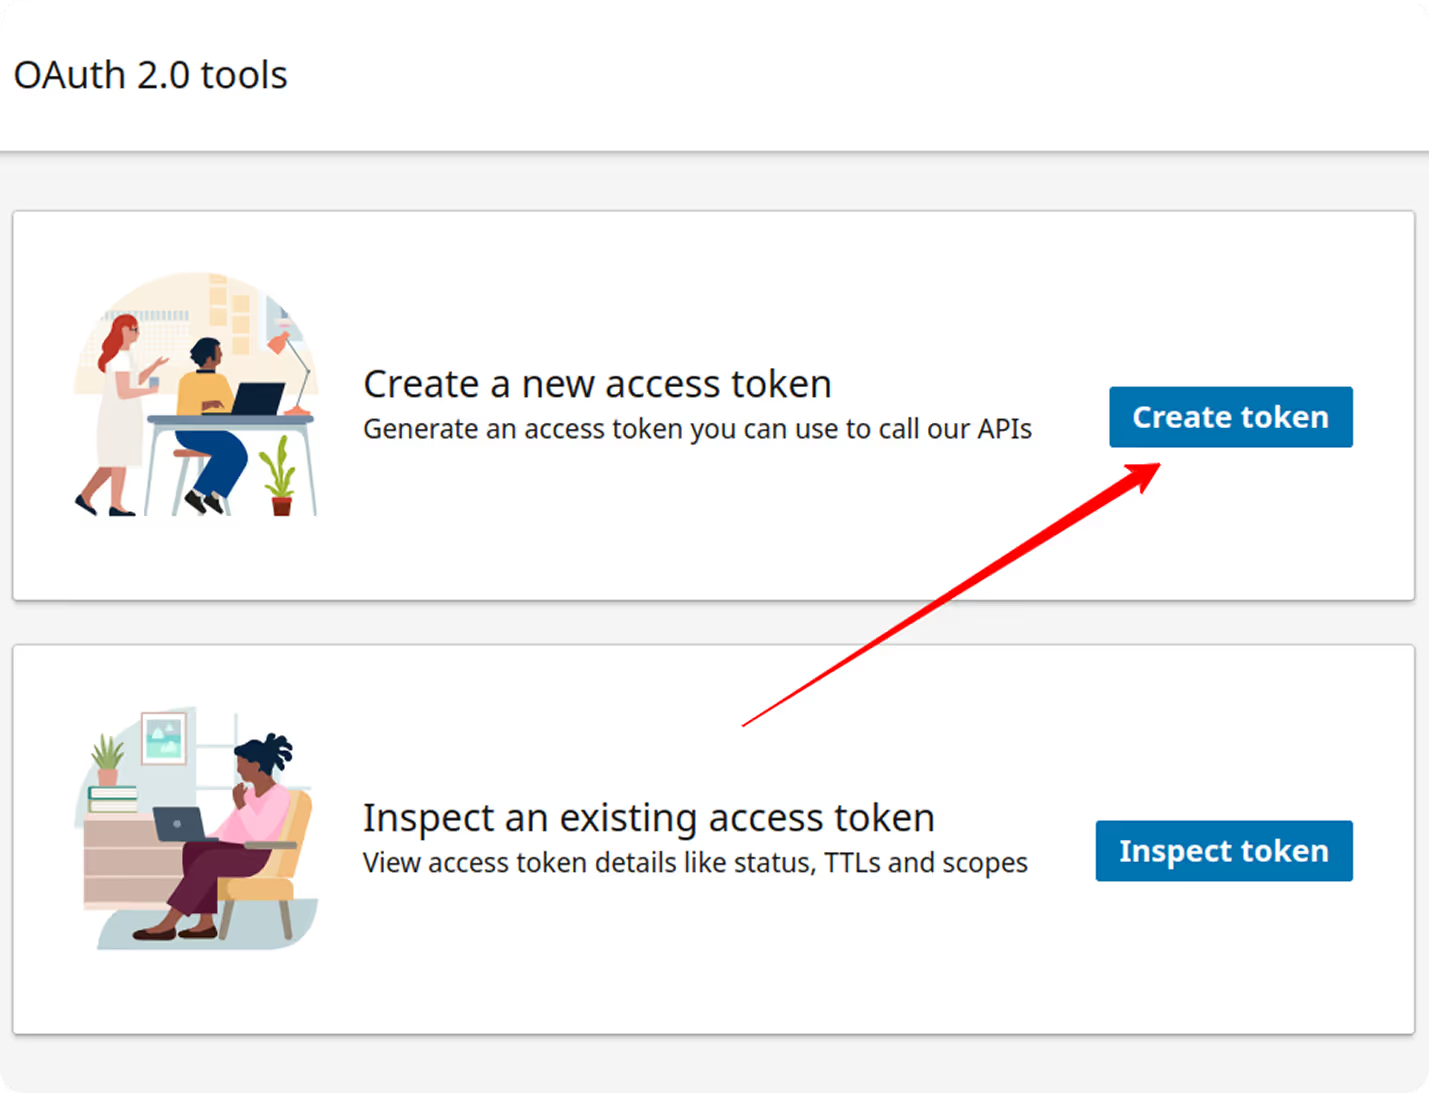
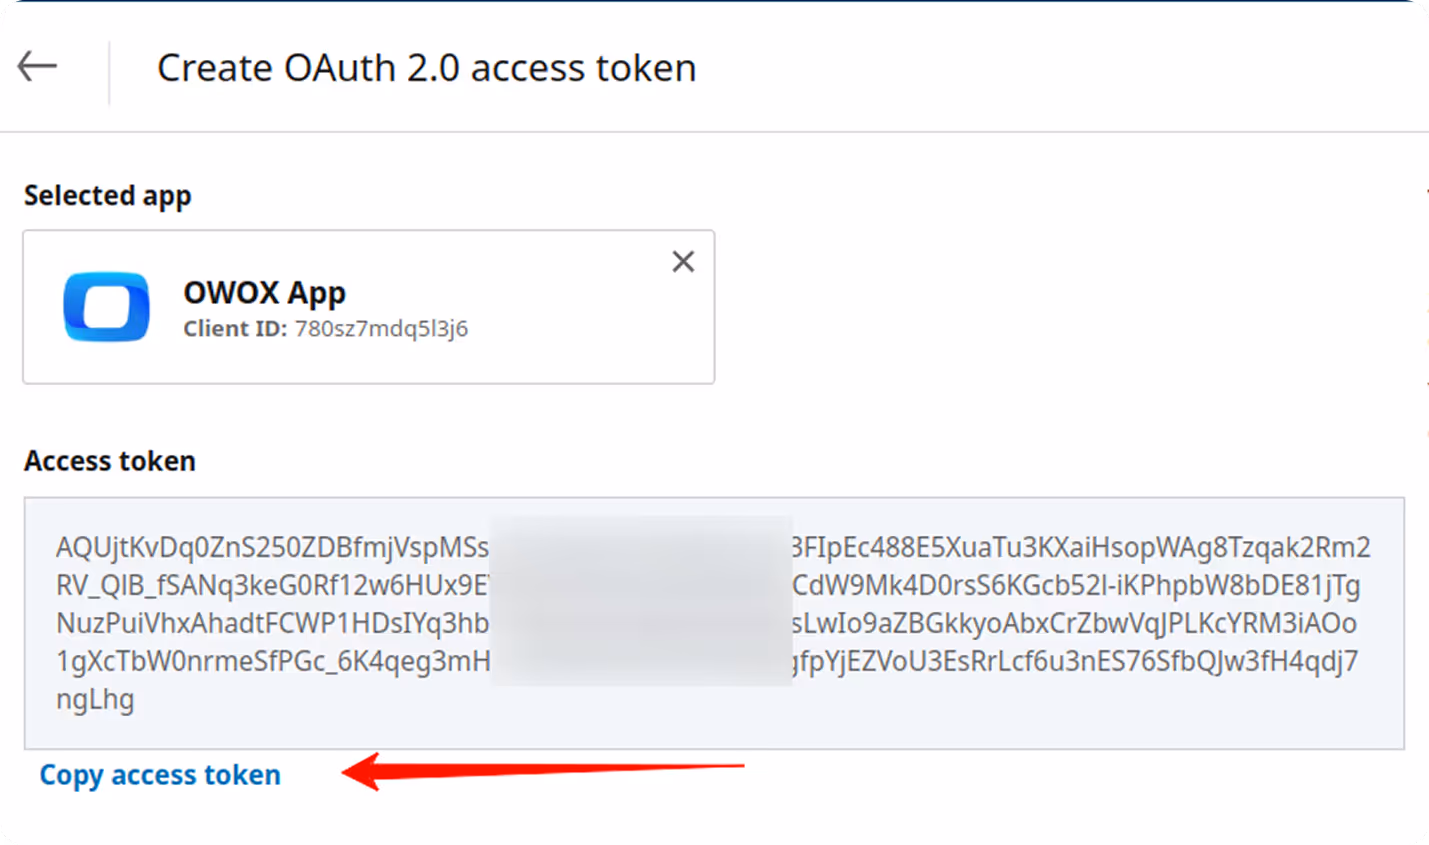
- Generate an access token:
- Go to the Auth tab.
- Click OAuth 2.0 Tools on the right-hand panel.
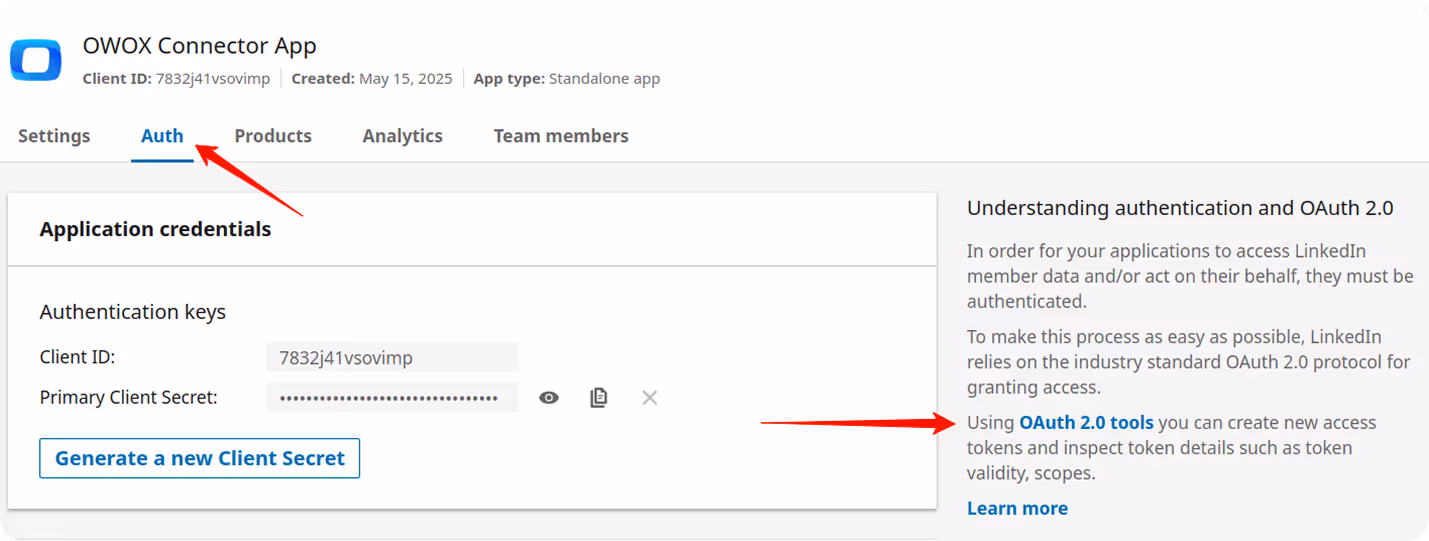
- Click the Create Token button.
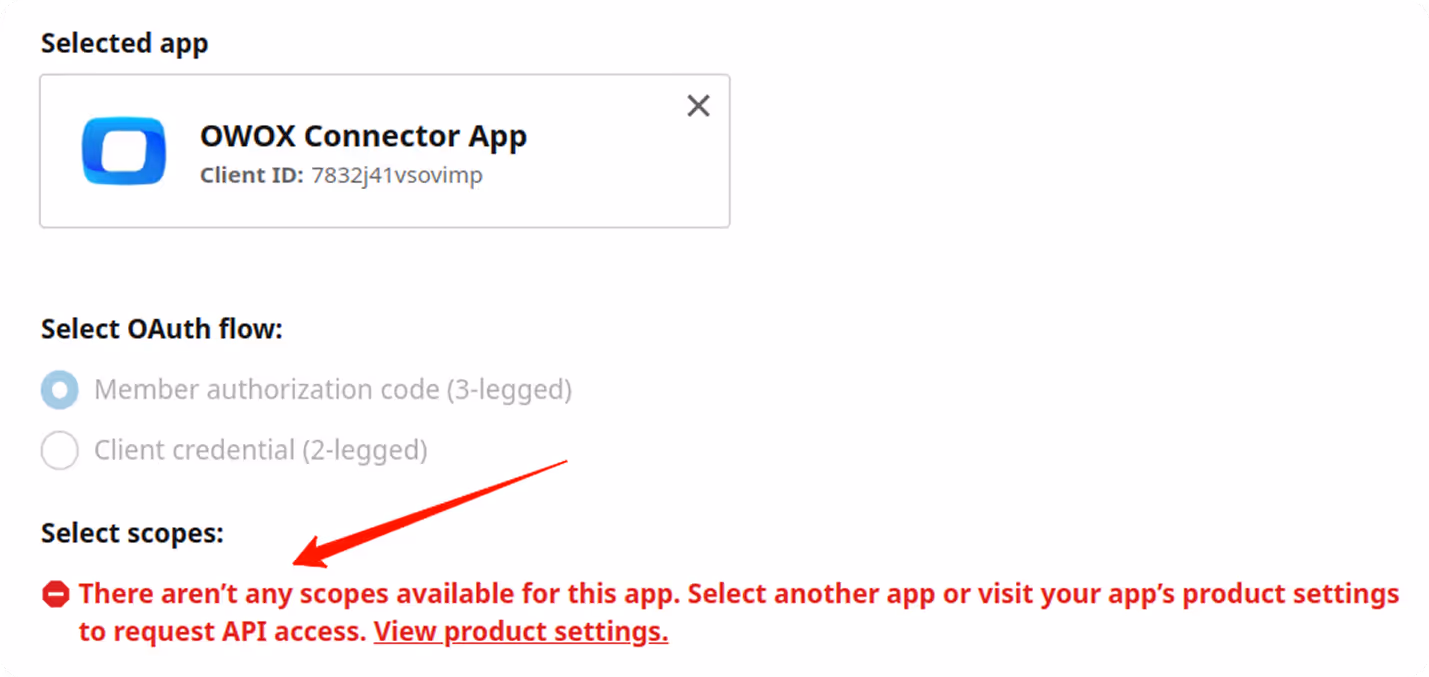
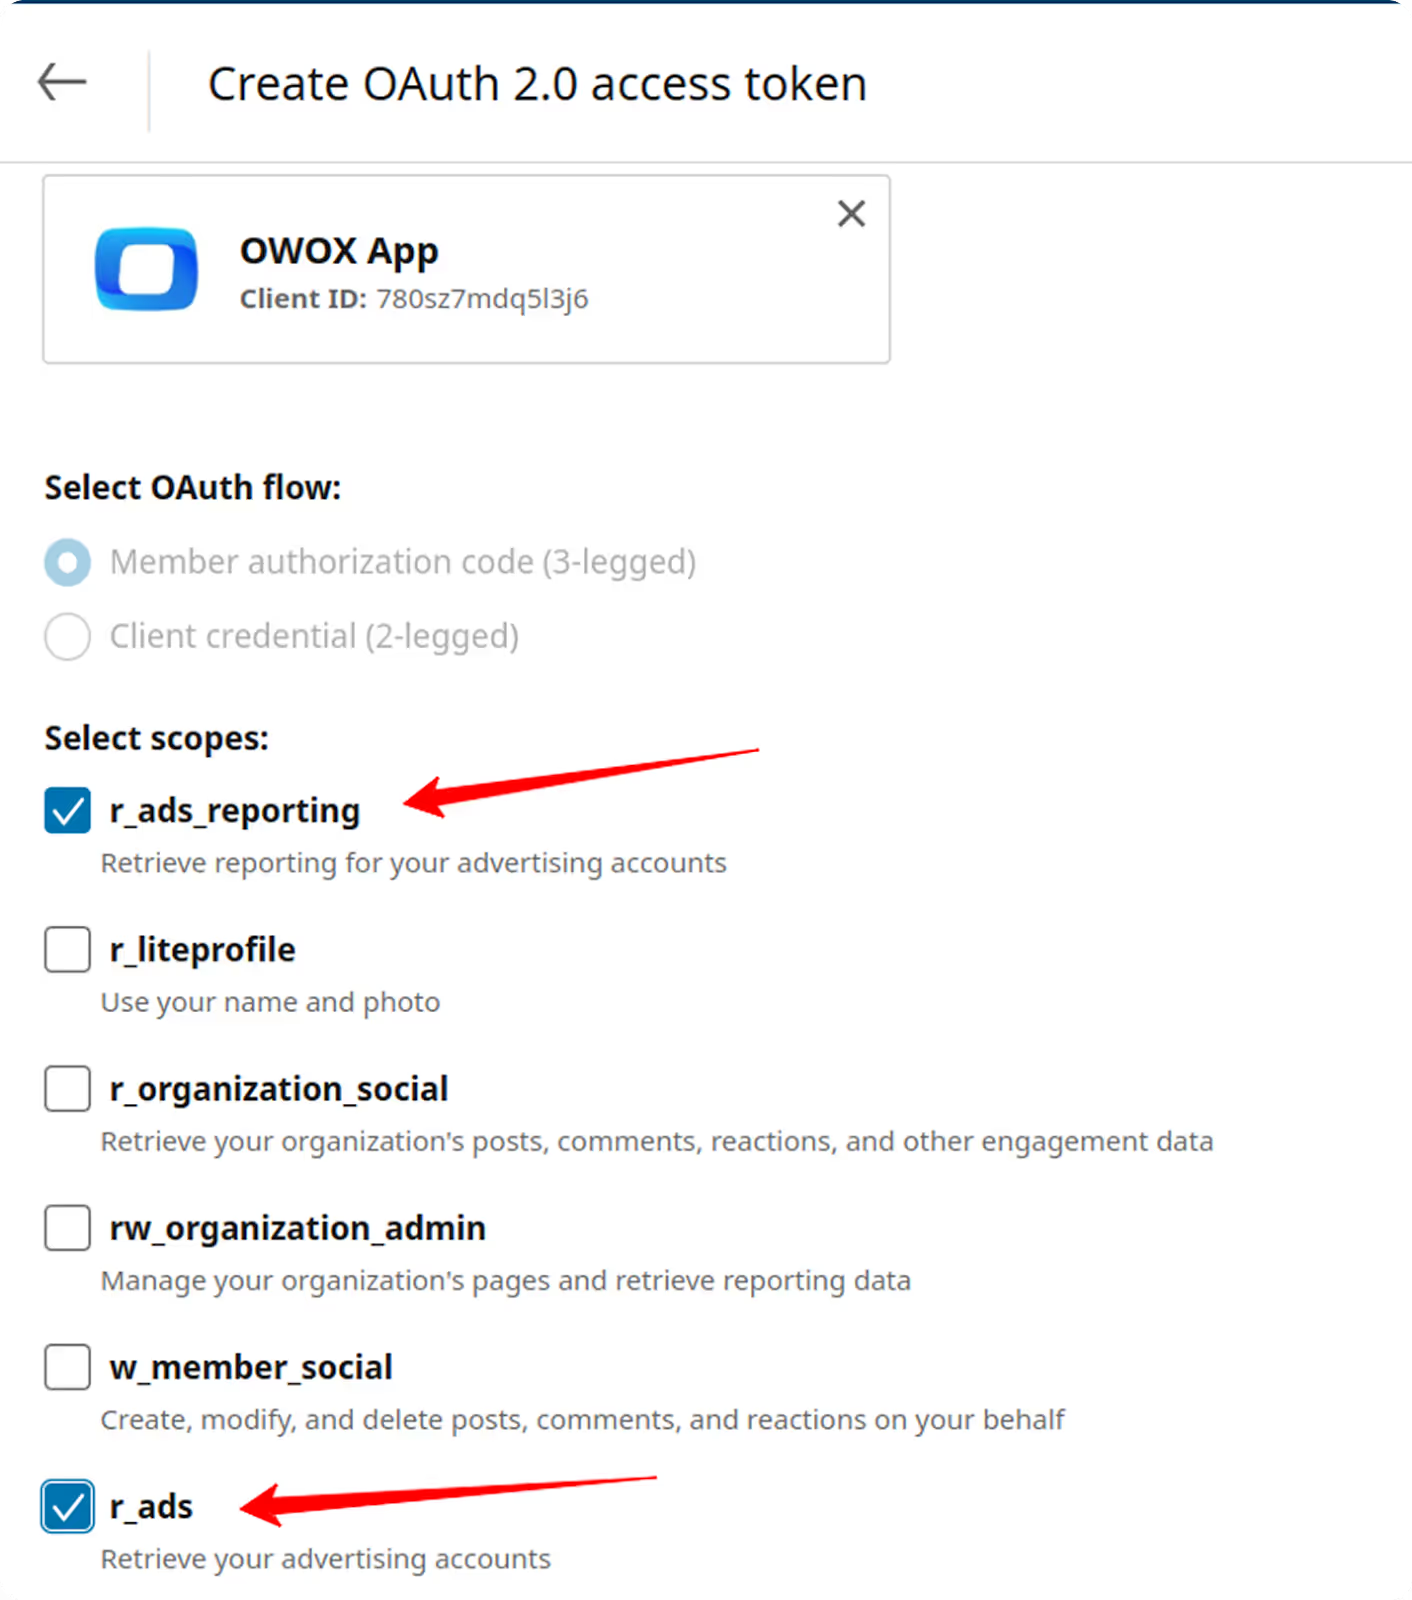
- Configure scopes:
- If you see the error: "There aren't any scopes available for this app…", it means the Advertising API access has not been granted yet.
- Ensure these two scopes are selected:
r_ads
r_ads_reporting
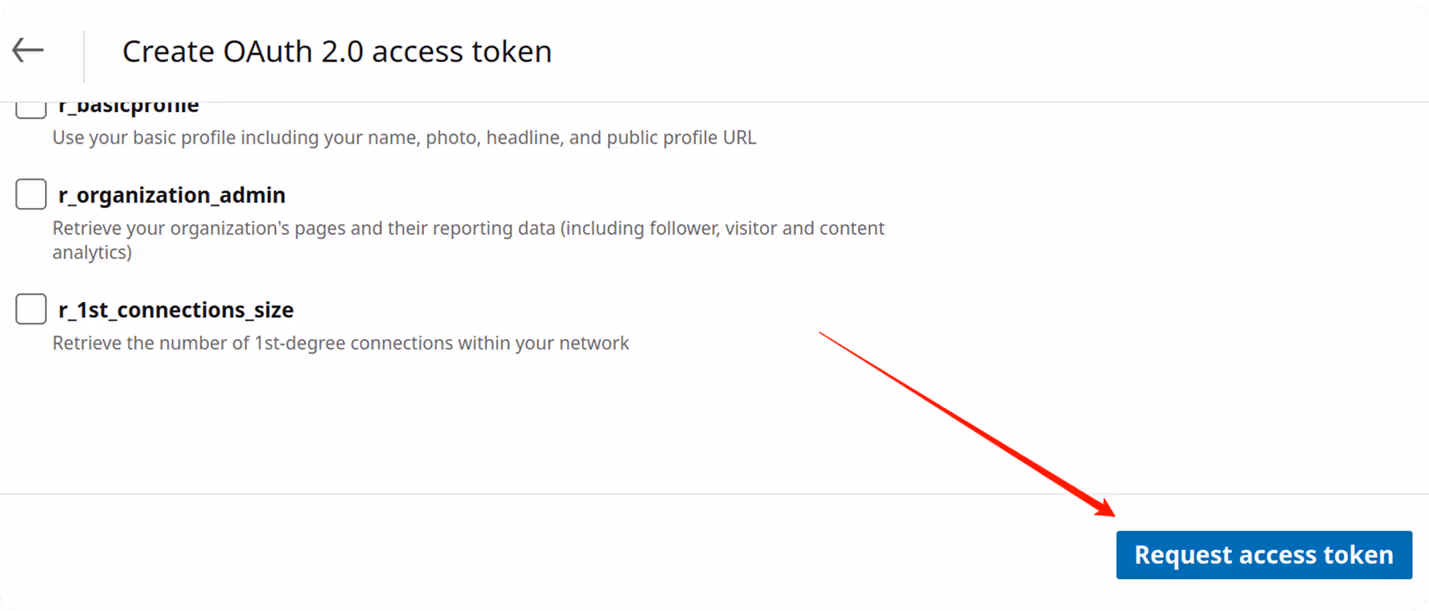
- Then click Request access token.
- Authorize and copy the token:
- On the next screen, click Allow to approve access.
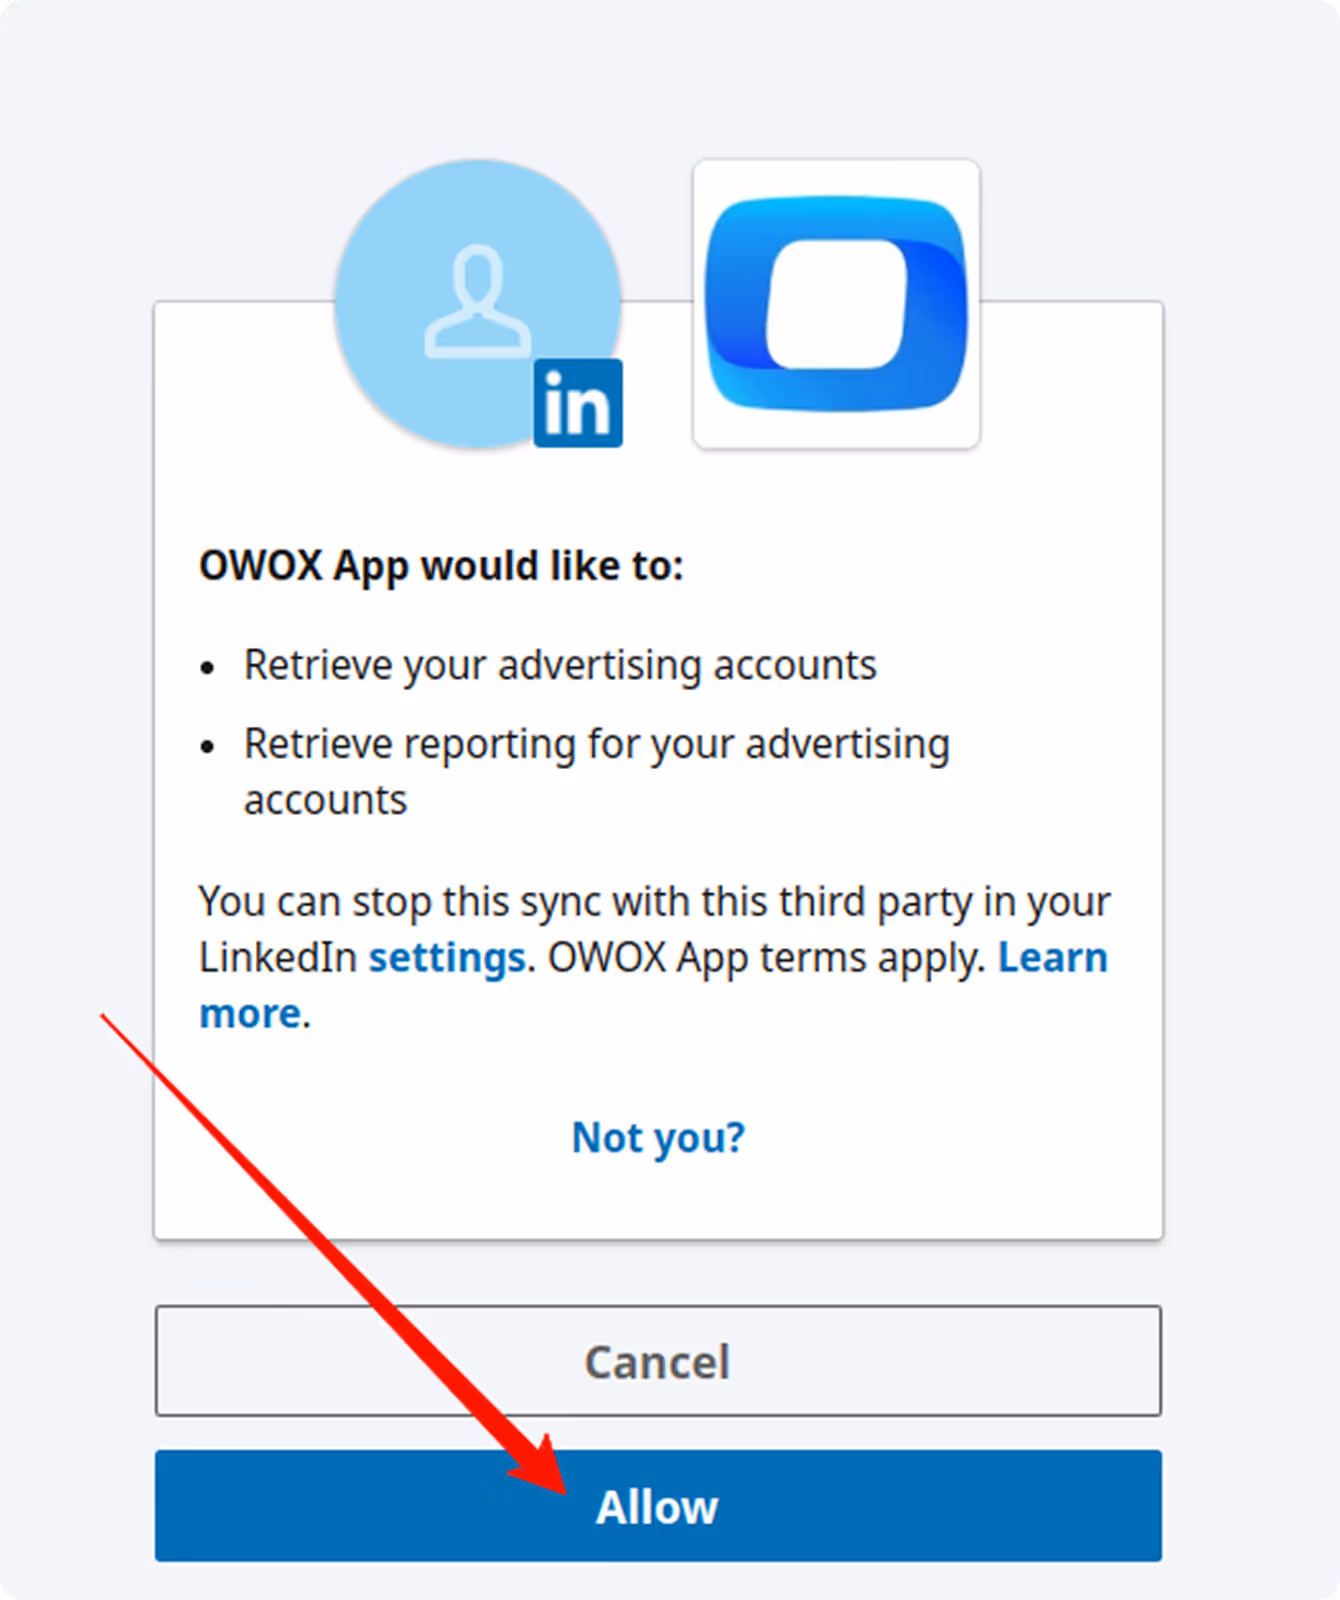
- Your access token will be created and ready to use.
- Copy and securely store the token – you’ll use it to authorize the OWOX template.
Note: Make sure you are copying the Access Token, not the Refresh Token. The Access Token is located at the top of the page.
Security Notes
- Keep your access token and app secret secure
- Don’t share credentials
- For production environments, always implement secure token refresh logic
Step 4: Configure LinkedIn Ads Connector and Run Your First Import ( ~2 min)
Now that you’ve retrieved your LinkedIn Ads access token, it’s time to configure the connector in OWOX.
1. Paste the Access Token
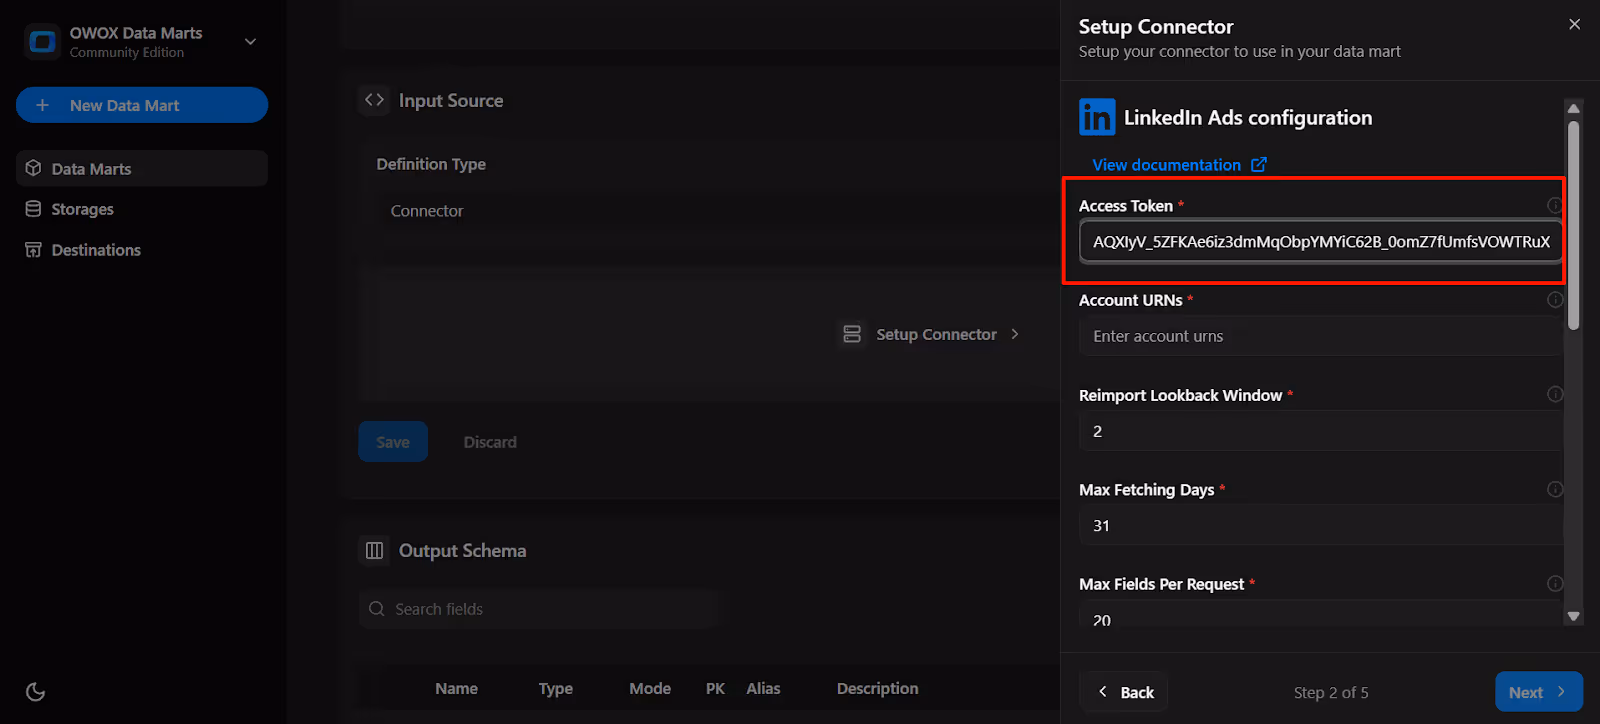
2. Find your Account URN:
- You can find this on your LinkedIn Ads homepage, look for it directly in the account interface.
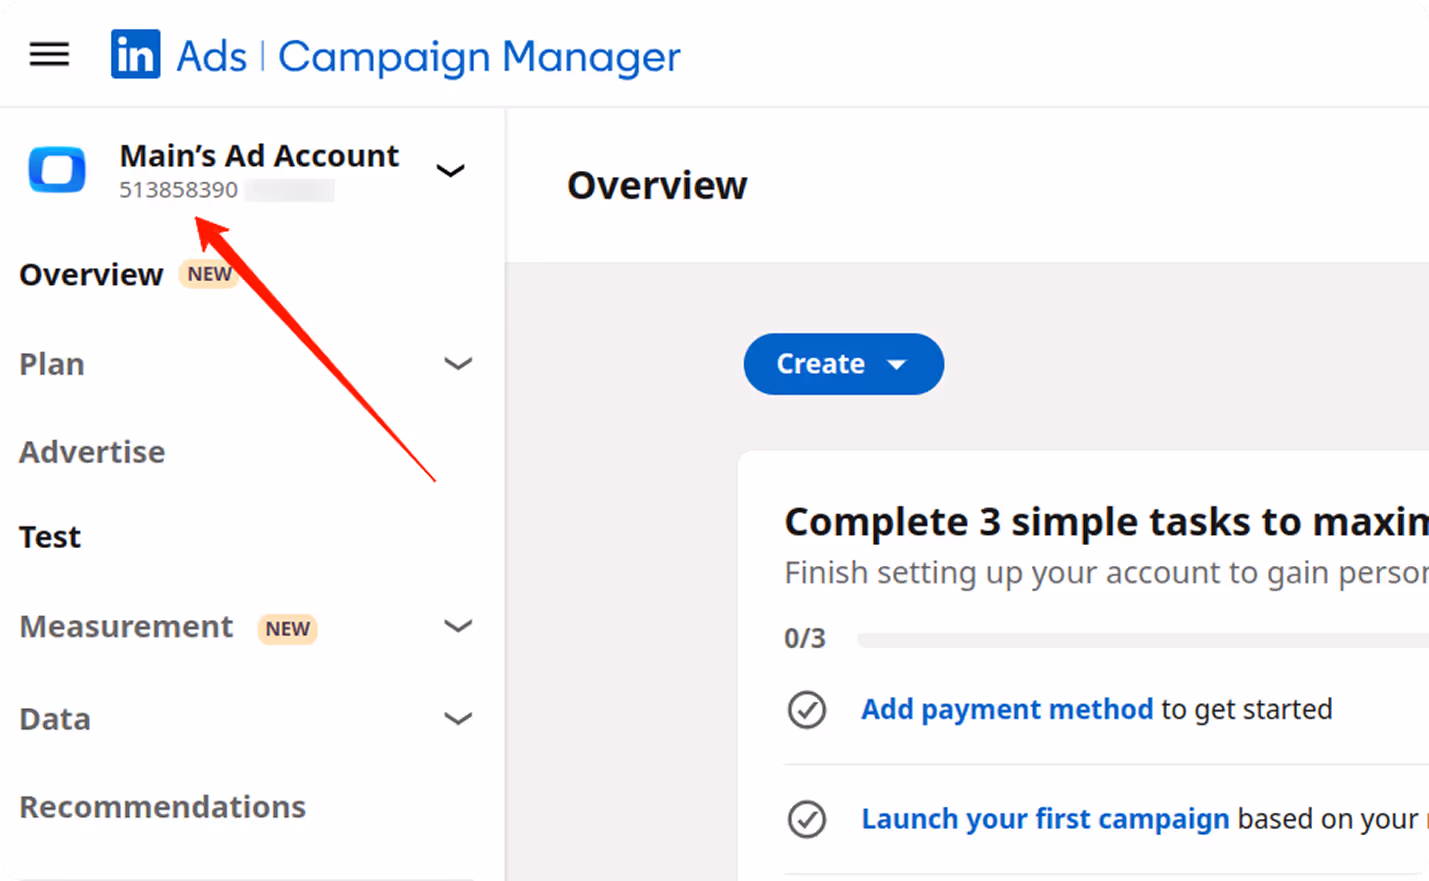
- Paste the Account URN

3. Start Date:
- Set the reporting start date (e.g., 2018-01-01). This determines how far back data will be fetched.
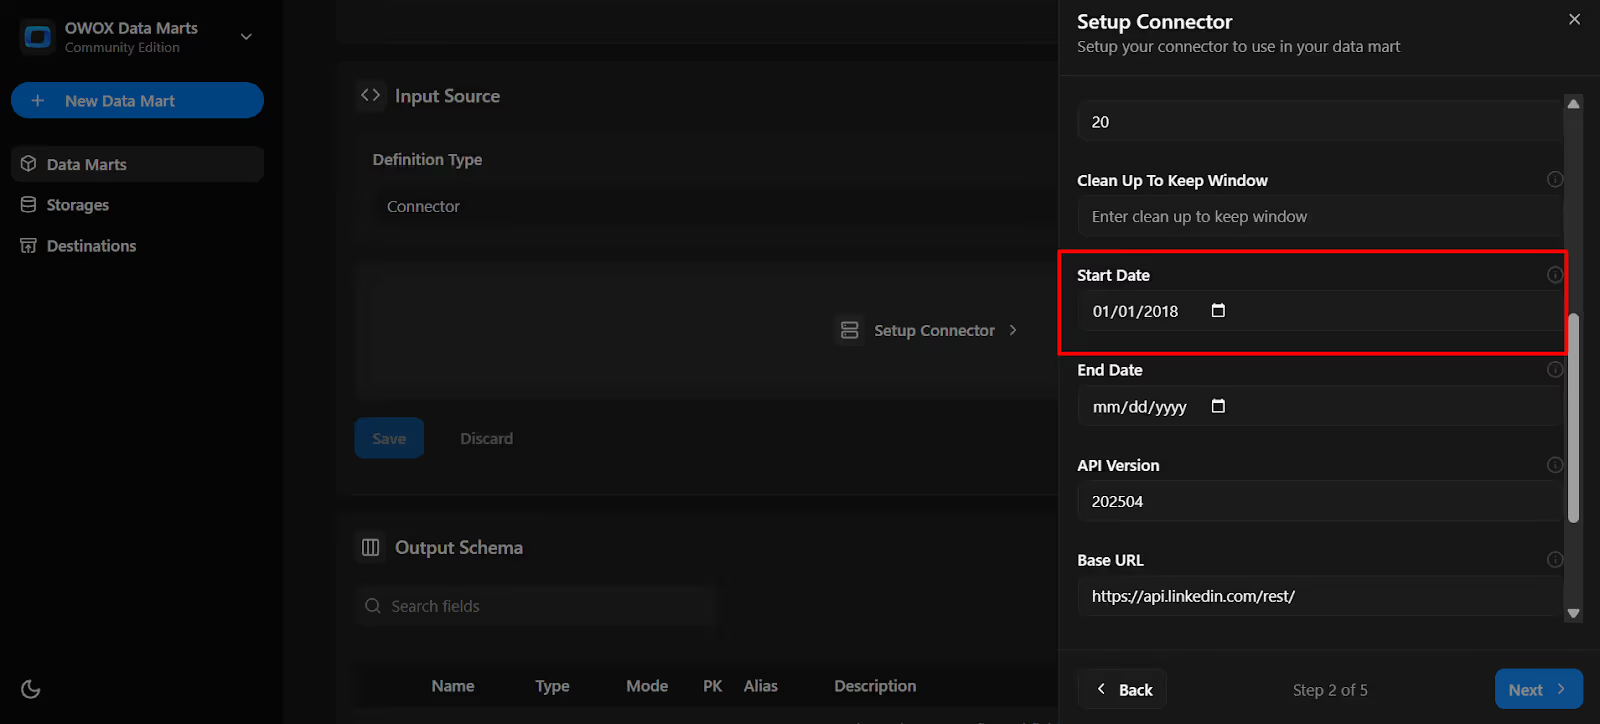
4. As you scroll down, additional parameter fields appear. For the first run, these are optional, and you can adjust them anytime later.
5. Click Next
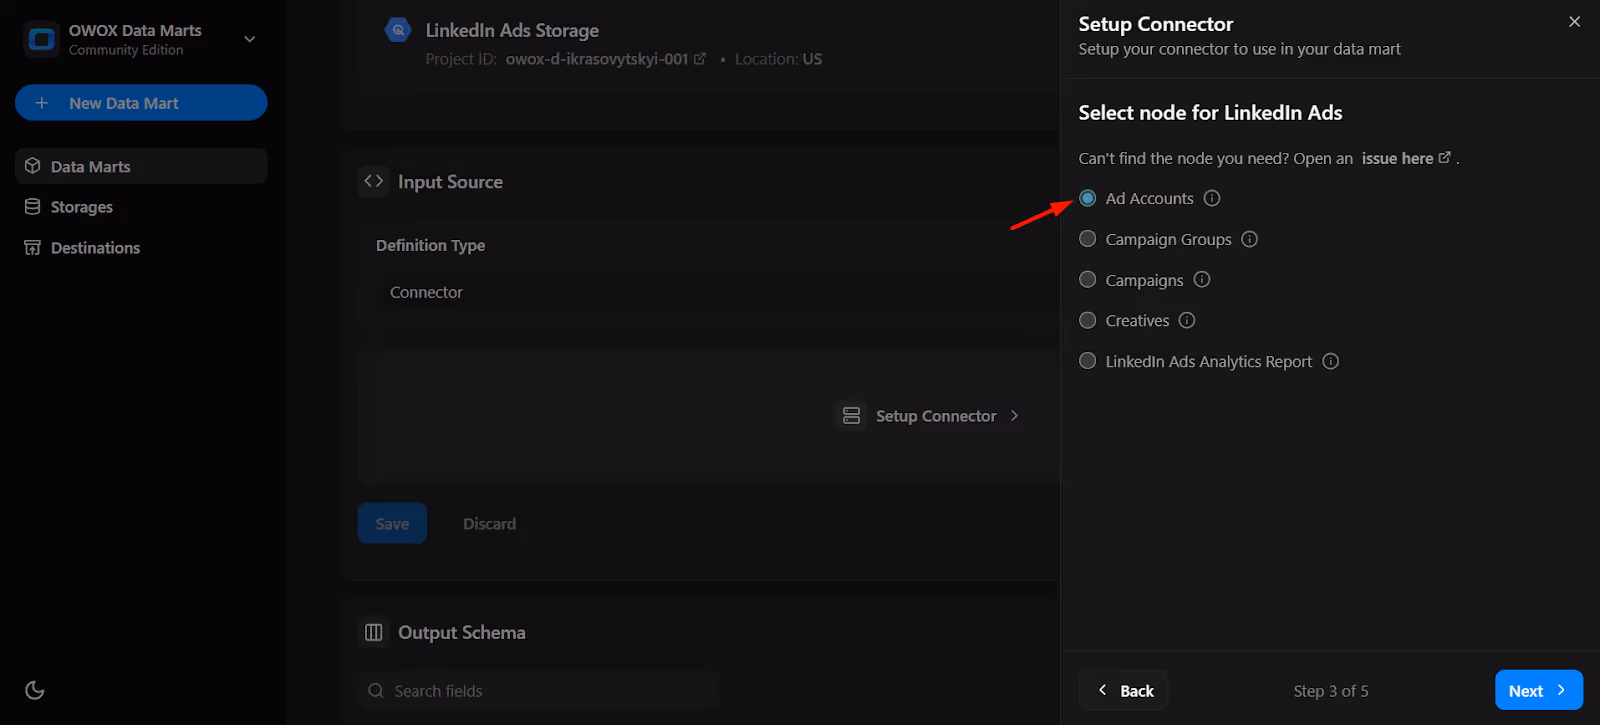
6. Endpoint: Choose from the following valid endpoints:
- Ad Accounts – General account-level information such as account details, currency, and status.
- Campaign Groups – Data about campaign groups, including objectives and grouping structure.
- Campaigns – Campaign-level details such as budget, targeting, and scheduling.
- Creatives – Information on individual ads and creative assets used in campaigns.
- LinkedIn Ads Analytics Report – Performance metrics like impressions, clicks, spend, and conversions.
👉 Tip for first-time setup: If you’re just getting started, begin with the Ad Accounts endpoint. It gives you essential account-level details like currency, status, and settings that provide a solid foundation for your reporting. Later, you can add Campaigns, Campaign Groups, or Creatives to enrich your data model with performance and targeting insights.
7. Select Fields for the chosen node.
- Select all available fields or choose specific metrics like currency, name, servingStatus, status and type based on your reporting needs.

8. Name the Dataset
- Enter the BigQuery dataset name where the imported data should be stored.
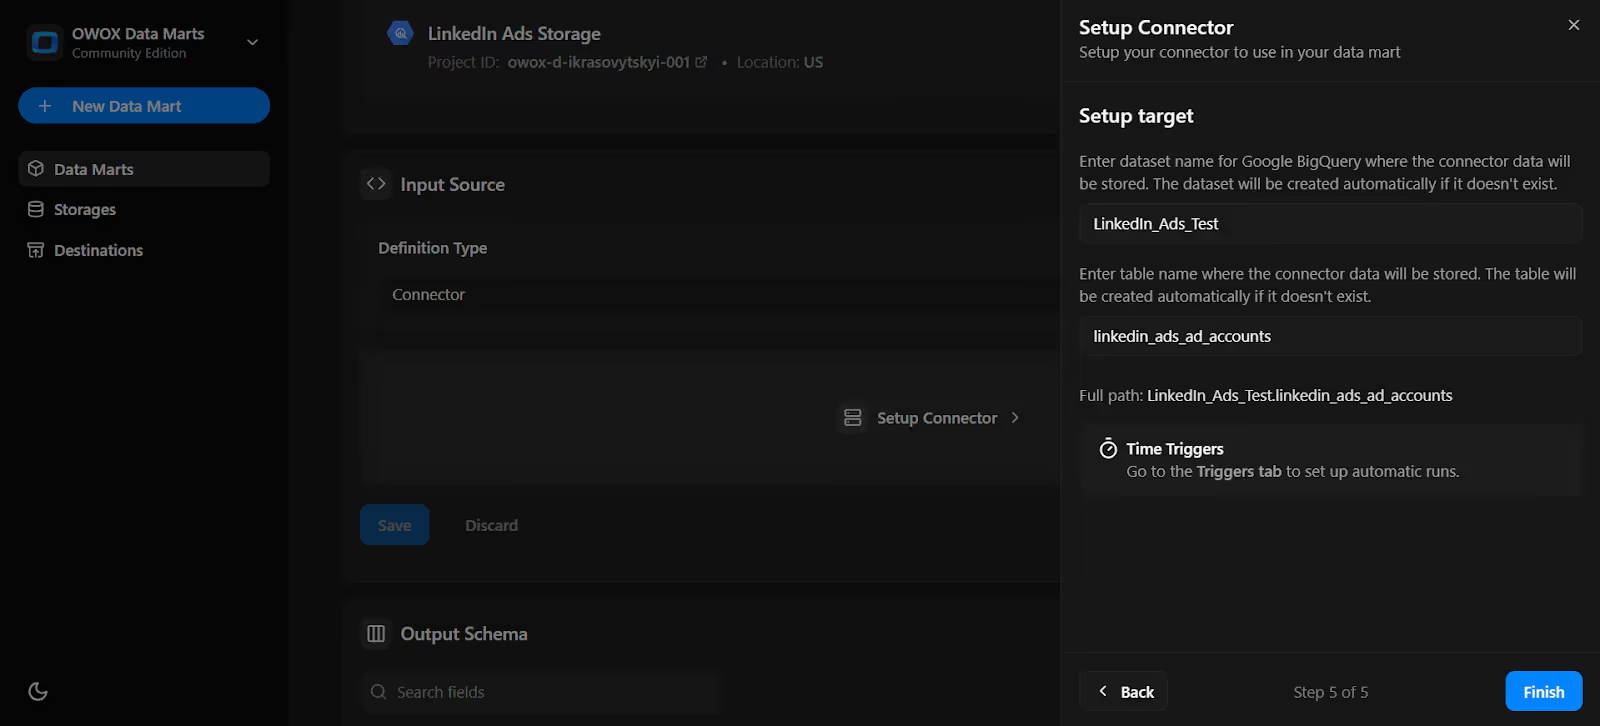
Note: If the dataset doesn't exist, OWOX will create it automatically during the import process.
9. Click 'Finish'
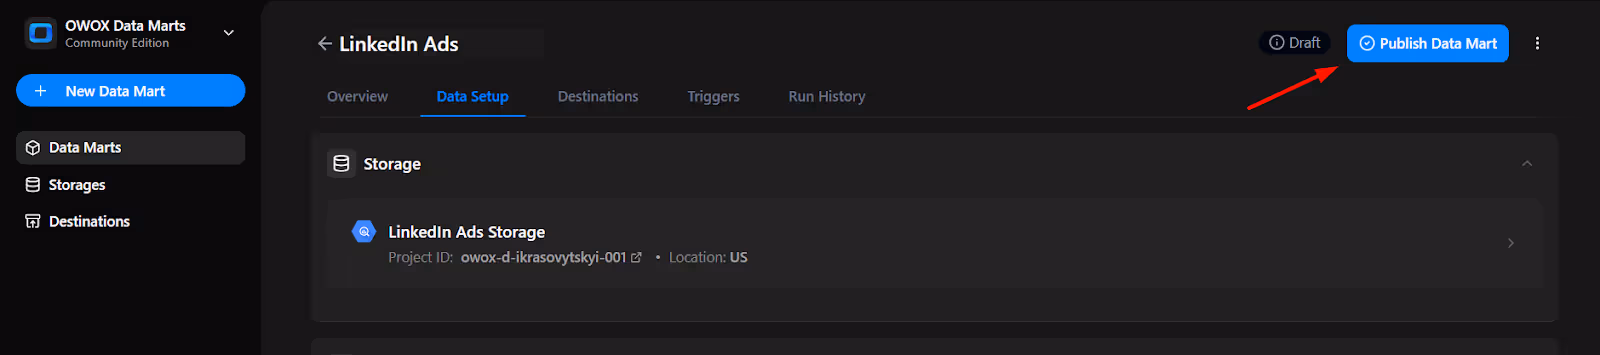
10. In the Data Setup Tab, Click 'Save'.

11. Click 'Publish Data Mart'.
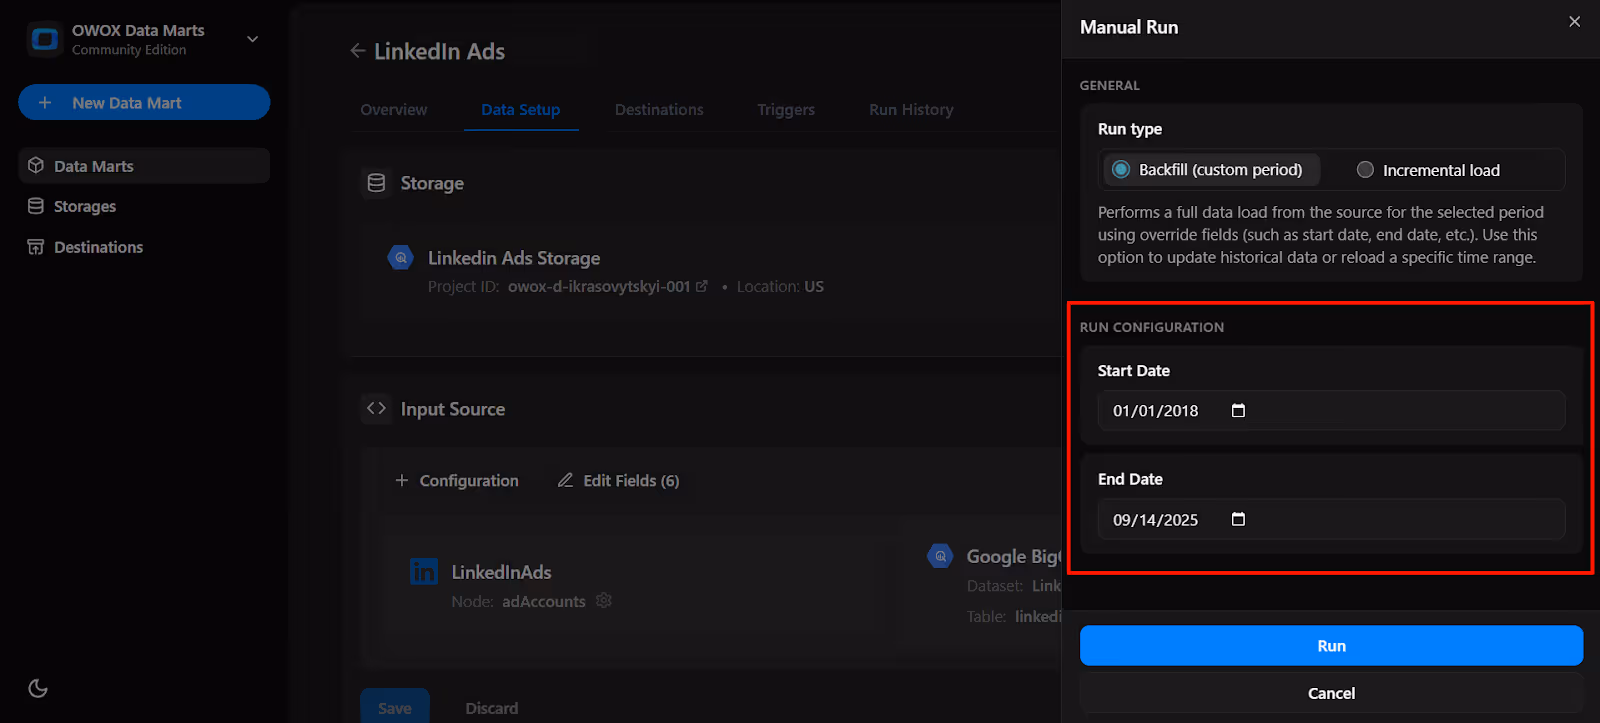
12. Click 'Manual Run' button or use the 3-dot menu.
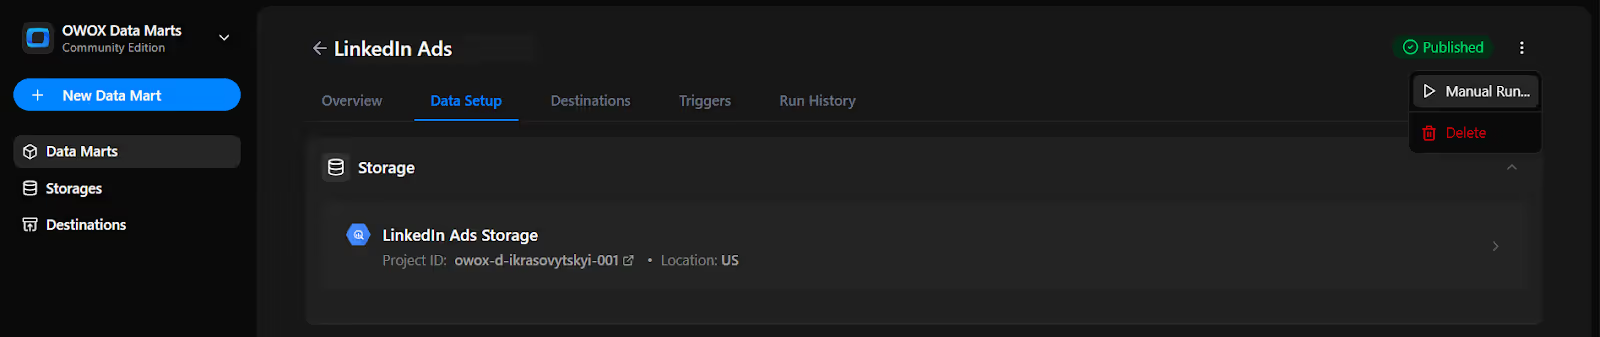
13. A configuration panel will appear to choose a Run Type. Select Backfill or Incremental Load. Then add the required start and end dates, then click Run to load the data.
Please Note: If you are setting up this connector for the first time, you need to go with the Backfill Run Type.
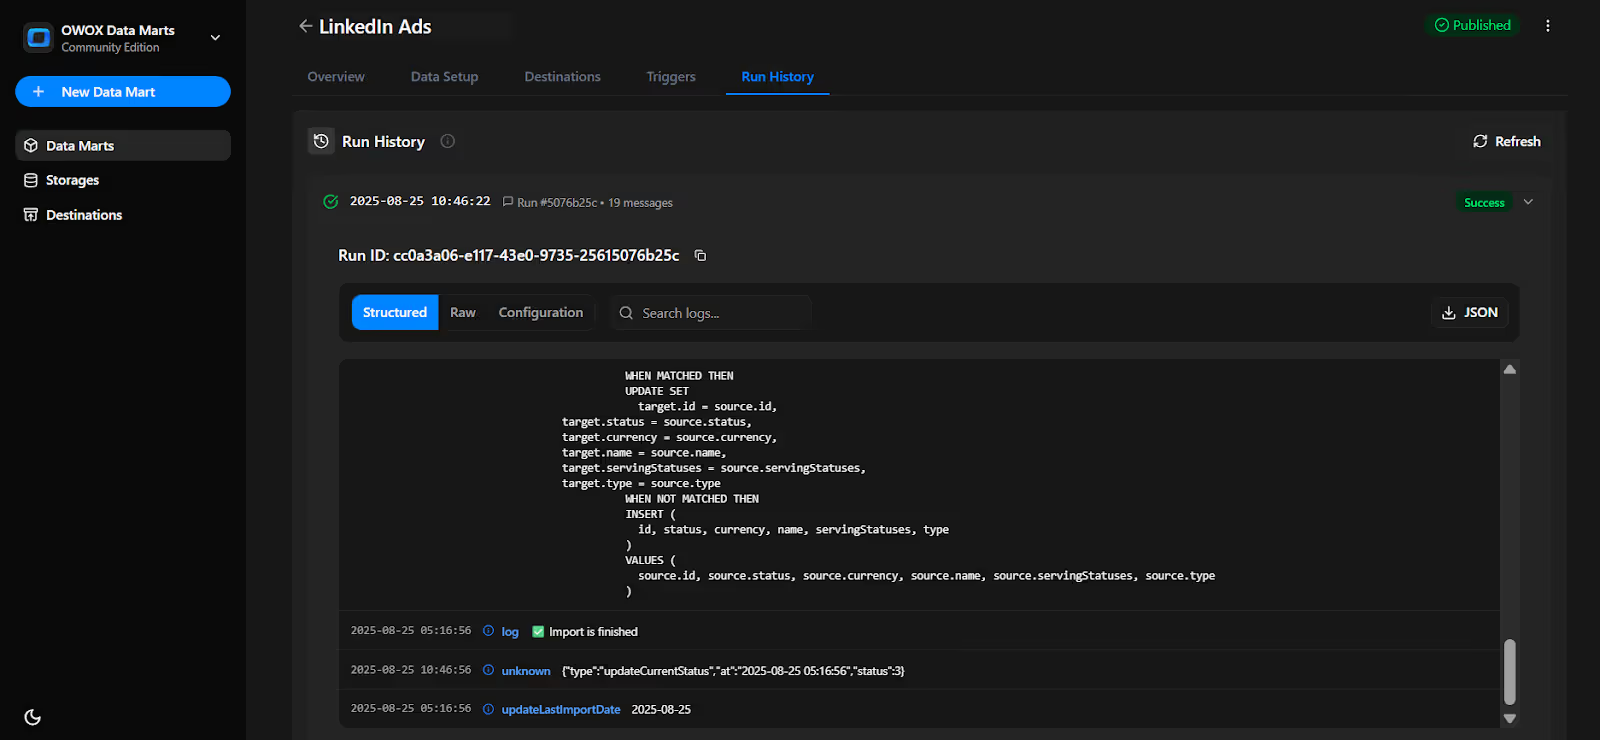
14. Go to 'Run History' and see the message: 'Success'.
Step 5: Schedule Automated Imports ( ~1 min)
Set up a trigger to pull data on a recurring schedule.
1. Go to the 'Triggers' tab in the new Data Mart
- Click 'Add Trigger'.
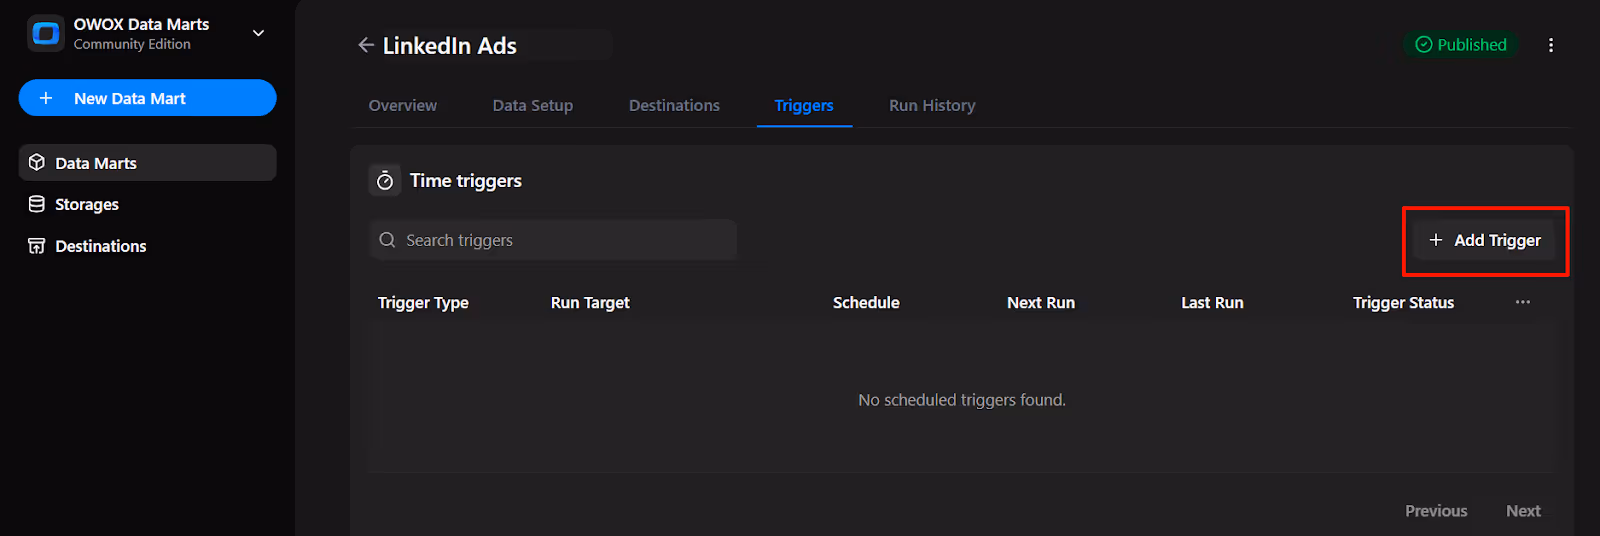
2. Configure:
- Choose the Trigger Type as Connector Run and the Schedule Settings: Daily / Weekly / Monthly / Interval.
- Set the Time (hour, minute, or second), days of the week, and choose your time zone.
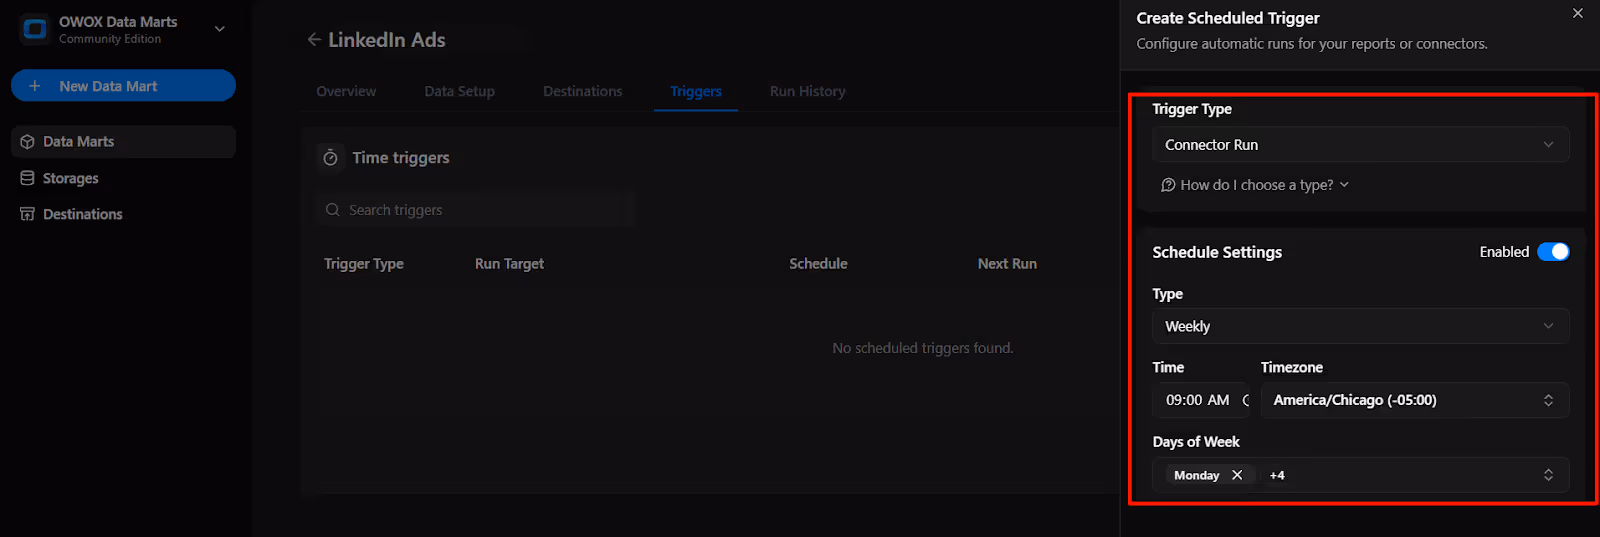
3. Click 'Create Trigger'.
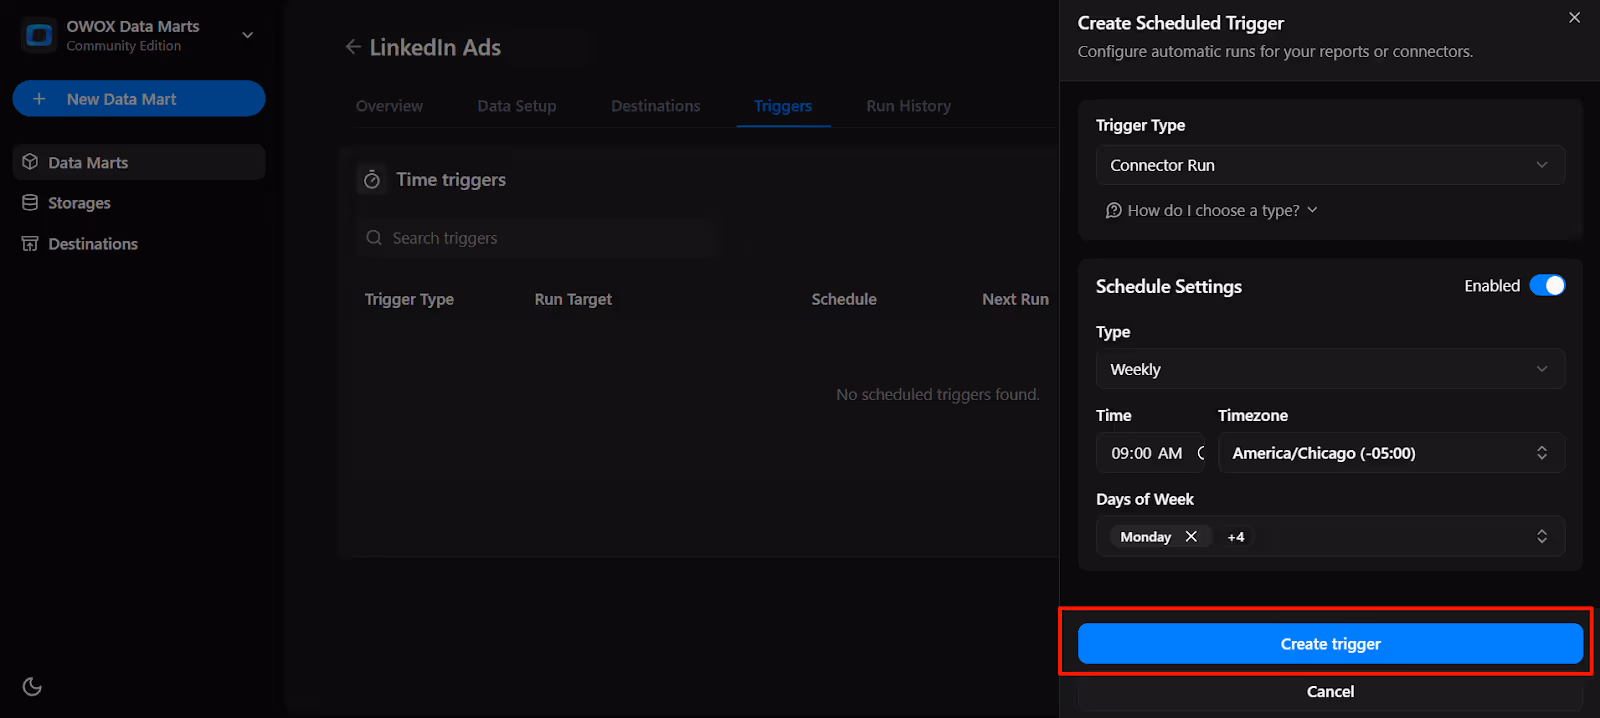
4. The trigger is now active and scheduled to run automatically on the defined days and at the defined time.

What’s Next?
This free LinkedIn Ads to BigQuery connector from OWOX Data Marts (Community Edition) moves us closer to making data ownership simple, transparent, and accessible to all.
Explore more resources below:
🔗 More free connectors – like X (Twitter) Ads, and Reddit Ads Connector for BigQuery
🎥 In-depth video tutorials – guiding you through setup and best practices
📊 Pre-built dashboard templates – so you can get reporting insights instantly
Explore our GitHub repo, drop us a ⭐ star, and help us shape a more open and transparent future for marketing analytics.
Frequently asked questions

.png)
.png)


Finally, a tool that doesn't ask business users to learn a new dashboarding UI. Our marketing team already knows Sheets. OWOX just delivers the right data.
Joinable data marts concept was the thing that sold us. We can now use the semantic layer without building one.
Self-hosted the OSS version on Digital Ocean. Zero vendor lock-in. Contributed a Shopify connector back in week two.