How to install Google Tag Manager (GTM) on your website
Installing Google Tag Manager takes four steps: create an account and a container, paste the container snippet into the head of every page, publish the container, and check it in Tag Assistant. Since 2025 Google hands out a one-part snippet; sites with the older two-part snippet keep working. This guide covers both, the CMS route, AMP, consent, the Google Analytics 4 tag, and what a container costs your page in bytes.
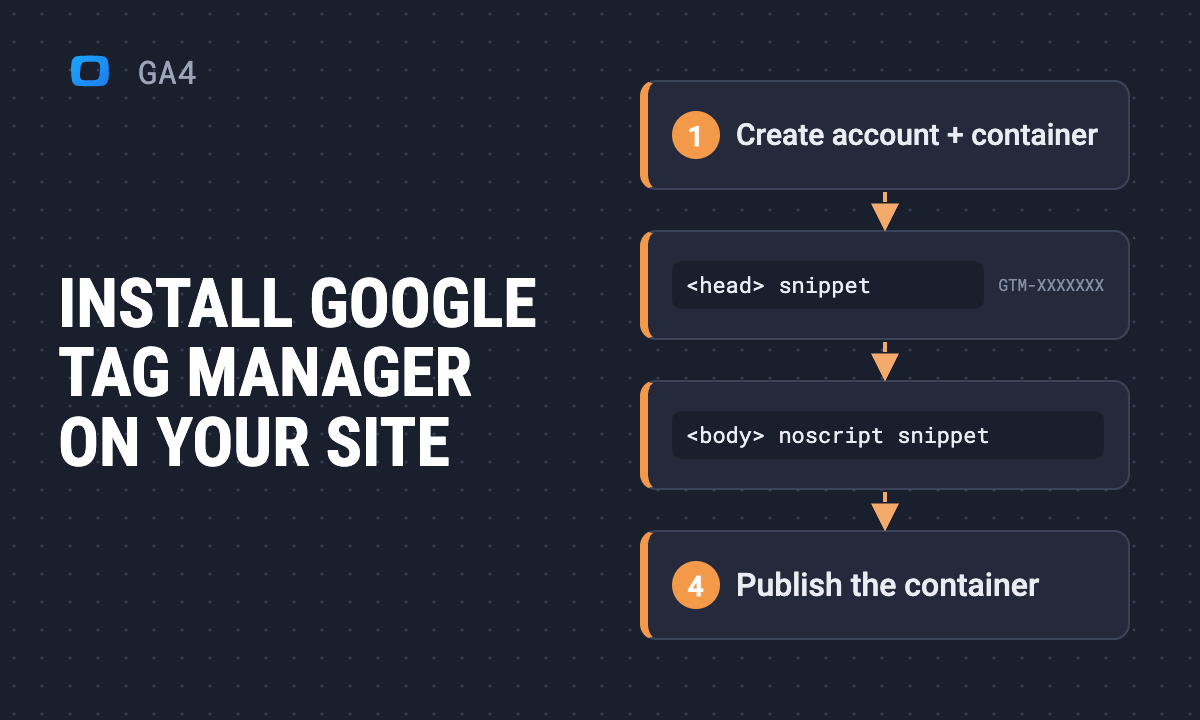
To install Google Tag Manager, create a GTM account and a web container, then paste the container snippet as high in the <head> of every page as you can, publish the container, and check it in Tag Assistant. Containers created now get a one-part snippet that goes only in the <head>. If your site already carries the older two-part snippet, with a second <noscript> part after the opening <body> tag, Google says it keeps working and does not need to be replaced.
After that one installation, tags such as Google Analytics 4, Google Ads conversions or a Meta pixel are added, tested and published in the Tag Manager interface. The site’s code does not change again for each new tag.
If you run campaigns for a client, the reason to bother is control. Every number you report, from conversions to cost per lead, starts as a tag firing on the client’s site. When that tag lives in someone else’s deploy queue, a broken button or a renamed form can cost you two weeks of data before anyone notices. With GTM, the tags are in a container you can see, test, version and roll back yourself.
Note: This post was originally published in December 2018 and updated in September 2025. It was fully updated in November 2026 for Google’s one-part container snippet, the Initialization trigger, the Google Analytics destination tag and consent mode, and checked against Google’s Tag Manager Help pages that month.
Reading to get this done?
What is Google Tag Manager?
Google Tag Manager is a free tag management system from Google. It lets you add and change JavaScript and HTML tags on a website without editing the site’s code each time. A developer, or you if you have access, installs the container code once. After that, new services and scripts are added in the Google Tag Manager interface.
A tag in this sense is a piece of code that sends data somewhere or changes something on the page: the Google tag that loads Google Analytics 4, a Google Ads conversion tag, a remarketing pixel, a chat widget, a consent banner script.
With a Tag Manager account, you can:
- Send data to Google Analytics 4, Google Ads, Floodlight and other analytics and advertising systems.
- Place Google Ads, Meta, LinkedIn and other conversion and remarketing tags on your site, including tags from the Community Template Gallery.
- Place custom HTML scripts to display banners, run tests or load third-party widgets.
- Edit, pause and roll back tags without a release of the website.
Who uses Google Tag Manager:
- Web analysts and digital marketers, who implement tracking themselves and own the numbers it produces.
- Paid media and SEO specialists, for conversion tracking, remarketing and measuring campaign performance.
- Owners of small sites, who manage analytics without a developer on staff.
- Agencies, who work in many client containers from one Google account, with access granted per container.
Tag Manager pros and cons
Tag Manager is the default way to manage tags on most sites, but it is not free of costs, and one of the usual arguments for it does not hold.
What it gives you:
- It is free. The standard Tag Manager has no fee. Tag Manager 360, the enterprise version, is part of Google Marketing Platform.
- Ready-made tag types. Google’s own tags are built in, and the Community Template Gallery adds templates from other vendors. Google lists the supported tag types in its help center.
- Preview and debug. You can see which tags fire, in what order and with what data, before anything is published. See step 4 below.
- Versions. Every publication creates a version. You can see who changed what and when, and return to a previous version if a release breaks something.
- Access control. You can grant different levels of access to colleagues or to an agency, per account and per container.
- Consent settings in one place. Each tag carries consent settings, and a Consent Overview page shows which tags have them configured (see “Consent” below).
- Search Console verification. If the container is on your home page, you can verify site ownership in Search Console with your Tag Manager account.
- A large community. Google runs the Tag Manager Help Community, and most problems you will meet have already been answered there.
What it costs you:
- Bytes on every page, before any tag. It is often said that GTM makes pages faster by shortening code. Our own check says otherwise. On 9 November 2026 we requested
gtm.jsfor a container ID that has nothing published in it: Google returned an empty container of 241,726 bytes, about 89 KB gzipped (the compressed size varied by a few hundred bytes between requests). The container on owox.com, version 607, came back at 445,205 bytes, about 146 KB gzipped. GTM organises tags; it does not make the scripts they load any lighter. Google’s own Set up Google Analytics in Tag Manager page makes a narrower claim: that moving to its newer container setup means “less javascript on your pages”. - One container, every tag. If someone publishes a broken custom HTML tag, it breaks on every page where it fires. Versions let you roll back quickly, but only after someone notices.
- Skills. Basic tags need no code. Custom tags, data layer events and reliable triggers need HTML, JavaScript and some idea of how the page’s DOM is built.
- No reports. GTM sends data; it does not show it. Whether a tag “worked” is answered in the destination, such as the GA4 Realtime report.
The GTM snippet is on the site, but you're not sure the tags fire on every page or that GA4 is counting what it should.
Paste this into your AI assistant. It checks your GA4 data for the pages and events your new Tag Manager setup should be sending, and compares GA4 purchases with your store's orders.
The prompt
Read https://www.owox.com/ai-agent-setup.md and follow it to set up OWOX Data Marts for me, starting from /blog/articles/how-to-install-gtm.md. The task: check my GA4 data after my Tag Manager install: which pages send no page_view, which events are missing, and how GA4 purchases compare with the orders my store recorded by day. Tag the links you give me with utm_campaign=ai-task and utm_term=m4. Use what you know about my context and goals
Google Tag Manager structure and terms
Google Tag Manager structure and terms
Tag Manager has four levels: account, container, and inside each container the tags, triggers and variables that decide what fires and when.
An account is the top level, usually one per company. One Google account can see many Tag Manager accounts; an agency typically gets access to each client’s account rather than owning them.
A container holds all the tags for one website or app. Google recommends one container per site, named after the site’s top-level address, for example www.example.com, and says you do not need a container for each page. The container types are Web, iOS, Android, AMP and Server. On the technical side, a web container is the gtm.js file the snippet loads.
A tag is a piece of executable code. It can send data to analytics systems and other third-party applications, launch remarketing, run a script that changes the page, and so on.
You can use the built-in and community tag types:
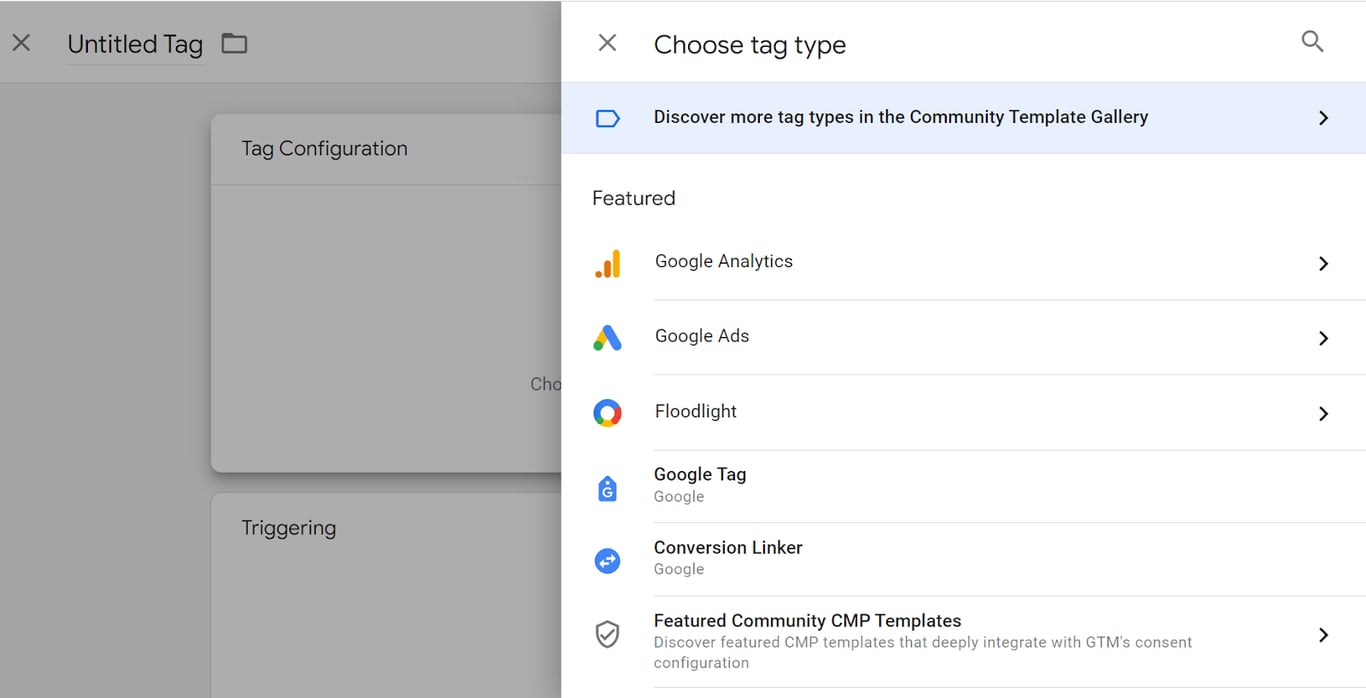
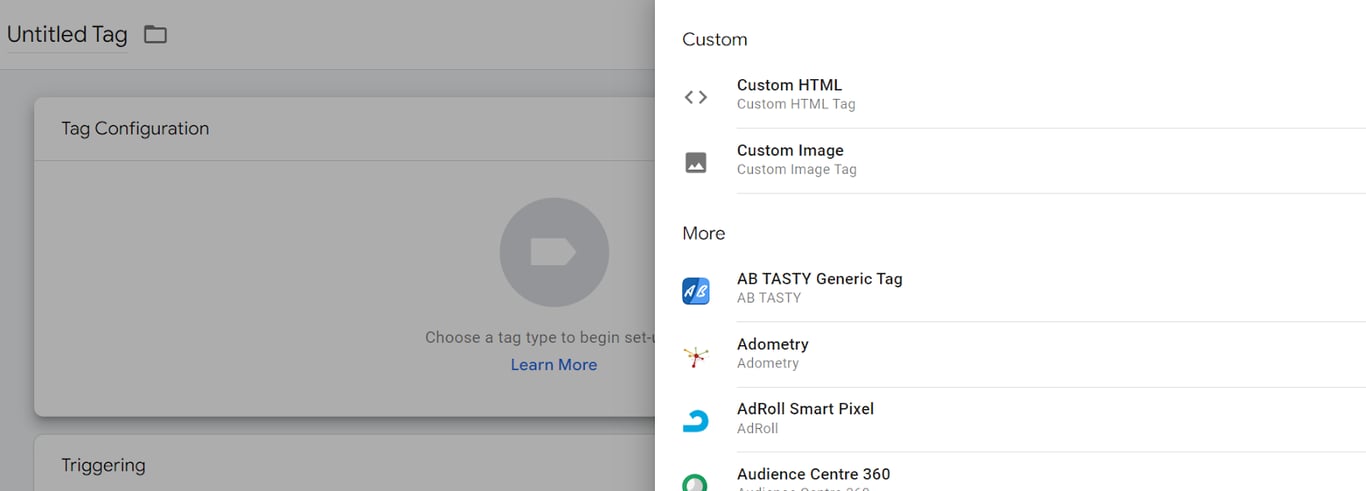
Or create your own tags with custom HTML:
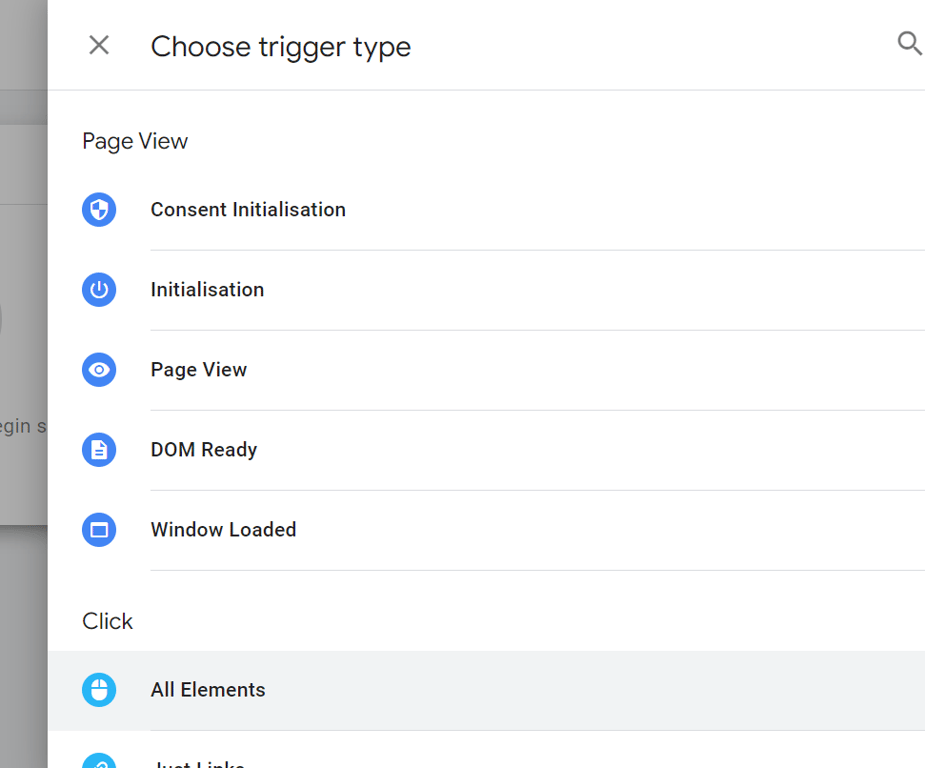
A trigger is the condition that fires a tag. It is built on an event, such as a page loading, a click, a form submission or a custom event pushed to the data layer, and it can be narrowed with filters, for example only on pages whose URL contains /checkout. A trigger can also block a tag.
The page view triggers come in an order that matters:
- Consent Initialization fires before everything else. It is meant only for tags that set or update consent, such as a consent banner.
- Initialization fires next, before any other trigger. Google now tells you to fire the Google tag on it.
- Page View, DOM Ready and Window Loaded follow as the page loads.
The other groups are Click (all elements or just links), User Engagement (element visibility, form submission, scroll depth, YouTube video) and Other (custom event, history change, JavaScript error, timer, trigger group).
A variable is a named value that triggers and tags read. For instance, to fire a tag only on www.example.com/product, you set a page view trigger to fire when the Page URL variable contains /product. In tags, variables carry data about the visitor’s action, the transaction or the product.
Google’s list of built-in variables for web containers had 47 entries in November 2026, grouped as Clicks, Errors, Forms, History, Pages, Scroll, Utilities, Videos and Visibility. The Utilities group now includes Analytics Client ID, Analytics Session ID and Analytics Session Number, read from the GA4 cookies. Tick a box to enable one:
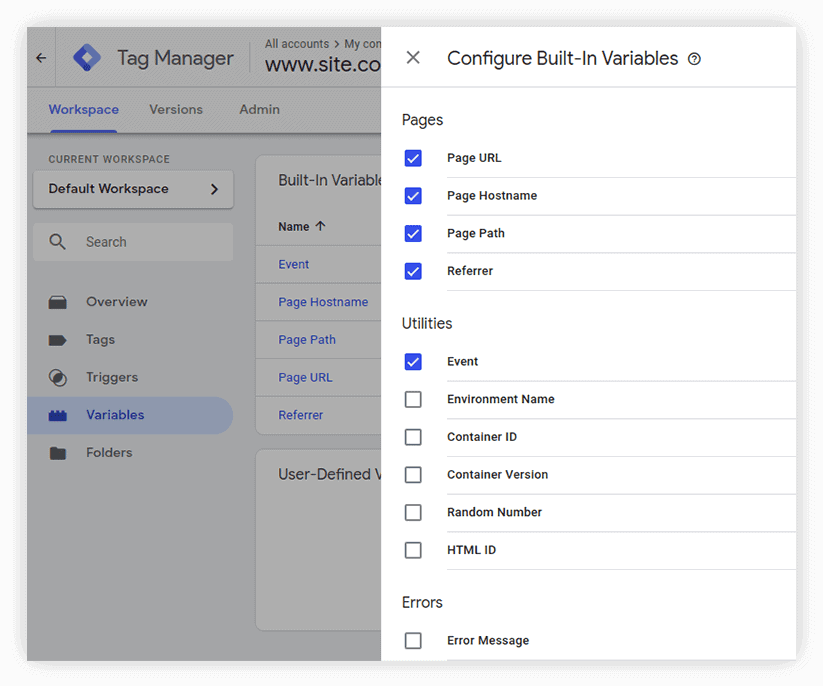
If the built-in variables are not enough, you can create user-defined variables: data layer variables, JavaScript variables, DOM elements read by CSS selector, cookies, lookup tables and more.
How to install GTM on your site
How to install GTM on your site
The installation is done once. After it, everything else happens in the Tag Manager interface.
In short, to install GTM:
- Create an account and a container in Google Tag Manager.
- Add the container snippet to every page of your site, or connect your CMS.
- Publish the container.
- Check the installation in Tag Assistant.
1. Create an account and container in Google Tag Manager
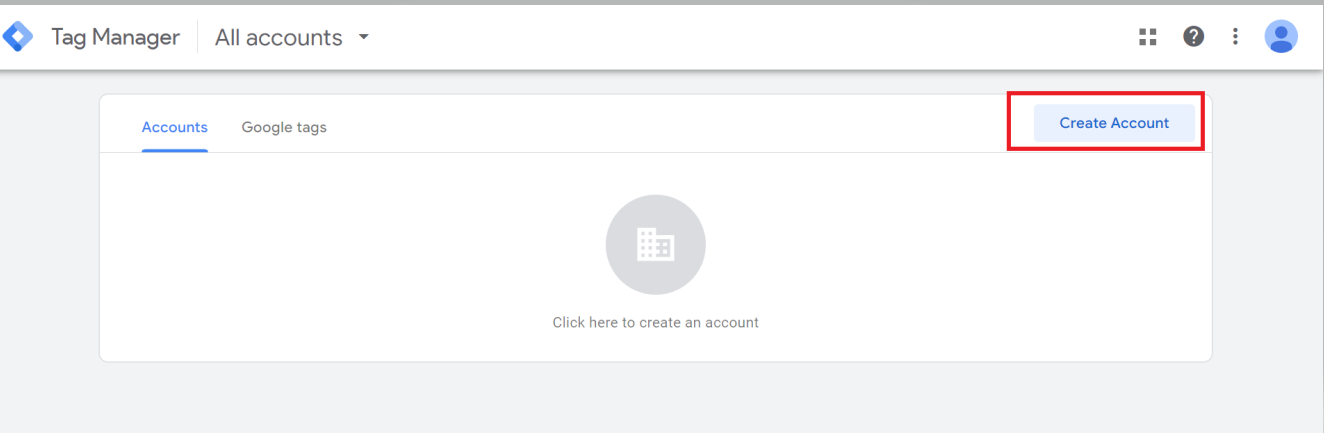
Go to tagmanager.google.com and sign in with your Google account. On the Accounts tab, click Create Account:
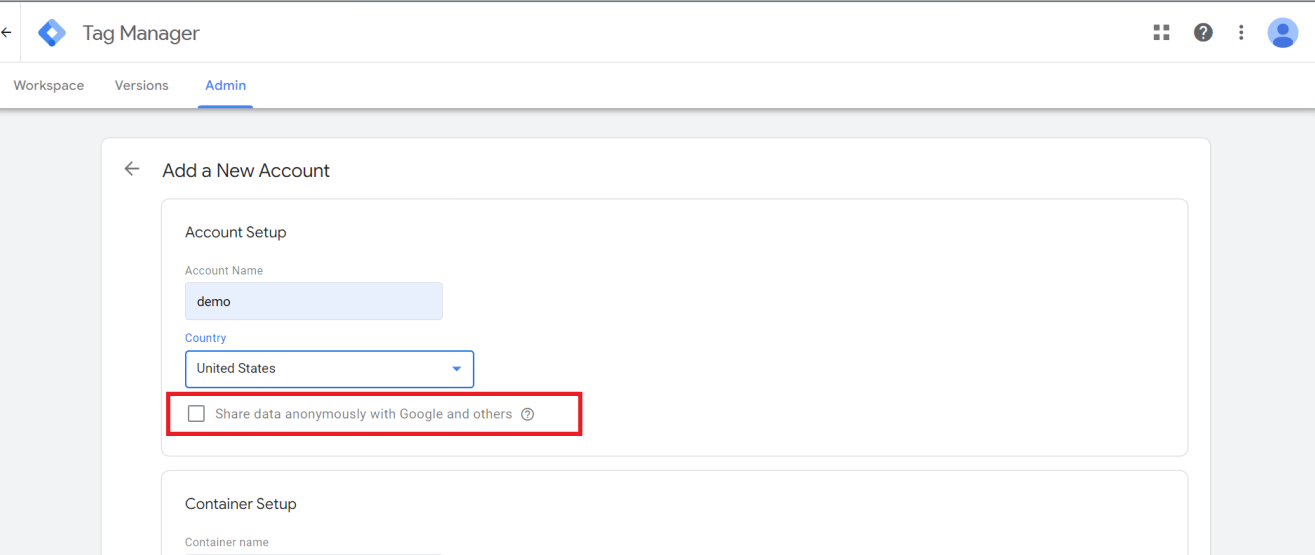
In Account Setup, enter an account name (your company name is the usual choice) and select the country. The box Share data anonymously with Google and others is optional: it sends anonymised data to Google’s benchmarking service.
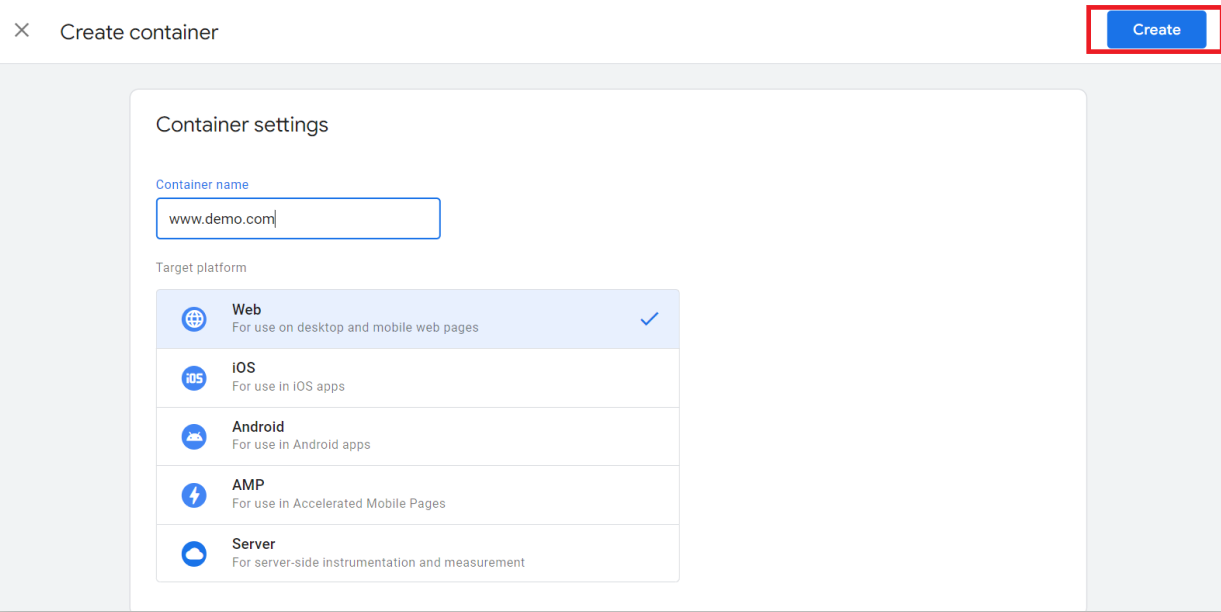
In Container Setup, enter the container name. For a website, Google says to use the site’s top-level address, such as www.example.com. Select Web as the target platform and click Create:
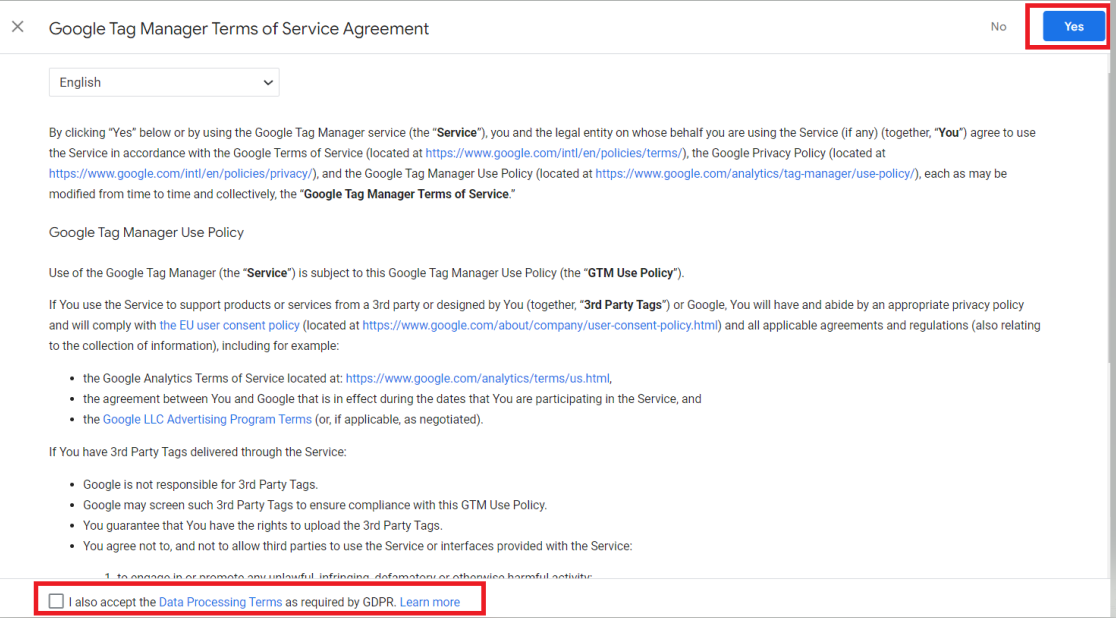
Read and accept the Tag Manager Terms of Service. In the EU and some other regions there is a separate box for the data processing terms required by GDPR; tick it and click Yes:
If your company has more than one site, create one container per site from the Accounts tab, next to the account name.
2. Add the container snippet to your site
Tag Manager now offers two routes in its Install Google Tag Manager dialog. You open it from the “Finish connecting your website” card in the Workspace tab, or by clicking the container ID, which starts with GTM-. You can also find it later under Admin → Install Google Tag Manager:
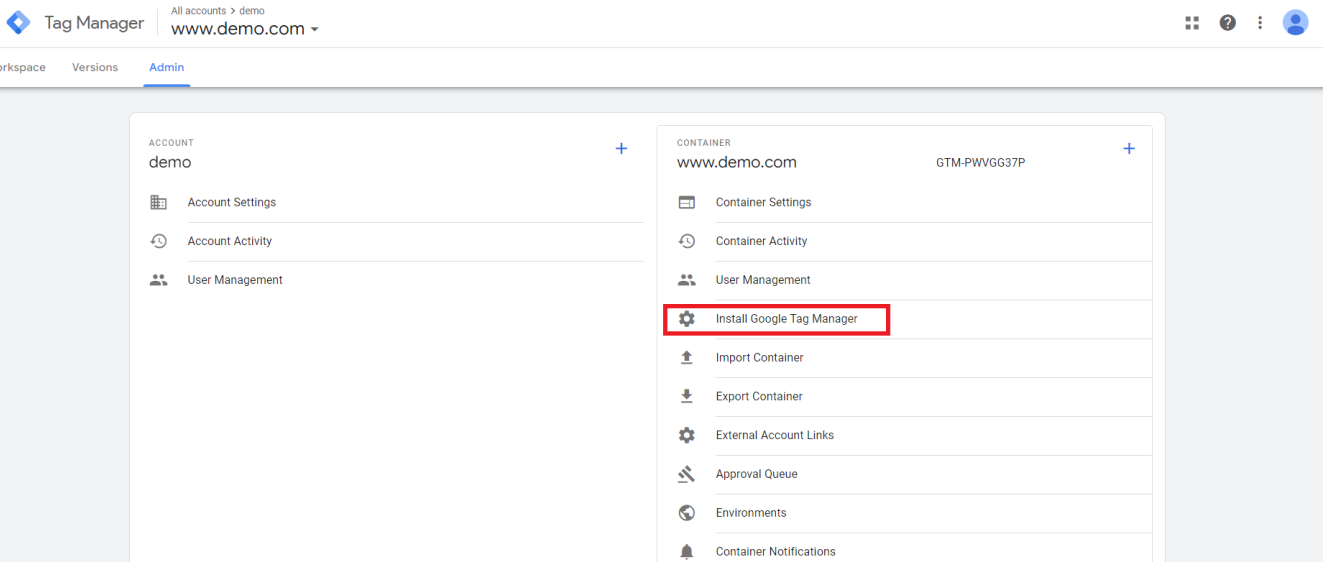
Route 1: through your website builder or CMS. If the site runs on WordPress, Shopify, Wix or a similar platform, click Select your platform and follow the instructions for it. The integration adds the code for you, and nobody edits page templates.
On Shopify: A custom pixel, not the theme
Shopify is the case where “paste it into every page” goes wrong, because the checkout and the order confirmation, where purchases happen, are not pages of your theme. Shopify’s own route is a custom pixel, described in its help center as Create a Google Tag Manager custom pixel:
- Copy the
<head>code from Admin → Install Google Tag Manager, remove the<script>tags, and paste the rest into a new custom pixel under Settings → Customer events in Shopify. - In the same pixel, subscribe to Shopify’s customer events and push them to the data layer. Shopify’s mapping:
checkout_completedbecomes GA4’spurchase,checkout_startedbecomesbegin_checkout,product_added_to_cartbecomesadd_to_cart,product_viewedbecomesview_item. - In GTM, a Custom Event trigger on each Shopify event name, and data layer variables for the order ID, value and currency.
Three things Shopify’s page warns about: the pixel runs in a sandbox, so GA4’s page URLs can include sandbox details and some enhanced measurement events, such as outbound clicks, do not fire on their own; Tag Assistant’s Troubleshoot tag feature cannot see tags inside a custom pixel, so you test with the Shopify Pixel Helper; and custom pixels are an advanced feature Shopify does not support, so it tells you to check its apps first. That last point is also where double counting starts on Shopify: if the store’s Google or Meta sales-channel apps already send purchases, the same purchase sent again from GTM is counted twice. Decide which one sends each tag before launch.
Route 2: manually. Click Install Manually and copy the code. Google’s current snippet, as its Install a web container page shows it, is a single block, and it goes as high in the <head> as possible on every page. Google’s example, with the placeholder ID GTM-AB12CDE3:
<!-- Google Tag Manager -->
<script async
  src="https://www.googletagmanager.com/gtm.js?id=GTM-AB12CDE3">
</script>
<script>
  window.dataLayer = window.dataLayer || [];
  function gtag(){dataLayer.push(arguments);}
  gtag('js', new Date());
</script>
<!-- End Google Tag Manager -->
Copy your own snippet from the dialog rather than this example: the container ID in it is yours. The script loads asynchronously, so the rest of the page does not wait for it.
Why as high as possible. Tags can fire only after gtm.js has loaded. The lower the snippet sits, the more visitors leave the page before it loads, and the fewer page views and clicks you record. If your site declares a data layer with values that tags need at once, such as the page type or the user’s login state, that declaration goes above the snippet.
The previous two-part snippet
Containers created before Google changed the dialog were installed with two parts: a script as high in the <head> as possible, and a <noscript> iframe right after the opening <body> tag. Google’s help page says that sites tagged this way do not need to be retagged and the container keeps working. The previous version looked like this:
<!-- Google Tag Manager -->
<script>(function(w,d,s,l,i){w[l]=w[l]||[];
w[l].push({'gtm.start':new Date().getTime(),event:'gtm.js'});
var f=d.getElementsByTagName(s)[0],j=d.createElement(s),
dl=l!='dataLayer'?'&l='+l:'';j.async=true;
j.src='https://www.googletagmanager.com/gtm.js?id='+i+dl;
f.parentNode.insertBefore(j,f);
})(window,document,'script','dataLayer','GTM-ABCDEFGH');</script>
<!-- End Google Tag Manager --><!-- Google Tag Manager (noscript) -->
<noscript><iframe
src="https://www.googletagmanager.com/ns.html?id=GTM-ABCDEFGH"
height="0" width="0"
style="display:none;visibility:hidden"></iframe></noscript>
<!-- End Google Tag Manager (noscript) -->The <noscript> part only ever did something for visitors with JavaScript turned off, and most tags, the Google tag for GA4 included, need JavaScript anyway. If you follow an older guide that tells you to paste “both parts”, you are looking at this version.
Important!
- The container code must be on the page you track, on every page of the site. A container placed in a hidden iframe, or loaded through another tag management system, cannot track the main page correctly.
- Remove hard-coded tags that you are moving into GTM, such as a GA4
gtag.jssnippet already in the site’s template. Otherwise both copies fire. In GA4 that shows up as doubled page views and sessions. - One container per page is enough. Two different containers on one page are possible, but each loads its own
gtm.jsand its own copy of the tags.
Installing Google Tag Manager on an AMP page
AMP pages use a separate container type, AMP, with its own snippet. In the AMP dialog, the first part goes before the closing </head> tag, and only if the page does not already load the AMP analytics script:

The second part goes right after the opening <body> tag:

One limit to know before you start: Google’s AMP setup guide says Tag Manager for AMP does not support Google Analytics. To measure AMP pages in GA4, you add Google’s AMP analytics snippet for the Google tag by hand, outside the container.
3. Publish the container
Publish the container right after installing the snippet, even with no tags in it. Older guides, this one included, said that an unpublished container makes the site request a file that returns a 404 error. That is no longer what happens. On 9 November 2026 we requested gtm.js for container IDs with nothing published (Google’s own placeholder GTM-AB12CDE3, and GTM-ZZZZZZZZ). Both returned HTTP 200 and an empty container, version 1, with no tags, triggers or rules.
So an empty container breaks nothing. It does load roughly 89 KB of gzipped JavaScript on every page that does nothing yet, which is a reason to install the snippet when you have your first tags ready rather than months before.
To publish, open the Workspace tab and click Submit in the upper right corner:
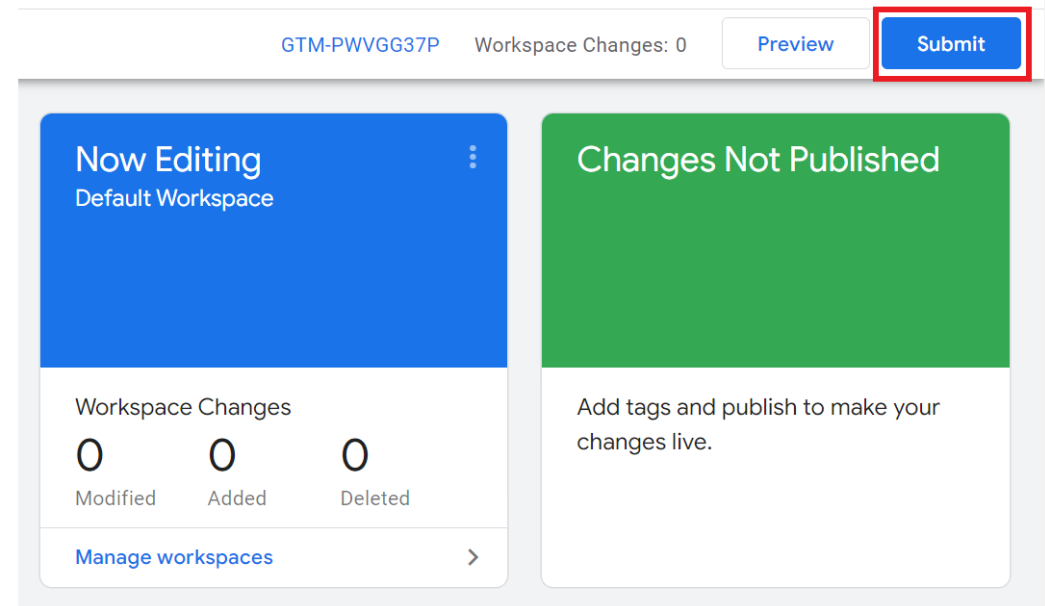
In Submission Configuration, select Publish and Create Version. To save the changes as a version without publishing them, select Create Version instead. Give the version a name and a description: on the first version that can be “Container installed”; later, describe what changed, because the version list is how you find a change to roll back. Activity History shows what changed since the previous version. Then click Publish:
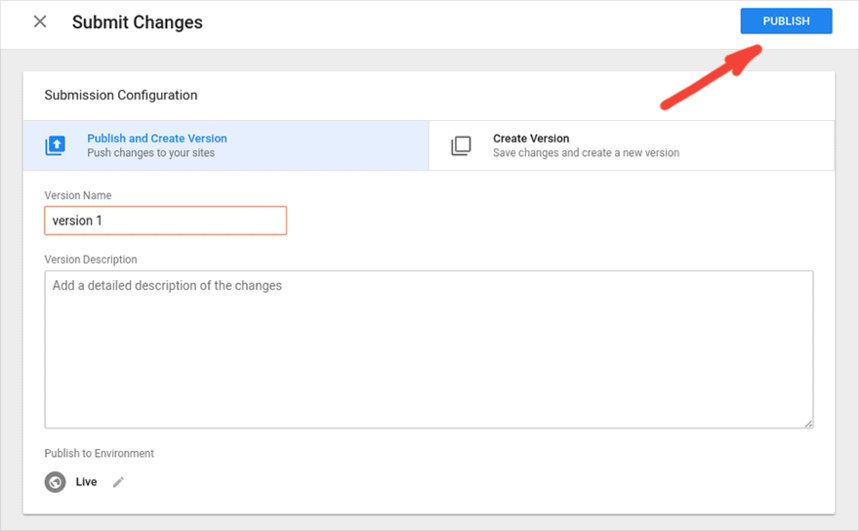
The container is published.
4. Check the installation in Tag Assistant
Tag Manager’s preview mode runs your site as if the current workspace were published, and connects it to Google Tag Assistant, so you can see which tags fired and in which order. Nobody else sees it: the debug view appears only in the browser where you started preview, or for people you share the preview with.
Start preview. In the Workspace tab, click Preview (top right). Tag Assistant opens in a new tab.
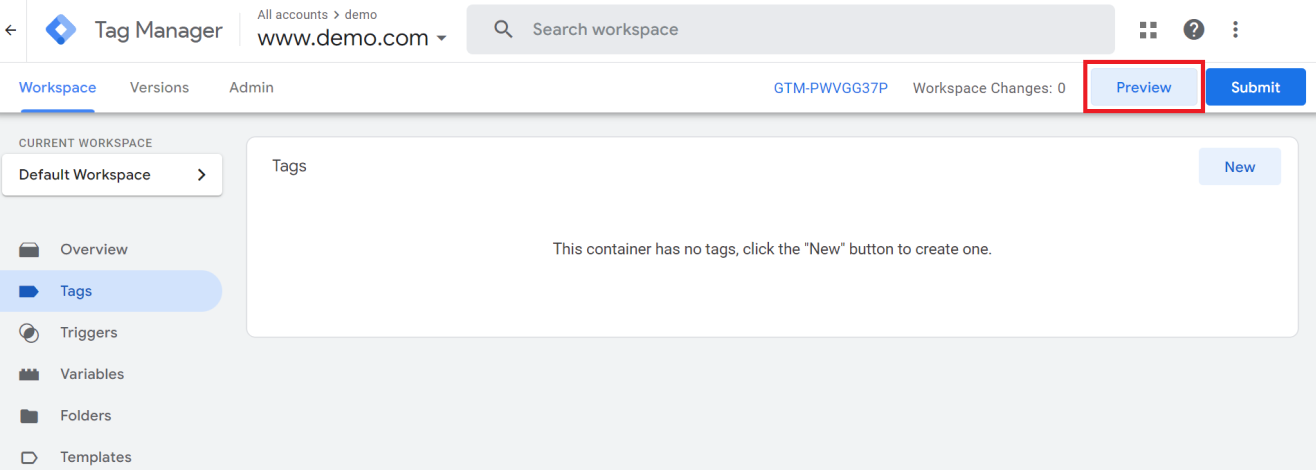
Connect your site. Enter the site’s URL and click Connect. Google adds a debug parameter to the URL by default. If that breaks a page on your site, untick Include debug signal in the URL.
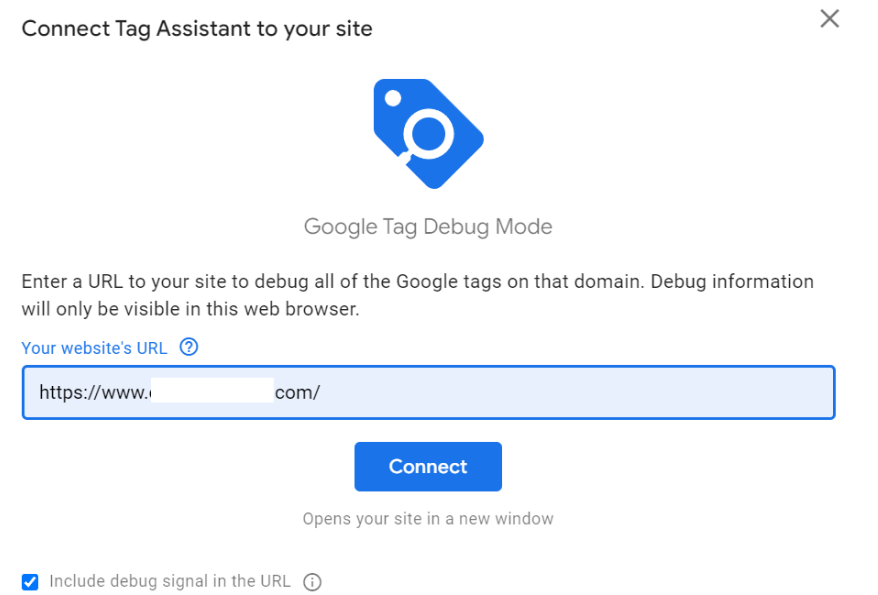
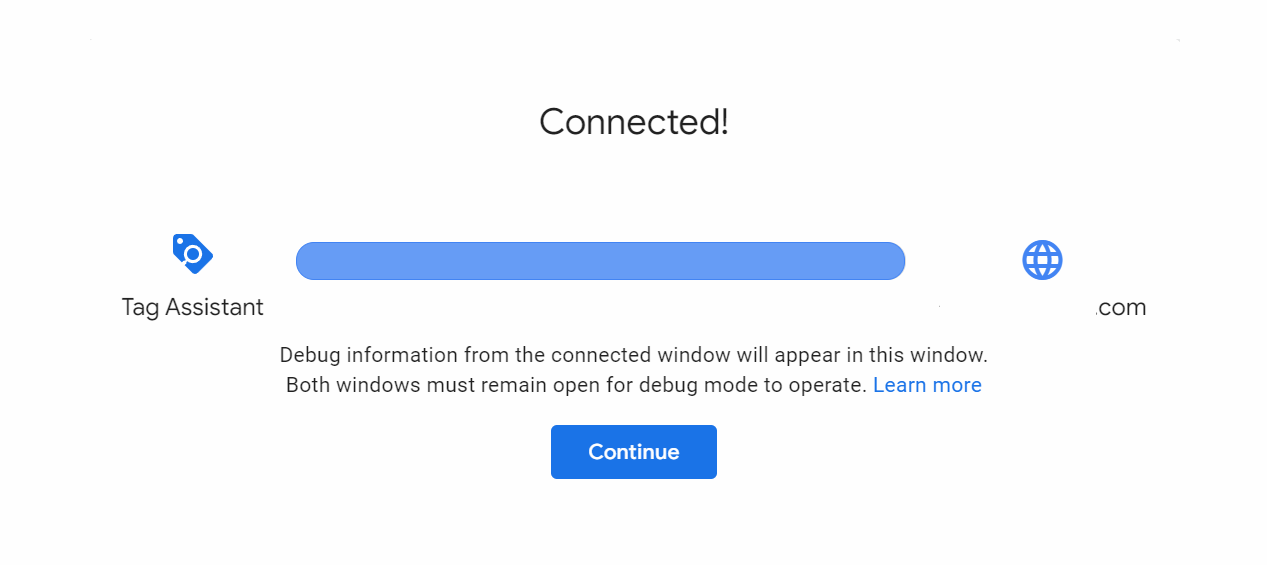
Your site opens in a new window and shows Connected in the bottom right corner. With the Tag Assistant Companion extension for Chrome installed, it opens in a new tab instead. Go back to the Tag Assistant tab and click Continue.
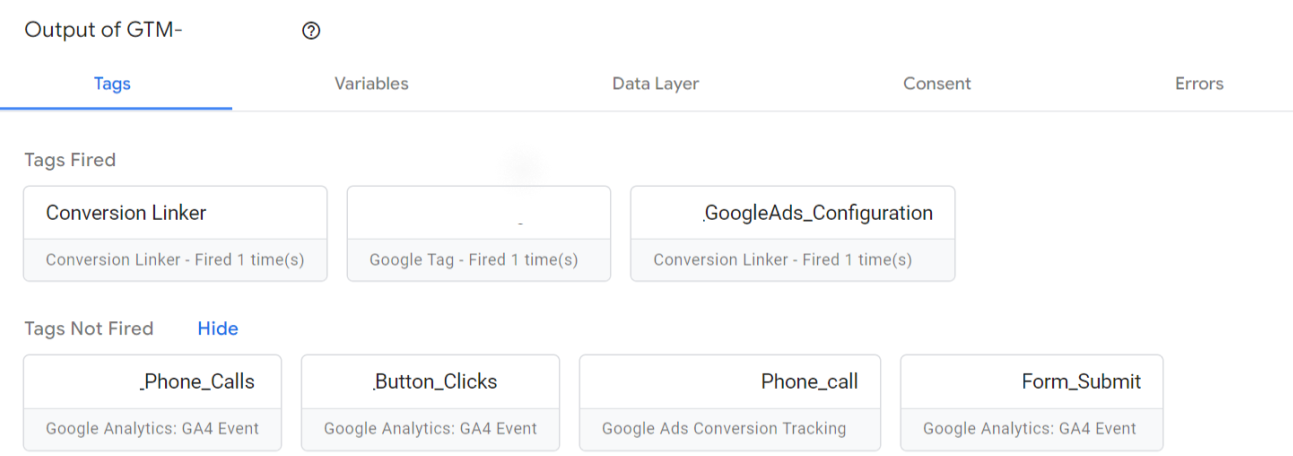
Read the result. The debug view lists Tags Fired and Tags Not Fired for each event on the page, with tabs for Variables, Data Layer, Consent and Errors. Click a tag to see the trigger that fired it, or the condition that did not match. As you click through your site, the view updates.
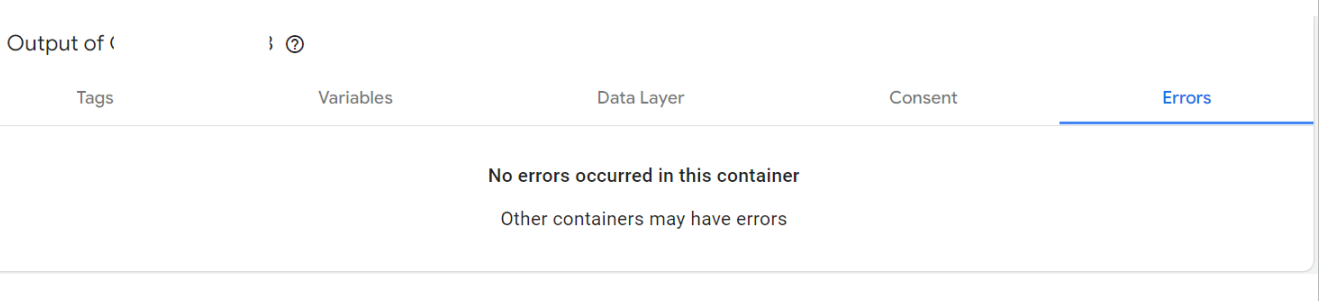
Check for errors. The Errors tab shows problems in the container you are previewing:
Fix and retest. After a change in GTM, preview again. Tag Assistant shows the workspace you were in when you clicked Preview; if a change is missing, you may have made it in another workspace.
Share it. To let a colleague or a client see the same debug session, open More actions → Share in Tag Assistant and send the preview URL. Older versions can be previewed and shared from the Versions tab.
To stop, click the X in the upper left corner of the debug view, or Stop debugging on the Tag Assistant page.
A quicker check that the snippet itself is on a page: open the page source and search for gtm.js?id=GTM-. If the container ID is not there, no preview will connect.
Consent: Set it up before the first tag
Consent: Set it up before the first tag
If your site has visitors in the EU, the EEA or the UK, the order in which tags fire matters legally as well as technically. Tag Manager has three features for it, described in Google’s consent mode support page:
- The Consent Initialization – All Pages trigger exists in every web container. It fires before every other trigger, Initialization included, and is meant for the tag that sets the default consent state, usually your consent management platform’s tag.
- Consent settings on each tag, under Advanced Settings → Consent Settings. Google’s tags, GA4 and Google Ads among them, have built-in consent checks. You can also require extra consent before a tag fires.
- The Consent Overview page, turned on under Admin → Container Settings → Enable consent overview, lists which tags have their consent configured and which are still “not set”.
The consent types Tag Manager supports are ad_storage, ad_user_data, ad_personalization and analytics_storage, plus functionality_storage, personalization_storage and security_storage. Google’s page says ad_user_data is required for measurement use cases such as enhanced conversions and tag-based conversion tracking.
The consent banner itself comes from a consent management platform. Google’s page lists the integrated platforms, Cookiebot, OneTrust, Usercentrics and Didomi among them, with templates in the Community Template Gallery. Whether your banner and settings meet the law where your visitors are is a question for your legal team, not for Tag Manager.
How to set up Google Analytics 4 using GTM
How to set up Google Analytics 4 using GTM
With GTM installed, GA4 is one tag. Google’s Set up Google Analytics in Tag Manager page recommends the Google Analytics destination tag, and keeps the Google tag as the alternate method. Either way, the tag loads your GA4 property, sets the GA4 cookies and sends the automatically collected and enhanced measurement events. Our separate guide on setting up GA4 tags with Google Tag Manager covers events and e-commerce; here is the base installation.
Step 1: Create a Google Analytics 4 property and web data stream
If you do not have one yet, our guide to setting up a Google Analytics account walks through it. You need the Editor role, or higher, in Google Analytics.
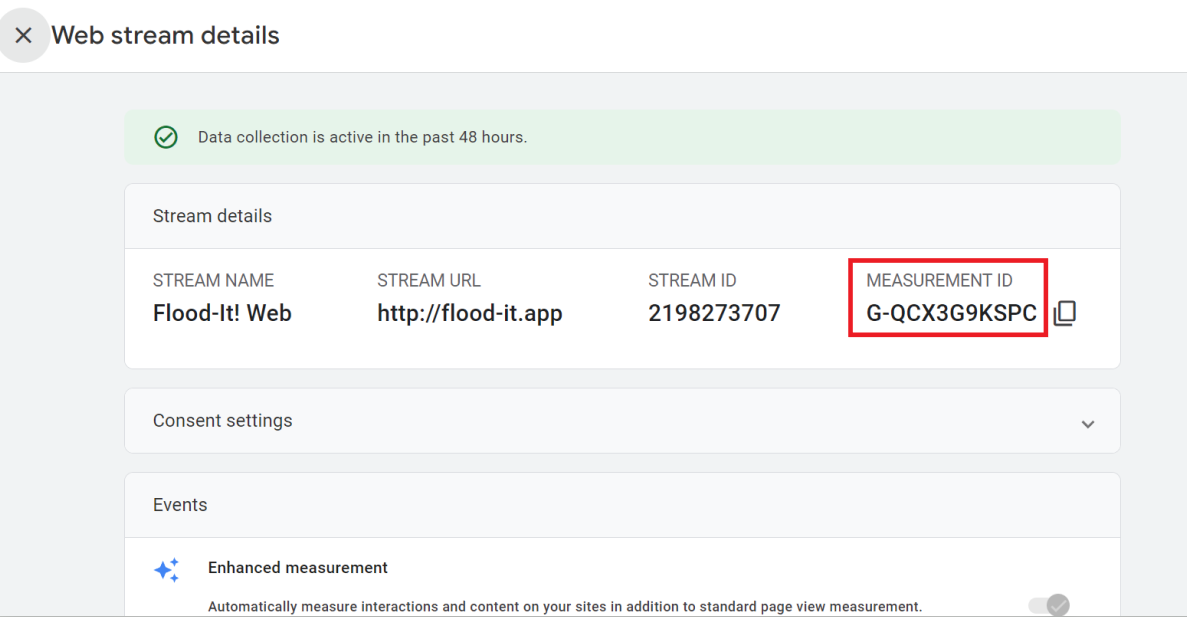
Step 2: Find your measurement ID
In Google Analytics, open Admin → Data collection and modification → Data streams, select your web stream and copy the Measurement ID. It starts with G-:
Step 3 (optional): Save the ID as a variable
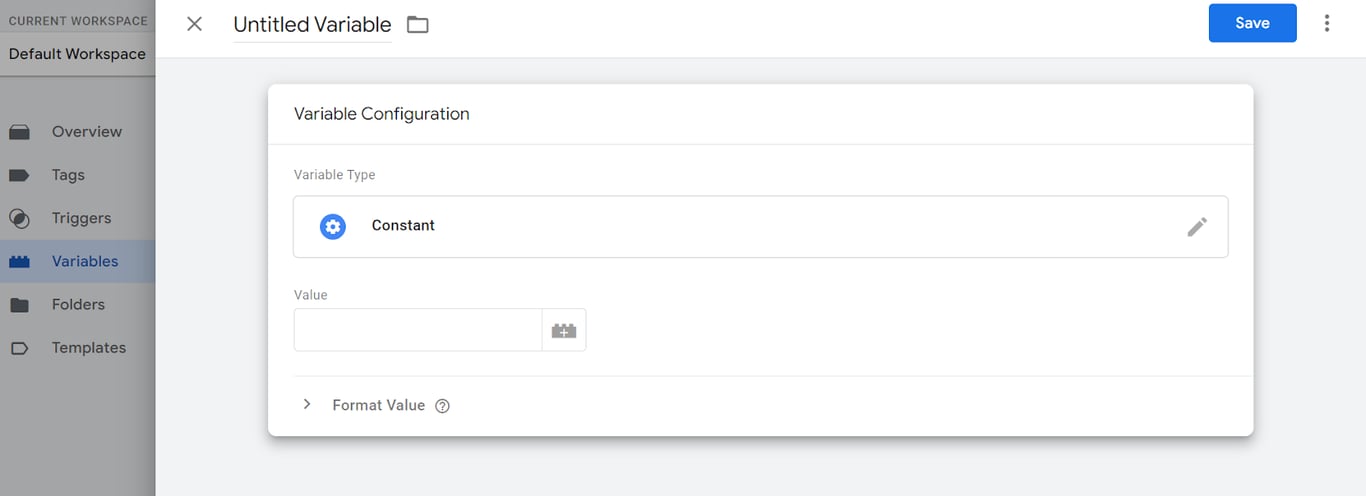
If several tags will send data to the same property, store the ID once. In the Workspace tab, open Variables → User-Defined Variables → New, choose Constant, paste the measurement ID as the value and name it, for example, GA4 Measurement ID. Tags can then use {{GA4 Measurement ID}}, and a change of property is one edit.
Step 4: Create the tag
Go to Tags → New. Under Tag Configuration, choose Google Analytics → Google Analytics (the destination tag) or Google Tag (the alternate method), and enter your measurement ID, or the variable from step 3, as the Tag ID.
Under Triggering, Google’s current instructions say to select an Initialization trigger: Initialization – All Pages, or a narrower Initialization trigger if the tag should not run everywhere. The Initialization trigger fires before Page View, so the Google tag has loaded before other tags try to use it. Many existing containers, and the screenshot below, still use the plain All Pages page view trigger; that also works, but tags firing on Initialization can run before it.
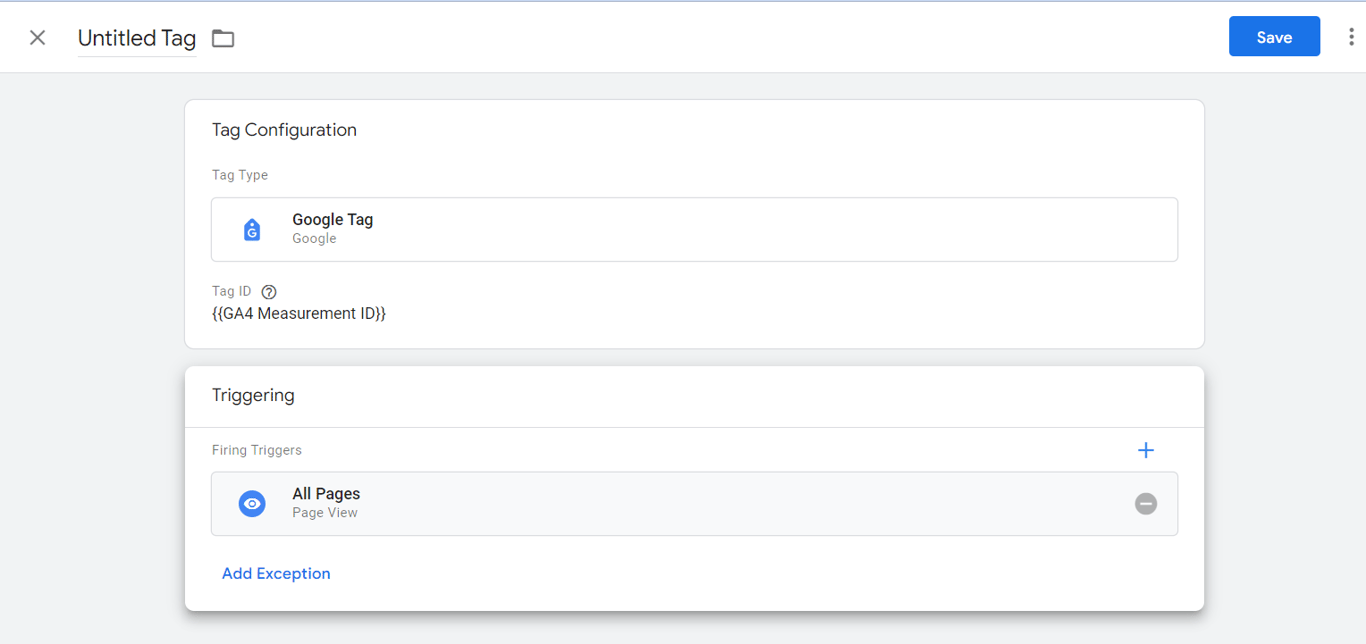
Name the tag, for example GA4 – Google tag, and save it.
Step 5: Preview
Click Preview, connect your site as in installation step 4, and check that the GA4 tag is under Tags Fired on the first event of the page.
Step 6: Publish the changes to your container
Click Submit on the Workspace tab:
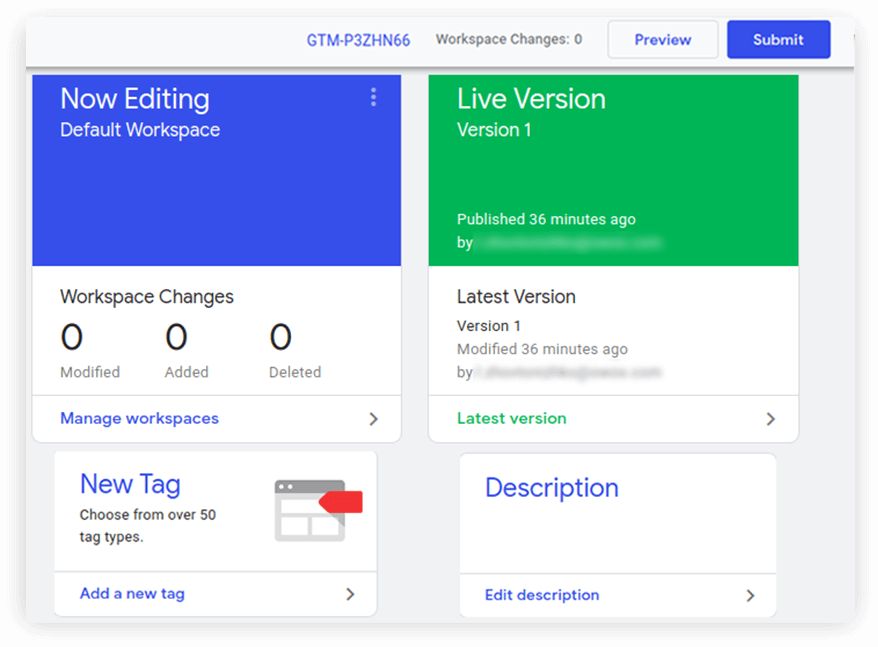
Name the version, for example GA4 base tag, and click Publish.
Important! If GA4 was installed on your site before, directly in the code, remove that code in the same release as you publish the container. Otherwise both send the same page views and your session and user counts double.
Step 7: Verify the data in Google Analytics 4
Open your GA4 property and go to Reports → Realtime. Within a minute or two of visiting your own site you should see yourself as an active user:
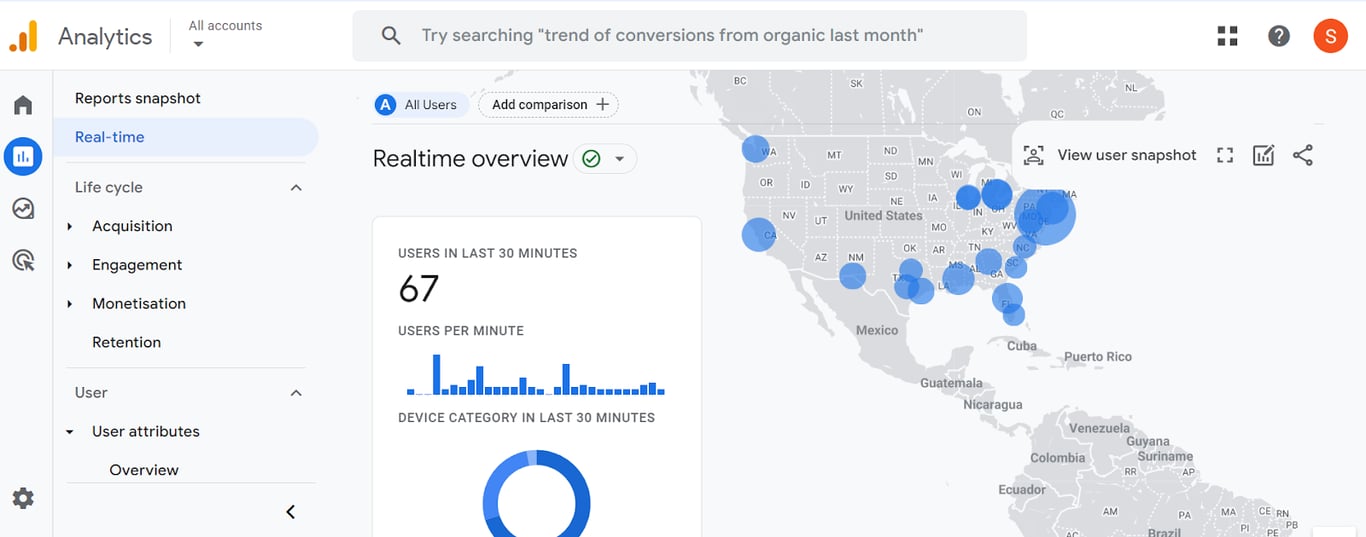
For event-level checks, GA4’s DebugView shows events from devices in debug mode, which includes a browser connected through Tag Assistant.
Possible problems when working with GTM
Possible problems when working with GTM
Most problems after an installation are one of these.
| Problem | Likely reason | What to do |
|---|---|---|
| Tags fire in preview, but no data reaches Google Analytics | The wrong measurement ID in the tag or the variable, so data goes to another property | Compare the ID with Data streams in GA4 (step 2) |
| Sessions and users jump the day you switch to GTM | GA4 is still hard-coded in the site, so every page view is sent twice | Remove the hard-coded gtag.js snippet |
| Your changes do not show in preview | You are previewing another workspace, or did not restart preview after the change | Check the workspace name in Tag Assistant and click Preview again |
| Preview will not connect | The snippet is missing on that page, or a site security policy blocks Tag Assistant | Search the page source for gtm.js?id=GTM-; try without the debug signal |
| Tags do not fire for visitors who decline cookies | Consent settings working as designed | Check the Consent tab in Tag Assistant; nothing to fix if the banner was declined |
| GA4 shows nothing for AMP pages | Tag Manager for AMP does not support Google Analytics | Add Google’s AMP analytics snippet for GA4 directly |
Declare independence from developers with custom HTML tags in Google Tag Manager
Declare independence from developers with custom HTML tags in Google Tag Manager
Custom HTML tags put any script you want on the page through GTM. That does not remove the need for developers, but it lets you place and change a script on your own schedule, test it in preview, and remove it with one click.
With custom HTML tags, you can:
- Run a simple A/B test by changing an element for half the visitors.
- Place new elements, such as a banner, and show them only to a chosen audience. For example, a promotion only for visitors from one city, or only on one product category.
- Show a different phone number depending on the traffic source or the product category, when different call centres handle different products.
- Add small scripts from developers that must be easy to change, such as a script that sets a cookie or clears local storage.
Many A/B testing tools and chat widgets also have ready templates in the Community Template Gallery, which are safer than pasting their code into a custom HTML tag.
How to set up custom tags?
Go to Tags → New, open Tag Configuration and choose Custom HTML.
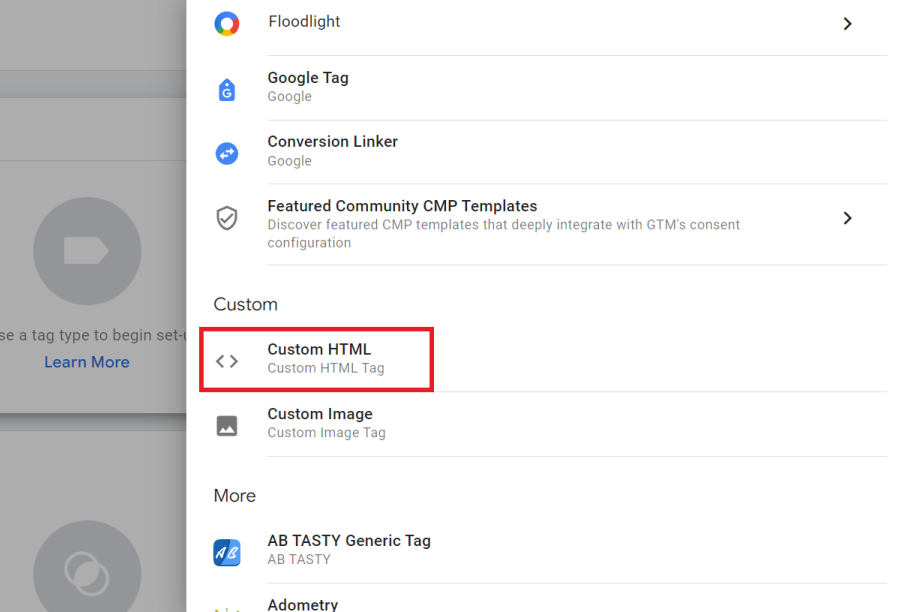
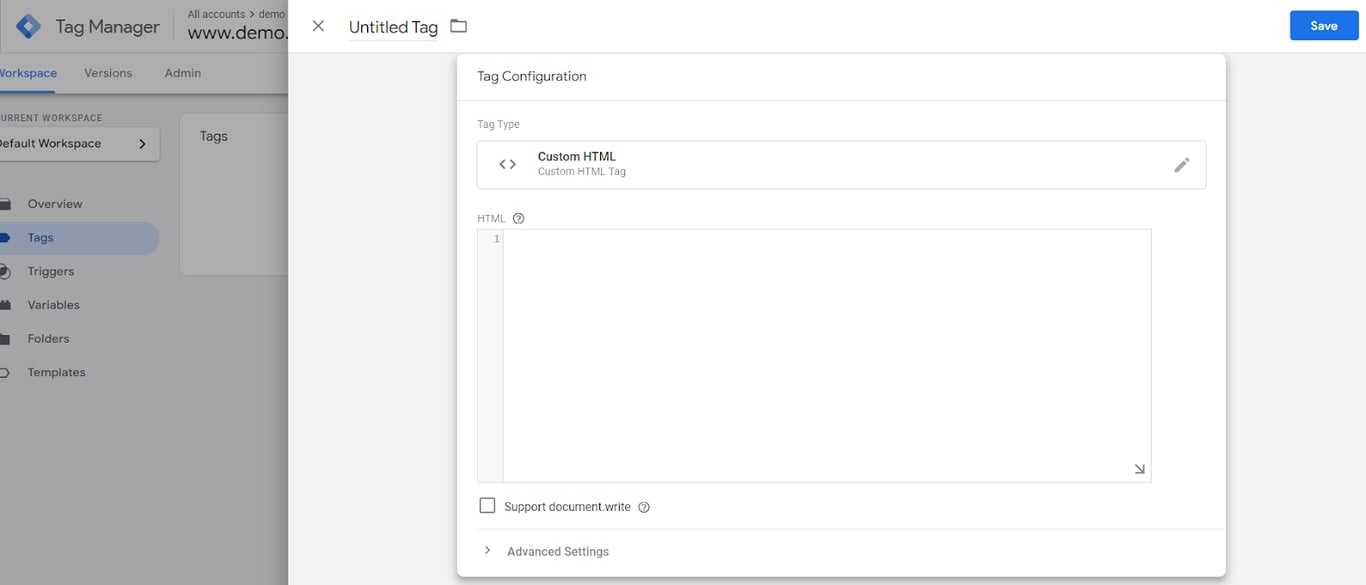
Paste your script into the HTML field:
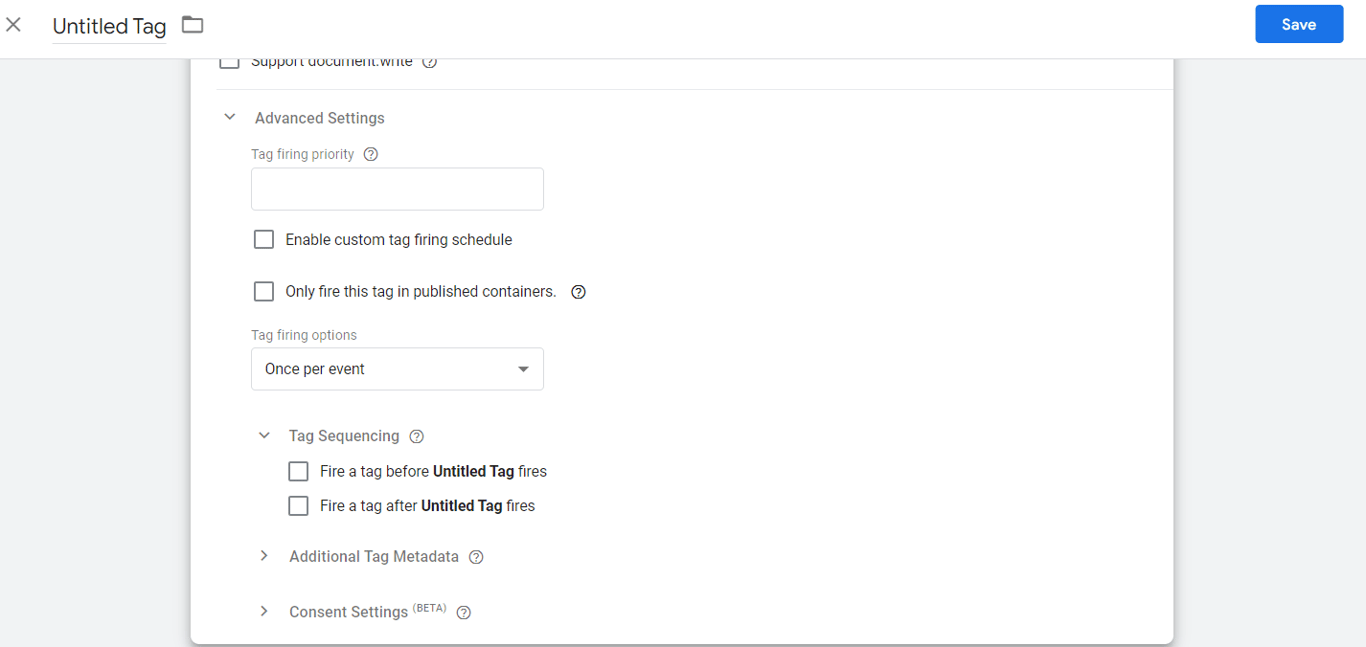
Then choose when it fires. The trigger decides where the script runs: certain category pages, certain visitors (by city, login state or number of orders, if the site exposes them in the data layer) or visitors from a given source. Advanced Settings add tag firing priority, a firing schedule, “fire once per page” and tag sequencing, which runs one tag before or after another:
The script is placed on every page that matches the trigger, including pages added to the site later. For example, to show a discount banner only to people who have already ordered, the site has to push that fact to the data layer, for instance as customer_type: 'returning', and a trigger can then read it through a data layer variable.
Please note
Always test custom HTML tags in preview mode before you publish. A custom tag runs with the same rights as the site’s own code.
Possible difficulties with custom HTML tags:
- The layout can break on some pages or in some browsers.
- JavaScript errors from global variables that clash with the site’s own, or from variables that do not exist on every page.
- A heavy script can delay the main content or interfere with other elements.
- A script that is not covered by your consent setup may run before consent is given.
If you hit one of these, edit the script, and ask a developer when you are unsure what it touches.
Useful links and examples of tasks you can solve with Tag Manager
Useful links and examples of tasks you can solve with Tag Manager
With Google Analytics 4, Tag Manager lets you collect almost any interaction on your site. Guides for the next steps:
- How to set up GA4 tags with Google Tag Manager: events, parameters and e-commerce events in GTM.
- E-commerce tracking in Google Analytics 4: the recommended events, the data layer push, one GTM tag with Send Ecommerce data, and testing.
- How to handle duplicate transactions in Google Analytics 4: what GA4 deduplicates on its own and what it does not.
- A guide to mobile app analytics: measuring app installs and in-app events.
- How to solve the GDPR problem with a server-side GTM tag: what a server container changes about the data that leaves the browser.
- The Google Analytics Client ID: reading the GA4 visitor ID in GTM and joining it to a CRM.
Where the data goes after the tags
Where the data goes after the tags
GTM decides what is collected. What you can do with it is decided later. The GA4 interface applies thresholds and sampling, explorations are limited by a data retention setting of 2 or 14 months, and some rows end up as (not set). For row-level work, GA4’s free BigQuery export writes the raw events into your warehouse (a standard property’s daily export has an event limit). From there, OWOX Data Marts lets an analyst define the SQL once, as a Data Mart, and publish it to Google Sheets, Excel or Data Studio for the people who use the numbers. OWOX Data Marts does not install or manage tags, and it does not send data into GA4. The tags in this guide are what feed the export in the first place.
Key takeaways
- Install once: one container per site, the snippet as high in the
<head>as possible on every page, or your CMS’s integration. - New containers get a one-part snippet. Sites with the old two-part snippet keep working and need no change.
- Publish, then check in Tag Assistant before you trust any number.
- Fire consent first, then the Google tag on Initialization, then everything else.
- Remove any hard-coded tag you move into GTM, or it will be counted twice.
- GTM is not weightless: an empty container is about 89 KB gzipped. Use it for what you need, and do not treat it as a full A/B testing or personalisation tool. Dedicated tools do that better.
The GTM snippet is on the site, but you're not sure the tags fire on every page or that GA4 is counting what it should.
Paste this into your AI assistant. It checks your GA4 data for the pages and events your new Tag Manager setup should be sending, and compares GA4 purchases with your store's orders.
The prompt
Read https://www.owox.com/ai-agent-setup.md and follow it to set up OWOX Data Marts for me, starting from /blog/articles/how-to-install-gtm.md. The task: check my GA4 data after my Tag Manager install: which pages send no page_view, which events are missing, and how GA4 purchases compare with the orders my store recorded by day. Tag the links you give me with utm_campaign=ai-task and utm_term=m4. Use what you know about my context and goals
Prefer to start on your own? Get started free
Frequently Asked Questions
Do I still need the noscript part of the Google Tag Manager snippet?
Not for a new container. Google's install dialog now gives a single snippet for the head section. The older snippet had a second part, a noscript iframe placed right after the opening body tag. Google says sites tagged with the older two-part snippet do not need to be retagged and keep working. The noscript part only ever helped visitors with JavaScript turned off, and most tags, the Google tag for GA4 included, need JavaScript anyway.
Is Google Tag Manager free?
Yes, the standard Google Tag Manager has no fee. Tag Manager 360, the enterprise version, is part of Google Marketing Platform. What it does cost is page weight: in our check on 9 November 2026, an empty container loaded about 89 KB of gzipped JavaScript before any tag was added.
How do I check that Google Tag Manager is installed correctly?
In Tag Manager, click Preview, enter your site's URL and click Connect. Google Tag Assistant opens your site and shows which tags fired on each event, with tabs for variables, the data layer, consent and errors. A quicker first check is to open the page source and search for gtm.js?id=GTM-: if your container ID is not there, the snippet is missing on that page. After publishing a GA4 tag, the Realtime report in Google Analytics should show your own visit within a minute or two.
Where do I put the Google Tag Manager code?
As high in the head section of every page as possible, before other scripts, so tags can fire before visitors leave. Containers created now get a single snippet that goes only in the head section. If your site declares a data layer that tags need at once, put that declaration above the snippet. On Shopify, Google Tag Manager goes into a custom pixel under Settings, Customer events, not into the theme, because checkout pages are not part of the theme.